Introduction to eBPF for Windows

In the Linux world, the eBPF technology has been around for years. Its purpose is to allow writing programs that run within the Linux kernel. However, contrary to standard kernel modules, eBPF runs in a constrained environment, its API is limited as to not hurt the kernel. Furthermore, every eBPF program must be verified before it’s allowed to execute, to ensure it’s safe (like memory safety, no infinite loops, and more) and cannot cause any damage to the system.

Microsoft began a project a few years ago, openly worked on Github to create a Windows version of eBPF. We all know there is an inherent risk running kernel drivers on Windows – any such driver can compromise the system in all sorts of ways, not to mention crashing it (“Blue Screen of Death“), as was painfully evident in the CrowdStrike incident on July 19, 2024. Kernel drivers cannot just go away, however. The best Microsoft can do is make every effort to ensure reliability and quality of kernel drivers. eBPF just might be a good step in that direction, as it does not allow unconstrained access to kernel APIs.

(eBPF stands for “Extended Berkley Packet Filter”, the original usage of the technology. eBPF does not stand for anything now, because its usage goes beyond network packet filtering. Look for more information online or in the book “Learning eBPF” by Liz Rice about the origins of eBPF).

The Readme file in the root of the eBPF-for-Windows repository does a good job of explaining the eBPF architecture on Windows, and how to get started. In this post, I’d like to show an example of building an eBPF program, running it, and observing the results.

Disclaimer: This post is based on my (limited) experience with eBPF for Windows.

Getting Started

There are a couple of ways to get started with eBPF on Windows, the simplest being using the MSI installer provided as part of the Releases. At the time of writing, version 0.20 is the latest one. You can grab an MSI for your VM’s platform, or even grab the full directory (Debug or Release) with all build artifacts as through you have built it yourself. This is useful for debugging purposes (PDB files are provided), and also having all the samples and tests available is beneficial if you’d like to learn more. Here, I’m going to go with the MSI for simplicity.

You will need a Virtual Machine that is configured to run in test signing mode, so that the eBPF drivers themselves (and your programs, for that matter) are able to load without being signed by a trusted certificate. Use the following elevated command line to get into test signing mode (restart is required):

bcdedit /set testsigning on

Now you can install the MSI, which presents a classic Windows installation experience – just click Next on every page.

Writing an eBPF Program

eBPF programs are classically written in C, although other options are available today (Rust, Python, …); I’ll stick with C. An eBPF program is compiled to an intermediate language, leveraging an eBPF virtual machine. This allows eBPF compiled code to be generic, based on a virtual CPU, so that it can later be compiled to the actual target processor on the system. Two modes are available for this: JIT and Native. With JIT, some entity compiles the eBPF byte code before the first invocation – this could be part of the kernel, or some entity running in user mode that then pushes the resulting code to the kernel.

The eBPF for Windows implementation provides a user-mode service that can JIT-compile eBPF byte code (provided as an ELF object file) and then pushing the result to the kernel. This JIT mode, however, is currently being deprecated, so may or may not be supported in the future. The other option is Native – the byte code is compiled to the target machine and generates a normal PE, which is in fact a kernel driver. Verification is also performed at this stage, where compilation fails if verification fails.

The details of exactly how all this works is beyond the scope of this post. The documentation in the eBPF-for-Windows repo should shed more light on the details. I may provide more information in a future post.

To actually write the eBPF program, we could use any editor, and use the clang compiler to generate the eBPF byte code, wrapped in an ELF binary file (eBPF-for-Windows tries to be as compatible as possible to the Linux way of working, so uses clang that compiles to an ELF file, not a PE). We can certainly go down that route, but to make things somewhat easier, I will be using Visual Studio and Nuget to simplify getting the required header files and libraries.

Creating the Project

We create a new C++ console application, as there is no eBPF or similar template available. We could also write normal C++ code to load the program into the kernel (once properly compiled), but I’m not going to do this in this post. Instead, we’ll use the netsh tool, that has been extended with an eBPF provided DLL that allows loading programs and a few other operations. For now, let’s continue with Visual Studio. The project I created is named TraceConnections. Its purpose is going to be counting the number of TCP connect operations that occur per process.

I rename the resulting TestConnections.cpp file to TestConnection.c so we don’t use any C++ feature – eBPF supports C only. Next, we need to use eBPF specific headers and other tools – fortunately, these are available through a Nuget package. Just open the Nuget Packages window and search for “ebpf”. You’ll find 3 packages targeting x86, ARM64 and x64. Choose the package based on the target (most likely x64) and install it:

Now we can begin coding.

Writing an eBPF Program

We start with two includes, provided by the Nuget package:

#include <bpf_helpers.h>
#include <ebpf_nethooks.h>

A eBPF program starts in a function that can have any name, but must have a prototype based on the “type” of program. For our purposes, it’s a program that “binds” to network connections. We start the function like so:

SEC("bind")
bind_action_t TraceConnections(bind_md_t* ctx) {

The function name is TraceConnections, it accepts one pointer and returns an enumeration indicating whether to allow or block the connection:

typedef enum _bind_action {
    BIND_PERMIT,   ///< Permit the bind operation.
    BIND_DENY,     ///< Deny the bind operation.
    BIND_REDIRECT, ///< Change the bind endpoint.
} bind_action_t;

This gives you an idea how easy it would be to block a connection if we so desire. The accepted pointer’s type to the main function depends on the kind of “program” we write. In this case, it’s bind_md_t providing details about the connection:

typedef struct _bind_md {
    uint8_t* app_id_start;         ///< Pointer to start of App ID.
    uint8_t* app_id_end;           ///< Pointer to end of App ID.
    uint64_t process_id;           ///< Process ID.
    uint8_t socket_address[16];    ///< Socket address to bind to.
    uint8_t socket_address_length; ///< Length in bytes of the socket address.
    bind_operation_t operation;    ///< Operation to do.
    uint8_t protocol;              ///< Protocol number (e.g., IPPROTO_TCP).
} bind_md_t;

We get some basic details, like process ID, process name, and network address. The SEC macro places the code in a section called “bind”, which is one way to tell eBPF what kind of program we’re writing.

In this example, we’d like to keep track of all processes making network connections, and just count how many such connections occur. For this purpose, we can create a helper structure:

typedef struct _process_info {
	uint32_t id;
	char name[32];
	uint32_t count;
} process_info;

We’ll keep track of the process ID, an executable name, and the count itself. The next question is where is all that going to be stored?

eBPF works with the concept of maps, which you can think of as key/value pairs, where keys could be managed in multiple ways, based on the map type. To define a map, we can build a structure with some helper macros, and place any variable(s) in a section called “.maps” in the resulting ELF object file. For this example, this is the map I defined:

struct {
	__uint(type, BPF_MAP_TYPE_HASH);
	__type(key, uint32_t);
	__type(value, process_info);
	__uint(max_entries, 1024);
} proc_map SEC(".maps");

type indicates the map type (a hash table), the key is the process ID (to uniquely identify the process being tracked), value is our process_info structure. Finally, max_entries is a hint to the map implementation, as to how many items are expected. A global variable named proc_map resperesnts our map. Now we’re ready to implement the body of our function. First, we’ll look at bind to port operations only (not unbind), and we always permit the connection to continue:

SEC("bind")
bind_action_t TraceConnections(bind_md_t* ctx) {
	if (ctx->operation == BIND_OPERATION_BIND) {
	}
	return BIND_PERMIT;
}

Next, we grab the process ID, and look it up in the map. If it’s already there, just increment the count:

uint32_t pid = (uint32_t)ctx->process_id;
process_info pi = { 0 };
process_info* p = bpf_map_lookup_elem(&proc_map, &pid);
if (p) {
	p->count++;
}

If not, we need to create a new entry by populating a new process_info:

else {
	pi.id = pid;
	memcpy(pi.name, ctx->app_id_start, 
        MIN(sizeof(pi.name), ctx->app_id_end - ctx->app_id_start));
	pi.count = 1;
	p = &pi;
}

Finally, we need to update the map with the new or updated value:

bpf_map_update_elem(&proc_map, &pid, p, 0);

The arguments are (in order): the map variable, pointer to the key, pointer to the value, and flags indicating whether to update if there is already a value, or update always, etc; zero means update if exists, or create if does not exist.

That’s almost it! Just need to add a license for verification purposes (the exact details are not important for this post):

char LICENSE[] SEC("license") = "Dual BSD/GPL";

Here is the full code for easier reference:

#include <bpf_helpers.h>
#include <ebpf_nethooks.h>

#define MIN(x, y) ((x) < (y)) ? (x) : (y)

typedef struct _process_info {
	uint32_t id;
	char name[32];
	uint32_t count;
} process_info;


struct {
	__uint(type, BPF_MAP_TYPE_HASH);
	__type(key, uint32_t);
	__type(value, process_info);
	__uint(max_entries, 1024);
} proc_map SEC(".maps");

SEC("bind")
bind_action_t TraceConnections(bind_md_t* ctx) {
	if (ctx->operation == BIND_OPERATION_BIND) {
		uint32_t pid = (uint32_t)ctx->process_id;
		process_info pi = { 0 };
		process_info* p = bpf_map_lookup_elem(&proc_map, &pid);
		if (p) {
			p->count++;
		}
		else {
			pi.id = pid;
			memcpy(pi.name, ctx->app_id_start, 
                MIN(sizeof(pi.name), ctx->app_id_end - ctx->app_id_start));
			pi.count = 1;
			p = &pi;
		}
		bpf_map_update_elem(&proc_map, &pid, p, 0);

	}
	return BIND_PERMIT;
}

char LICENSE[] SEC("license") = "Dual BSD/GPL";

Compiling the Program

This is where things get a bit hairy. First, we need a clang compiler. The Visual Studio installer offers a clang compiler and related tools, but it seems it does not support an eBPF target (use clang -print-targets to verify). Installing the official LLVM (version 18.1.8 at the time of writing) toolset provides clang that supports eBPF. Make sure you add the LLVM bin path to the system PATH environment variable to make it easier to access clang (the installation wizard will offer that option for convenience).

In order to set the command line for compilation, right-click the TestConnections.c file in Solution Explorer and choose Properties. In the General tab, change the Item Type to Custom Build Tool (check all platforms and configurations so you don’t have to repeat this later):

Click OK and open the properties again so they get refreshed. Now you can edit the custom tool command line. Here is what you need:

clang.exe -target bpf -g -O2 -Werror -I"../packages/eBPF-for-Windows.x64.0.20.0/build/native/include" -c %(FileName).c -o $(OutDir)%(FileName).o
pushd $(OutDir)
powershell -NonInteractive -ExecutionPolicy Unrestricted $(SolutionDir)packages\eBPF-for-Windows.x64.0.20.0\build\native\bin\Convert-BpfToNative.ps1 -FileName %(Filename) -IncludeDir $(SolutionDir)packages\eBPF-for-Windows.x64.0.20.0\build\native\include -Platform $(Platform) -Configuration $(Configuration) -KernelMode $true
popd

Let’s break it down. The first call is to the clang compiler to compile the eBPF code to an ELF object file. -g adds debug information, which will be useful in looking into the generated code (more on that later), -target bpf is obvious, -O2 is required for certain optimizations, -Werror treats warnings as errors, so they cannot be ignored, and -I is where the helper eBPF header are located from the Nuget package.

The next step is to compile the object file to a native SYS file – making the eBPF program bundled in a driver PE file. This is where the Convert-BpfToNative cmdlet comes into play. It has some strict requirements – it does not accept a full path name, so we must switch to the object file directory before proceeding; this is the role of pushd and popd.

Next, we have to set the two outputs in the Outputs line in the Custom Build tool config:

$(OutputPath)%(Filename).o
$(OutputPath)%(Filename).sys

Now we can build. If all goes well, a TestConnections.sys should be created in the output folder. We’ll copy it to somewhere on the target system (e.g. c:\Test).

Loading and Testing

In the target system, open an elevated command window, and type netsh. Then type ebpf to get into the ebpf extensions.

Type show programs to see there are no programs loaded. Now type add program c:\Test\Testconnections.sys. If that works, type show programs again, and you should see something like this:

netsh ebpf>show programs

ID  Pins  Links  Mode       Type           Name
====== ==== ===== ========= ============= ====================
 3     1        1 NATIVE     bind          TestConnections

We have a loaded program, and it’s running! You can verify that maps exist (your map and program IDs may be different):

netsh ebpf>show maps

                              Key  Value      Max  Inner
     ID            Map Type  Size   Size  Entries     ID  Pins  Name
=======  ==================  ====  =====  =======  =====  ====  ========
      2                hash     4     40     1024     -1     0  proc_map

We can see the map data by using a tool I’m working on, called eBPF Studio. You can download the latest release and run it on the target system (note: there is a release and debug versions for eBPF Studio. This is currently necessary because of the way the CRT is linked to the eBPF API). Run the Release version, and if it crashes, run the Debug one. Hopefully, this issue will be fixed in a future eBPF for Windows release.

When you run eBPF Studio, it shows the programs, maps, and links (not discussed here) currently loaded into the kernel, in three separate tabs. If you click the Maps tab, you can choose a map, and its contents are shown in the bottom part:

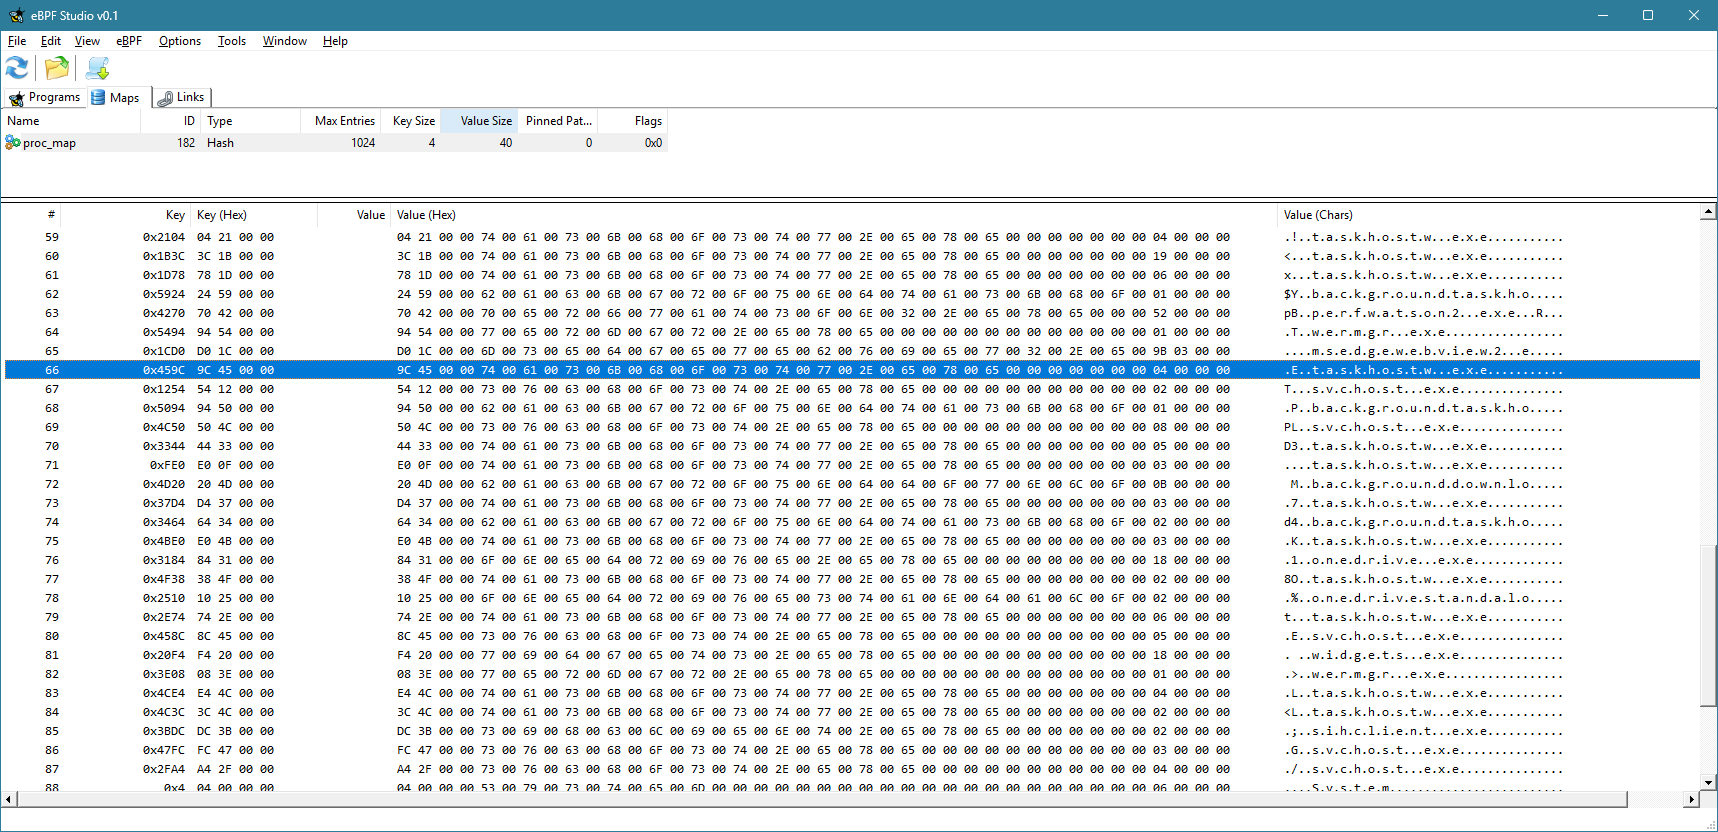
Currently, the view is not refreshed automatically. You have to click the Refresh button to refresh the maps and programs views. You can clearly see the keys (process IDs) and the values for each item in the map.

You can also use eBPF Studio to open an object file (ELF *.O files), and see their contents. Here is what you would see for TestConnections.o:

You can see the source code interspersed with eBPF “machine” instructions. Note that the -g flag mentioned earlier would allow you to see the source. Otherwise, you would only see the “assembly” instructions.

Extending the Example

Now you can add some simple functionality, like blocking a process based on its PID or executable name. I’ll leave that as an exercise to the interested reader.

The full source code is available here.

Writing a Simple Driver in Rust

The Rust language ecosystem is growing each day, its popularity increasing, and with good reason. It’s the only mainstream language that provides memory and concurrency safety at compile time, with a powerful and rich build system (cargo), and a growing number of packages (crates).

My daily driver is still C++, as most of my work is about low-level system and kernel programming, where the Windows C and COM APIs are easy to consume. Rust is a system programming language, however, which means it plays, or at least can play, in the same playground as C/C++. The main snag is the verbosity required when converting C types to Rust. This “verbosity” can be alleviated with appropriate wrappers and macros. I decided to try writing a simple WDM driver that is not useless – it’s a Rust version of the “Booster” driver I demonstrate in my book (Windows Kernel Programming), that allows changing the priority of any thread to any value.

Getting Started

To prepare for building drivers, consult Windows Drivers-rs, but basically you should have a WDK installation (either normal or the EWDK). Also, the docs require installing LLVM, to gain access to the Clang compiler. I am going to assume you have these installed if you’d like to try the following yourself.

We can start by creating a new Rust library project (as a driver is a technically a DLL loaded into kernel space):

cargo new --lib booster

We can open the booster folder in VS Code, and begin are coding. First, there are some preparations to do in order for actual code to compile and link successfully. We need a build.rs file to tell cargo to link statically to the CRT. Add a build.rs file to the root booster folder, with the following code:

fn main() -> Result<(), wdk_build::ConfigError> {
    std::env::set_var("CARGO_CFG_TARGET_FEATURE", "crt-static");
    wdk_build::configure_wdk_binary_build()
}

(Syntax highlighting is imperfect because the WordPress editor I use does not support syntax highlighting for Rust)

Next, we need to edit cargo.toml and add all kinds of dependencies. The following is the minimum I could get away with:

[package]
name = "booster"
version = "0.1.0"
edition = "2021"

[package.metadata.wdk.driver-model]
driver-type = "WDM"

[lib]
crate-type = ["cdylib"]
test = false

[build-dependencies]
wdk-build = "0.3.0"

[dependencies]
wdk = "0.3.0"       
wdk-macros = "0.3.0"
wdk-alloc = "0.3.0" 
wdk-panic = "0.3.0" 
wdk-sys = "0.3.0"   

[features]
default = []
nightly = ["wdk/nightly", "wdk-sys/nightly"]

[profile.dev]
panic = "abort"
lto = true

[profile.release]
panic = "abort"
lto = true

The important parts are the WDK crates dependencies. It’s time to get to the actual code in lib.rs.

The Code

We start by removing the standard library, as it does not exist in the kernel:

#![no_std]

Next, we’ll add a few use statements to make the code less verbose:

use core::ffi::c_void;
use core::ptr::null_mut;
use alloc::vec::Vec;
use alloc::{slice, string::String};
use wdk::*;
use wdk_alloc::WdkAllocator;
use wdk_sys::ntddk::*;
use wdk_sys::*;

The wdk_sys crate provides the low level interop kernel functions. the wdk crate provides higher-level wrappers. alloc::vec::Vec is an interesting one. Since we can’t use the standard library, you would think the types like std::vec::Vec<> are not available, and technically that’s correct. However, Vec is actually defined in a lower level module named alloc::vec, that can be used outside the standard library. This works because the only requirement for Vec is to have a way to allocate and deallocate memory. Rust exposes this aspect through a global allocator object, that anyone can provide. Since we have no standard library, there is no global allocator, so one must be provided. Then, Vec (and String) can work normally:

#[global_allocator]
static GLOBAL_ALLOCATOR: WdkAllocator = WdkAllocator;

This is the global allocator provided by the WDK crates, that use ExAllocatePool2 and ExFreePool to manage allocations, just like would do manually.

Next, we add two extern crates to get the support for the allocator and a panic handler – another thing that must be provided since the standard library is not included. Cargo.toml has a setting to abort the driver (crash the system) if any code panics:

extern crate wdk_panic;
extern crate alloc;

Now it’s time to write the actual code. We start with DriverEntry, the entry point to any Windows kernel driver:

#[export_name = "DriverEntry"]
pub unsafe extern "system" fn driver_entry(
    driver: &mut DRIVER_OBJECT,
    registry_path: PUNICODE_STRING,
) -> NTSTATUS {

Those familiar with kernel drivers will recognize the function signature (kind of). The function name is driver_entry to conform to the snake_case Rust naming convention for functions, but since the linker looks for DriverEntry, we decorate the function with the export_name attribute. You could use DriverEntry and just ignore or disable the compiler’s warning, if you prefer.

We can use the familiar println! macro, that was reimplemented by calling DbgPrint, as you would if you were using C/C++. You can still call DbgPrint, mind you, but println! is just easier:

println!("DriverEntry from Rust! {:p}", &driver);
let registry_path = unicode_to_string(registry_path);
println!("Registry Path: {}", registry_path);

Unfortunately, it seems println! does not yet support a UNICODE_STRING, so we can write a function named unicode_to_string to convert a UNICODE_STRING to a normal Rust string:

fn unicode_to_string(str: PCUNICODE_STRING) -> String {
    String::from_utf16_lossy(unsafe {
        slice::from_raw_parts((*str).Buffer, (*str).Length as usize / 2)
    })
}

Back in DriverEntry, our next order of business is to create a device object with the name “\Device\Booster”:

let mut dev = null_mut();
let mut dev_name = UNICODE_STRING::default();
string_to_ustring("\\Device\\Booster", &mut dev_name);

let status = IoCreateDevice(
    driver,
    0,
    &mut dev_name,
    FILE_DEVICE_UNKNOWN,
    0,
    0u8,
    &mut dev,
);

The string_to_ustring function converts a Rust string to a UNICODE_STRING:

fn string_to_ustring(s: &str, uc: &mut UNICODE_STRING) -> Vec<u16> {
    let mut wstring: Vec<_> = s.encode_utf16().collect();
    uc.Length = wstring.len() as u16 * 2;
    uc.MaximumLength = wstring.len() as u16 * 2;
    uc.Buffer = wstring.as_mut_ptr();
    wstring
}

This may look more complex than we would like, but think of this as a function that is written once, and then just used all over the place. In fact, maybe there is such a function already, and just didn’t look hard enough. But it will do for this driver.

If device creation fails, we return a failure status:

if !nt_success(status) {
    println!("Error creating device 0x{:X}", status);
    return status;
}

nt_success is similar to the NT_SUCCESS macro provided by the WDK headers.

Next, we’ll create a symbolic link so that a standard CreateFile call could open a handle to our device:

let mut sym_name = UNICODE_STRING::default();
let _ = string_to_ustring("\\??\\Booster", &mut sym_name);
let status = IoCreateSymbolicLink(&mut sym_name, &mut dev_name);
if !nt_success(status) {
    println!("Error creating symbolic link 0x{:X}", status);
    IoDeleteDevice(dev);
    return status;
}

All that’s left to do is initialize the device object with support for Buffered I/O (we’ll use IRP_MJ_WRITE for simplicity), set the driver unload routine, and the major functions we intend to support:

    (*dev).Flags |= DO_BUFFERED_IO;

    driver.DriverUnload = Some(boost_unload);
    driver.MajorFunction[IRP_MJ_CREATE as usize] = Some(boost_create_close);
    driver.MajorFunction[IRP_MJ_CLOSE as usize] = Some(boost_create_close);
    driver.MajorFunction[IRP_MJ_WRITE as usize] = Some(boost_write);

    STATUS_SUCCESS
}

Note the use of the Rust Option<> type to indicate the presence of a callback.

The unload routine looks like this:

unsafe extern "C" fn boost_unload(driver: *mut DRIVER_OBJECT) {
    let mut sym_name = UNICODE_STRING::default();
    string_to_ustring("\\??\\Booster", &mut sym_name);
    let _ = IoDeleteSymbolicLink(&mut sym_name);
    IoDeleteDevice((*driver).DeviceObject);
}

We just call IoDeleteSymbolicLink and IoDeleteDevice, just like a normal kernel driver would.

Handling Requests

We have three request types to handle – IRP_MJ_CREATE, IRP_MJ_CLOSE, and IRP_MJ_WRITE. Create and close are trivial – just complete the IRP successfully:

unsafe extern "C" fn boost_create_close(_device: *mut DEVICE_OBJECT, irp: *mut IRP) -> NTSTATUS {
    (*irp).IoStatus.__bindgen_anon_1.Status = STATUS_SUCCESS;
    (*irp).IoStatus.Information = 0;
    IofCompleteRequest(irp, 0);
    STATUS_SUCCESS
}

The IoStatus is an IO_STATUS_BLOCK but it’s defined with a union containing Status and Pointer. This seems to be incorrect, as Information should be in a union with Pointer (not Status). Anyway, the code accesses the Status member through the “auto generated” union, and it looks ugly. Definitely something to look into further. But it works.

The real interesting function is the IRP_MJ_WRITE handler, that does the actual thread priority change. First, we’ll declare a structure to represent the request to the driver:

#[repr(C)]
struct ThreadData {
    pub thread_id: u32,
    pub priority: i32,
}

The use of repr(C) is important, to make sure the fields are laid out in memory just as they would with C/C++. This allows non-Rust clients to talk to the driver. In fact, I’ll test the driver with a C++ client I have that used the C++ version of the driver. The driver accepts the thread ID to change and the priority to use. Now we can start with boost_write:

unsafe extern "C" fn boost_write(_device: *mut DEVICE_OBJECT, irp: *mut IRP) -> NTSTATUS {
    let data = (*irp).AssociatedIrp.SystemBuffer as *const ThreadData;

First, we grab the data pointer from the SystemBuffer in the IRP, as we asked for Buffered I/O support. This is a kernel copy of the client’s buffer. Next, we’ll do some checks for errors:

let status;
loop {
    if data == null_mut() {
        status = STATUS_INVALID_PARAMETER;
        break;
    }
    if (*data).priority < 1 || (*data).priority > 31 {
        status = STATUS_INVALID_PARAMETER;
        break;
    }

The loop statement creates an infinite block that can be exited with a break. Once we verified the priority is in range, it’s time to locate the thread object:

let mut thread = null_mut();
status = PsLookupThreadByThreadId(((*data).thread_id) as *mut c_void, &mut thread);
if !nt_success(status) {
    break;
}

PsLookupThreadByThreadId is the one to use. If it fails, it means the thread ID probably does not exist, and we break. All that’s left to do is set the priority and complete the request with whatever status we have:

        KeSetPriorityThread(thread, (*data).priority);
        ObfDereferenceObject(thread as *mut c_void);
        break;
    }
    (*irp).IoStatus.__bindgen_anon_1.Status = status;
    (*irp).IoStatus.Information = 0;
    IofCompleteRequest(irp, 0);
    status
}

That’s it!

The only remaining thing is to sign the driver. It seems that the crates support signing the driver if an INF or INX files are present, but this driver is not using an INF. So we need to sign it manually before deployment. The following can be used from the root folder of the project:

signtool sign /n wdk /fd sha256 target\debug\booster.dll

The /n wdk uses a WDK test certificate typically created automatically by Visual Studio when building drivers. I just grab the first one in the store that starts with “wdk” and use it.

The silly part is the file extension – it’s a DLL and there currently is no way to change it automatically as part of cargo build. If using an INF/INX, the file extension does change to SYS. In any case, file extensions don’t really mean that much – we can rename it manually, or just leave it as DLL.

Installing the Driver

The resulting file can be installed in the “normal” way for a software driver, such as using the sc.exe tool (from an elevated command window), on a machine with test signing on. Then sc start can be used to load the driver into the system:

sc.exe sc create booster type= kernel binPath= c:\path_to_driver_file
sc.exe start booster

Testing the Driver

I used an existing C++ application that talks to the driver and expects to pass the correct structure. It looks like this:

#include <Windows.h>
#include <stdio.h>

struct ThreadData {
	int ThreadId;
	int Priority;
};

int main(int argc, const char* argv[]) {
	if (argc < 3) {
		printf("Usage: boost <tid> <priority>\n");
		return 0;
	}

	int tid = atoi(argv[1]);
	int priority = atoi(argv[2]);

	HANDLE hDevice = CreateFile(L"\\\\.\\Booster",
		GENERIC_WRITE, 0, nullptr, OPEN_EXISTING, 0,
		nullptr);

	if (hDevice == INVALID_HANDLE_VALUE) {
		printf("Failed in CreateFile: %u\n", GetLastError());
		return 1;
	}

	ThreadData data;
	data.ThreadId = tid;
	data.Priority = priority;
	DWORD ret;
	if (WriteFile(hDevice, &data, sizeof(data),
		&ret, nullptr))
		printf("Success!!\n");
	else
		printf("Error (%u)\n", GetLastError());

	CloseHandle(hDevice);

	return 0;
}

Here is the result when changing a thread’s priority to 26 (ID 9408):

Conclusion

Writing kernel drivers in Rust is possible, and I’m sure the support for this will improve quickly. The WDK crates are at version 0.3, which means there is still a way to go. To get the most out of Rust in this space, safe wrappers should be created so that the code is less verbose, does not have unsafe blocks, and enjoys the benefits Rust can provide. Note, that I may have missed some wrappers in this simple implementation.

You can find a couple of more samples for KMDF Rust drivers here.

The code for this post can be found at https://github.com/zodiacon/Booster.

Learn more about Rust at https://trainsec.net.

Improving Kernel Object Type Implementation (Part 4)

In part 3 we implemented the bulk of what makes a DataStack – push, pop and clear operations. We noted a few remaining deficiencies that need to be taken care of. Let’s begin.

Object Destruction

A DataStack object is deallocated when the last reference to it removed (typically all handles are closed). Any other cleanup must be done explicitly. The DeleteProcedure member of the OBJECT_TYPE_INITIALIZER is an optional callback we can set to be called just before the structure is freed:

init.DeleteProcedure = OnDataStackDelete;

The callback is simple – it’s called with the object about to be destroyed. We can use the cleanup support from part 3 to free the dynamic state of the stacked items:

void OnDataStackDelete(_In_ PVOID Object) {
	auto ds = (DataStack*)Object;
	DsClearDataStack(ds);
}

Querying Information

The native API provides many functions starting with NtQueryInformation* with an object type like process, thread, file, etc. We’ll add a similar function for querying information about DataStack objects. A few declarations are in order, mimicking similar declarations used by other query APIs:

typedef struct _DATA_STACK_CONFIGURATION {
	ULONG MaxItemSize;
	ULONG MaxItemCount;
	ULONG_PTR MaxSize;
} DATA_STACK_CONFIGURATION;

typedef enum _DataStackInformationClass {
	DataStackItemCount,
	DataStackTotalSize,
	DataStackConfiguration,
} DataStackInformationClass;

The query API itself mimics all the other Query APIs in the native API:

NTSTATUS NTAPI NtQueryInformationDataStack(
	_In_ HANDLE DataStackHandle,
	_In_ DataStackInformationClass InformationClass,
	_Out_ PVOID Buffer,
	_In_ ULONG BufferSize,
	_Out_opt_ PULONG ReturnLength);

The implementation (in kernel mode) is not complicated, just verbose. As with other APIs, we’ll start by getting the object itself from the handle, asking for DATA_STACK_QUERY access mask:

NTSTATUS NTAPI NtQueryInformationDataStack(_In_ HANDLE DataStackHandle, 
    _In_ DataStackInformationClass InformationClass, 
    _Out_ PVOID Buffer, _In_ ULONG BufferSize, 
    _Out_opt_ PULONG ReturnLength) {
	DataStack* ds;
	auto status = ObReferenceObjectByHandleWithTag(DataStackHandle,
        DATA_STACK_QUERY, g_DataStackType,
		ExGetPreviousMode(), DataStackTag, (PVOID*)&ds, nullptr);
	if (!NT_SUCCESS(status))
		return status;

Next, we check parameters:

// if no buffer provided then ReturnLength must be 
// non-NULL and buffer size must be zero
//
if (!ARGUMENT_PRESENT(Buffer) && (!ARGUMENT_PRESENT(ReturnLength) || BufferSize != 0))
	return STATUS_INVALID_PARAMETER;
//
// if buffer provided, then size must be non-zero
//
if (ARGUMENT_PRESENT(Buffer) && BufferSize == 0)
	return STATUS_INVALID_PARAMETER;

The rest is pretty standard. Let’s look at one information class:

ULONG len = 0;
switch (InformationClass) {
	case DataStackItemCount: 
        len = sizeof(ULONG); break;
	case DataStackTotalSize: 
        len = sizeof(ULONG_PTR); break;
	case DataStackConfiguration: 
        len = sizeof(DATA_STACK_CONFIGURATION); break;
	default: 
        return STATUS_INVALID_INFO_CLASS;
}

if (BufferSize < len) {
	status = STATUS_BUFFER_TOO_SMALL;
}
else {
	if (ExGetPreviousMode() != KernelMode) {
		__try {
			if (ARGUMENT_PRESENT(Buffer))
				ProbeForWrite(Buffer, BufferSize, 1);
			if (ARGUMENT_PRESENT(ReturnLength))
				ProbeForWrite(ReturnLength, sizeof(ULONG), 1);
		}
		__except (EXCEPTION_EXECUTE_HANDLER) {
			return GetExceptionCode();
		}
	}

	switch (InformationClass) {
		case DataStackItemCount:
		{
			ExAcquireFastMutex(&ds->Lock);
			auto count = ds->Count;
			ExReleaseFastMutex(&ds->Lock);

			if (ExGetPreviousMode() != KernelMode) {
				__try {
					*(ULONG*)Buffer = count;
				}
				__except (EXCEPTION_EXECUTE_HANDLER) {
					return GetExceptionCode();
				}
			}
			else {
				*(ULONG*)Buffer = count;
			}
			break;
		}
//...
//
// set returned bytes if requested
//
if (ARGUMENT_PRESENT(ReturnLength)) {
	if (ExGetPreviousMode() != KernelMode) {
		__try {
			*ReturnLength = len;
		}
		__except (EXCEPTION_EXECUTE_HANDLER) {
			return GetExceptionCode();
		}
	}
	else {
		*ReturnLength = len;
	}
}

ObDereferenceObjectWithTag(ds, DataStackTag);
return status;

You can find the other information classes implemented in the source code in a similar fashion.

To round it up, we’ll add Win32-like APIs that call the native APIs. The Native APIs call the driver in a similar way as the other native API user-mode implementations.

BOOL WINAPI GetDataStackSize(HANDLE hDataStack, ULONG_PTR* pSize) {
	auto status = NtQueryInformationDataStack(hDataStack, 
        DataStackTotalSize, pSize, sizeof(ULONG_PTR), nullptr);
	if (!NT_SUCCESS(status))
		SetLastError(RtlNtStatusToDosError(status));
	return NT_SUCCESS(status);
}

BOOL WINAPI GetDataStackItemCount(HANDLE hDataStack, ULONG* pCount) {
	auto status = NtQueryInformationDataStack(hDataStack,
        DataStackItemCount, pCount, sizeof(ULONG), nullptr);
	if (!NT_SUCCESS(status))
		SetLastError(RtlNtStatusToDosError(status));
	return NT_SUCCESS(status);
}

BOOL WINAPI GetDataStackConfig(HANDLE hDataStack, DATA_STACK_CONFIG* pConfig) {
	auto status = NtQueryInformationDataStack(hDataStack,
        DataStackConfiguration, pConfig, 
        sizeof(DATA_STACK_CONFIG), nullptr);
	if (!NT_SUCCESS(status))
		SetLastError(RtlNtStatusToDosError(status));
	return NT_SUCCESS(status);
}

Waitable Objects

Waitable objects, also called Dispatcher objects, maintain a state called Signaled or Non-Signaled, where the meaning of “signaled” depends on the object type. For example, process objects are signaled when terminated. Same for thread objects. Job objects are signaled when all processes in the job terminate. And so on.

Waitable objects can be waited on with WaitForSingleObject / WaitForMultipleObjects and friends in the Windows API, which call native APIs like NtWaitForSingleObject / NtWaitForMultipleObjects, which eventually get to the kernel and call ObWaitForSingleObject / ObWaitForMultipleObjects which finally invoke KeWaitForSingleObject / KeWaitForMultipleObjects (both documented in the WDK).

It would be nice if DataStack objects would be dispatcher objects, where “signaled” would mean the data stack is not empty, and vice-versa. The first thing to do is make sure that the SYNCHRONIZE access mask is valid for the object type. This is the default, so nothing special to do here. GENERIC_READ also adds SYNCHRONIZE for convenience.

In order to be a dispatcher object, the structure managing the object must start with a DISPATCHER_HEADER structure (which is provided by the WDK headers). For example, KPROCESS and KTHREAD start with DISPATCHER_HEADER. Same for all other dispatcher objects – well, almost. If we look at an EJOB (using symbols), we’ll see the following:

kd> dt nt!_EJOB
   +0x000 Event            : _KEVENT
   +0x018 JobLinks         : _LIST_ENTRY
   +0x028 ProcessListHead  : _LIST_ENTRY
   +0x038 JobLock          : _ERESOURCE
...

The DISPATCHER_HEADER is in the KEVENT. In fact, a KEVENT is just a glorified DISPATCHER_HEADER:

typedef struct _KEVENT {
    DISPATCHER_HEADER Header;
} KEVENT, *PKEVENT, *PRKEVENT;

The advantage of using a KEVENT is that the event API is available – this is taken advantage of by the Job implementation. For processes and threads, the work of signaling is done internally by the Process and Thread APIs.

For the DataStack implementation, we’ll take the Job approach, as the scheduler APIs are internal and undocumented. The DataStack now looks like this:

struct DataStack {
	KEVENT Event;
	LIST_ENTRY Head;
	FAST_MUTEX Lock;
	ULONG Count;
	ULONG MaxItemCount;
	ULONG_PTR Size;
	ULONG MaxItemSize;
	ULONG_PTR MaxSize;
};

In addition, we have to initialize the event as well as the other members:

void DsInitializeDataStack(DataStack* DataStack, ...) {
//...
	KeInitializeEvent(&DataStack->Event, NotificationEvent, FALSE);
//...
}

The event is initialized as a Notification Event (Manual Reset in user mode terminology). Why? This is just a choice. We could extend the DataStack creation API to allow choosing Notification (manual reset) vs. Synchronization (auto reset) – I’ll leave that for interested coder.

Next, we need to set or reset the event when appropriate. It starts in the non-signaled state (the FALSE in KeInitializeEvent), since the data stack starts empty. In the implementation of DsPushDataStack we signal the event if the count is incremented from zero to 1:

NTSTATUS DsPushDataStack(DataStack* ds, PVOID Item, ULONG ItemSize) {
//...
	if (NT_SUCCESS(status)) {
		InsertTailList(&ds->Head, &buffer->Link);
		ds->Count++;
		ds->Size += ItemSize;
		if(ds->Count == 1)
			KeSetEvent(&ds->Event, EVENT_INCREMENT, FALSE);
	}
//...

In the pop implementation, we clear (reset) the event if the item count drops to zero:

NTSTATUS DsPopDataStack(DataStack* ds, PVOID buffer, ULONG inputSize, ULONG* itemSize) {
//...
memcpy(buffer, item->Data, item->Size);
ds->Count--;
ds->Size -= item->Size;
ExFreePool(item);
if (ds->Count == 0)
	KeClearEvent(&ds->Event);
return STATUS_SUCCESS;
//...

These operations are performed under the protection of the fast mutex, of course.

Testing

Here is one way to amend the test application to use WaitForSingleObject:

// wait 5 seconds at most for data to appear
while (WaitForSingleObject(h, 5000) == WAIT_OBJECT_0) {
	DWORD size = sizeof(buffer);
	if (!PopDataStack(h, buffer, &size) && GetLastError() != ERROR_NO_DATA) {
		printf("Error in PopDataStack (%u)\n", GetLastError());
		break;
	}
//...
	DWORD count;
	DWORD_PTR total;
	if (GetDataStackItemCount(h, &count) && GetDataStackSize(h, &total))
		printf("Data stack Item count: %u Size: %zu\n", count, total);
}

Refer to the project source code for the full sample.

Summary

This four-part series demonstrated creating a new kernel object type and using only exported functions to implement it. I hope this sheds more light on certain mechanisms used by the Windows kernel.

Let’s Get Stacking! (Part 3)

In the first part we looked at creating a new kernel object type. In the second part we implemented creation of new DataStack objects and opening existing objects by name. In this part, we’ll implement the main functionality of a DataStack, that makes a DataStack what it is.

Before we get on with that, there is one correction I must make. A good comment from Luke (@lukethezoid) on X said that although the code returns a 32-bit HANDLE to 32-bit callers, it’s not nearly enough because all pointers passed using NtDeviceIoControlFile/DeviceIoControl would be wrong – 32-bit pointers would be passed to the 64-bit kernel and that would cause a crash unless we do some work. For example, a UNICODE_STRING provided by a 32-bit client has a different binary layout than a 64-bit one. Wow64 processes (32-bit x86 running on x64) have two versions of NtDll.Dll in their address space. One is the “native” 64-bit, and the other is a special 32-bit variant. I say “special” because it’s not the same NtDll.Dll you would find on a true 32-bit system. This is because this special DLL knows it’s on a 64-bit system, and provides conversions for parameters (pointer and structures) before invoking the “real” 64-bit DLL API. Here is a snapshot from Process Explorer showing a 32-bit process with two NtDll.Dll files – the native 64-bit loaded into a high address, while the other loaded into a low address (within the first 4GB of address space):

The changes required to support Wow64 processes are not difficult to make, but not too interesting, either, so I won’t be implementing them. Instead, 32-bit clients will be blocked from using DataStacks. We should block on the kernel side for sure, and also in user mode to fail faster. In the kernel, we could use something like this in IRP_MJ_CREATE or IRP_MJ_DEVICE_CONTROL handles:

if (IoIs32bitProcess(Irp)) {
	status = STATUS_NOT_IMPLEMENTED;
    // complete the request...
}

In user mode, we can prevent DataStack.Dll from loading in the first place in Wow64 processes:

BOOL APIENTRY DllMain(HMODULE hModule, DWORD reason, LPVOID) {
	switch (reason) {
		case DLL_PROCESS_ATTACH:
            // C++ 17
			if (BOOL wow; IsWow64Process(GetCurrentProcess(), &wow) && wow)
				return FALSE;
//...

Note, however, that on true 32-bit systems everything should work just fine, as user mode and kernel mode are bitness-aligned.

Implementing the Actual Data Stack

Now we’re ready to focus on implementing the stack functionality – push, pop, and clear.

We’ll start from user mode, and gradually move to kernel mode. First, we want nice APIs for clients to use that have “Win32” conventions like so:

BOOL WINAPI PushDataStack(_In_ HANDLE hDataStack, _In_ const PVOID buffer, _In_ DWORD size);
BOOL WINAPI PopDataStack(_In_ HANDLE hDataStack, _Out_ PVOID buffer, _Inout_ DWORD* size);
BOOL WINAPI ClearDataStack(_In_ HANDLE hDataStack);

The APIs return BOOL to indicate success/failure, and GetLastError could be used to get additional information in case of an error. Let’s start with push:

BOOL WINAPI PushDataStack(HANDLE hDataStack, const PVOID buffer, DWORD size) {
	auto status = NtPushDataStack(hDataStack, buffer, size);
	if (!NT_SUCCESS(status))
		SetLastError(RtlNtStatusToDosError(status));

	return NT_SUCCESS(status);
}

Nothing to it. Call NtPushDataStack and update the last error is needed. NtPushDataStack just packs the arguments in a helper structure and sends to the driver, just like we did with CreateDataStack and OpenDataStack:

NTSTATUS NTAPI NtPushDataStack(_In_ HANDLE DataStackHandle, 
    _In_ const PVOID Item, _In_ ULONG ItemSize) {
	DataStackPush data;
	data.DataStackHandle = DataStackHandle;
	data.Buffer = Item;
	data.Size = ItemSize;

	IO_STATUS_BLOCK ioStatus;
	return NtDeviceIoControlFile(g_hDevice, nullptr, nullptr, nullptr, &ioStatus,
		IOCTL_DATASTACK_PUSH, &data, sizeof(data), nullptr, 0);
}

Now we switch to the kernel side. The DeviceIoControl handler just forwards the arguments to the “real” NtPushDataStack:

case IOCTL_DATASTACK_PUSH:
{
	auto data = (DataStackPush*)Irp->AssociatedIrp.SystemBuffer;
	if (dic.InputBufferLength < sizeof(*data)) {
		status = STATUS_BUFFER_TOO_SMALL;
		break;
	}
	status = NtPushDataStack(data->DataStackHandle, data->Buffer, data->Size);
	break;
}

Now we’re getting to the interesting parts. First, we need to check if the arguments make sense:

NTSTATUS NTAPI NtPushDataStack(HANDLE DataStackHandle, 
    const PVOID Item, ULONG ItemSize) {
	if (ItemSize == 0)
		return STATUS_INVALID_PARAMETER_3;

	if (!ARGUMENT_PRESENT(Item))
		return STATUS_INVALID_PARAMETER_2;

If the pushed data size is zero or the pointer to the data is NULL, then it’s an error. The ARGUMENT_PRESENT macro returns true if the given pointer is not NULL. Notice that we can return specific “invalid parameter” error based on the parameter index. Unfortunately, user mode callers always get a generic ERROR_INVALID_PARAMETER regardless. But at least kernel callers can benefit from the extra detail.

Next, we need to get to the DataStack object corresponding to the given handle; in fact, the handle could be bad, or not point to a DataStack object at all. This is a job for ObReferenceObjectByHandle or one of its variants:

DataStack* ds;
auto status = ObReferenceObjectByHandleWithTag(DataStackHandle,
    DATA_STACK_PUSH, g_DataStackType, ExGetPreviousMode(), 
    DataStackTag, (PVOID*)&ds, nullptr);
if (!NT_SUCCESS(status))
	return status;

ObReferenceObjectByHandleWithTag attempts to retrieve the object pointer given a handle, a type object, and access. The added tag provides a simple way to “track” the caller taking the reference. I’ve defined DataStackTag to be used for dynamic memory allocations as well (we’ll do very soon):

const ULONG DataStackTag = 'ktsD';

It’s the same kind of tag typically provided to allocation functions. You can read the tag from right to left (that’s how it would be displayed in tools as we’ll see later) – “Dstk”, kind of short for “Data Stack”. The function also checks if the handle has the required access mask (DATA_STACK_PUSH in this case), and will fail if the handle is not powerful enough. ExGetPreviousMode is provided to the function to indicate who is the original caller – for kernel callers, any access will be granted (the access mask is not really used).

With the object in hand, we can do the work, delegated to a separate function, and then not to forget to dereference the object or it will leak:

status = DsPushDataStack(ds, Item, ItemSize);
ObDereferenceObjectWithTag(ds, DataStackTag);

return status;

Technically, we don’t have to use a separate function, but it mimics how the kernel works for complex objects: there is another layer of implementation that works with the object directly (no more handles involved).

The DataStack structure mentioned in the previous parts holds the data for the implementation, and will be treated as a classic C structure – no member functions just to mimic how the Windows kernel is implemented – almost everything in C, not C++:

struct DataStack {
	LIST_ENTRY Head;
	FAST_MUTEX Lock;
	ULONG Count;
	ULONG MaxItemCount;
	ULONG_PTR Size;
	ULONG MaxItemSize;
	ULONG_PTR MaxSize;
};

struct DataBlock {
	LIST_ENTRY Link;
	ULONG Size;
	UCHAR Data[1];
};

The “stack” will be managed by a linked list (the classic LIST_ENTRY and friends) implementation provided by the kernel. We’ll push by adding to the tail and pop by removing from the tail. (Clearly, it would be just as easy to implement a queue, rather than, or in addition to, a stack.) We need a lock to prevent corruption of the list, and a fast mutex will do the job. Count stores the number of items currently on the data stack, and Size has the total size in bytes. MaxSize and MaxItemCount are initialized when the DataStack is created and provide some control over the limits of the data stack. Values of zero indicate no special limit.

The second structure, DataBlock is the one that holds the actual data, along with its size, and of course a link to the list. Data[1] is just a placeholder, where the data is going to be copied to, assuming we allocate the correct size.

We’ll start the push implementation in an optimistic manner, and allocate the DataBlock structure with the required size based on the data provided:

NTSTATUS DsPushDataStack(DataStack* ds, PVOID Item, ULONG ItemSize) {
	auto buffer = (DataBlock*)ExAllocatePool2(POOL_FLAG_PAGED | POOL_FLAG_UNINITIALIZED, 
		ItemSize + sizeof(DataBlock), DataStackTag);
	if (buffer == nullptr)
		return STATUS_INSUFFICIENT_RESOURCES;

We use the (relatively) new ExAllocatePool2 API to allocate the memory block (ExAllocatePoolWithTag is deprecated from Windows version 2004, but you can use it with an old-enough WDK or if you turn off the deprecation warning). We allocate the buffer uninitialized, as we’ll copy the data to it very soon, so no need for zeroed buffer. Technically, we allocate one extra byte beyond what we need, but that’s not a big deal. Now we can copy the data from the client’s provided buffer, being careful to probe user-mode buffers under exception protection:

auto status = STATUS_SUCCESS;
if (ExGetPreviousMode() != KernelMode) {
	__try {
		ProbeForRead(Item, ItemSize, 1);
		memcpy(buffer->Data, Item, ItemSize);
	}
	__except (EXCEPTION_EXECUTE_HANDLER) {
		ExFreePool(buffer);
		return GetExceptionCode();
	}
}
else {
	memcpy(buffer->Data, Item, ItemSize);
}
buffer->Size = ItemSize;

If an exception occurs because of a bad user-mode buffer, we can return the exception code and that’s it. Note that ProbeForRead does not work for kernel addresses, and cannot prevent crashes – this is intentional. Only user-mode buffers are out of control from the kernel’s side.

Now we can add the item to the stack if the limits are not violated, while updating the DataStack’s stats:

ExAcquireFastMutex(&ds->Lock);
do {
	if (ds->MaxItemCount == ds->Count) {
		status = STATUS_NO_MORE_ENTRIES;
		break;
	}

	if (ds->MaxItemSize && ItemSize > ds->MaxItemSize) {
		status = STATUS_NOT_CAPABLE;
		break;
	}

	if (ds->MaxSize && ds->Size + ItemSize > ds->MaxSize) {
		status = STATUS_NOT_CAPABLE;
		break;
	}
} while (false);

if (NT_SUCCESS(status)) {
	InsertTailList(&ds->Head, &buffer->Link);
	ds->Count++;
	ds->Size += ItemSize;
}
ExReleaseFastMutex(&ds->Lock);

if (!NT_SUCCESS(status))
	ExFreePool(buffer);

return status;

First, we acquire the fast mutex to prevent data races. I opted not to use any C++ RAII type here to make things as clear as possible – we have to be careful not to return before releasing the fast mutex. Next, the do/while non-loop is used to check if any setting is violated, in which case the status is set to some failure. The status values I chose may not look perfect – the right thing to do is create new NTSTATUS values that would be specific for DataStacks, but I was too lazy. The interested reader/coder is welcome to do it right.

Inserting the item involves calling InsertTailList, and then just updating the item count and total byte size. If anything fails, we are careful to free the buffer to prevent a memory leak. This is for push.

Popping Items

The pop operation works along similar lines. In this case, the client asks to pop an item but needs to provide a large-enough buffer to store the data. We’ll use an additional size pointer argument, that on input indicates the buffer’s size, and on output indicates the actual item size. First, the “Win32” API:

BOOL WINAPI PopDataStack(HANDLE hDataStack, PVOID buffer, DWORD* size) {
	auto status = NtPopDataStack(hDataStack, buffer, size);
	if (!NT_SUCCESS(status))
		SetLastError(RtlNtStatusToDosError(status));

	return NT_SUCCESS(status);
}

Just delegating the work to the native API, which forwards to the kernel with a helper structure:

NTSTATUS NTAPI NtPopDataStack(_In_ HANDLE DataStackHandle, _In_ PVOID Buffer, _Inout_ PULONG ItemSize) {
	DataStackPop data;
	data.DataStackHandle = DataStackHandle;
	data.Buffer = Buffer;
	data.Size = ItemSize;

	IO_STATUS_BLOCK ioStatus;
	return NtDeviceIoControlFile(g_hDevice, nullptr, nullptr, nullptr, &ioStatus,
		IOCTL_DATASTACK_POP, &data, sizeof(data), nullptr, 0);
}

This should be expected by now. On the kernel side, things are more interesting. First, get the object based on the handle, then send it to the lower-layer function if successful:

NTSTATUS NTAPI NtPopDataStack(HANDLE DataStackHandle, 
    PVOID Buffer, PULONG BufferSize) {
	if (!ARGUMENT_PRESENT(BufferSize))
		return STATUS_INVALID_PARAMETER_3;

	ULONG size;
	if (ExGetPreviousMode() != KernelMode) {
		__try {
			ProbeForRead(BufferSize, sizeof(ULONG), 1);
			size = *BufferSize;
		}
		__except (EXCEPTION_EXECUTE_HANDLER) {
			return GetExceptionCode();
		}
	}
	else {
		size = *BufferSize;
	}

	if (!ARGUMENT_PRESENT(Buffer) && size != 0)
		return STATUS_INVALID_PARAMETER_2;

	DataStack* ds;
	auto status = ObReferenceObjectByHandleWithTag(DataStackHandle,
        DATA_STACK_POP, g_DataStackType, ExGetPreviousMode(), 
        DataStackTag, (PVOID*)&ds, nullptr);
	if (!NT_SUCCESS(status))
		return status;

	status = DsPopDataStack(ds, Buffer, size, BufferSize);
	ObDereferenceObjectWithTag(ds, DataStackTag);
	return status;
}

The input buffer size is extracted, being careful to probe the user mode pointer. The real work is done in DsPopDataStack. First, take the lock. Second, see if the data stack is empty – if so, no pop operation possible. If the input size is zero, return the size of the top element:

NTSTATUS DsPopDataStack(DataStack* ds, PVOID buffer, 
    ULONG inputSize, ULONG* itemSize) {
	ExAcquireFastMutex(&ds->Lock);
	__try {
		if (inputSize == 0) {
			//
			// return size of next item
			//			
			__try {
				if (ds->Count == 0) {
					//
					// stack empty
					//
					*itemSize = 0;
				}
				else {
					auto top = CONTAINING_RECORD(ds->Head.Blink, DataBlock, Link);
					*itemSize = top->Size;
				}
				return STATUS_SUCCESS;
			}
			__except (EXCEPTION_EXECUTE_HANDLER) {
				return GetExceptionCode();
			}
		}

The locking here works differently than the push implementation by using a __finally block, which is the one releasing the fast mutex. This ensures that no matter how we leave the __try block, the lock will be released for sure.

The CONTAINING_RECORD macro is used correctly to get to the item from the link (LIST_ENTRY). Technically, in this case we could just make a simple cast, as the LIST_ENTRY member is the first in a DataBlock. Notice how we get to the top item: Head.Blink, which points to the tail (last) item.

If the data stack is empty, we place zero in the item size pointer and return an error (abusing yet another existing error):

if (ds->Count == 0) {
	__try {
		*itemSize = 0;
	}
	__except (EXCEPTION_EXECUTE_HANDLER) {
		return GetExceptionCode();
	}
	return STATUS_PIPE_EMPTY;
}

If manage to get beyond this point, then there is an item, and we need to remove it, copy the data to the client’s buffer (if it’s big enough), and free the kernel’s copy of the buffer:

	auto link = RemoveTailList(&ds->Head);
	NT_ASSERT(link != &ds->Head);
	
	auto item = CONTAINING_RECORD(link, DataBlock, Link);
	__try {
		*itemSize = item->Size;
		if (inputSize < item->Size) {
			//
			// buffer too small
			// reinsert item
			//
			InsertTailList(&ds->Head, link);
			return STATUS_BUFFER_TOO_SMALL;
		}
		else {
			memcpy(buffer, item->Data, item->Size);
			ds->Count--;
			ds->Size -= item->Size;
			ExFreePool(item);
			return STATUS_SUCCESS;
		}
	}
	__except (EXCEPTION_EXECUTE_HANDLER) {
		return GetExceptionCode();
	}
}
__finally {
	ExReleaseFastMutex(&ds->Lock);
}

The call to RemoveTailList removes the top item from the list. The next assert verifies the list wasn’t empty before the removal (it can’t be as we dealt with that case in the previous code section). Remember, that if a list is empty calling RemoveTailList or RemoveHeadList returns the head’s pointer.

If the client’s buffer is too small, we reinsert the item back and bail. Otherwise, we copy the data, update the data stack’s stats and free our copy of the item.

Cleanup

The stack clear operation is relatively straightforward of them all. Here is the kernel part that matters:

NTSTATUS DsClearDataStack(DataStack* ds) {
	ExAcquireFastMutex(&ds->Lock);
	LIST_ENTRY* link;

	while ((link = RemoveHeadList(&ds->Head)) != &ds->Head) {
		auto item = CONTAINING_RECORD(link, DataBlock, Link);
		ExFreePool(item);
	}
	ds->Count = 0;
	ds->Size = 0;
	ExReleaseFastMutex(&ds->Lock);

	return STATUS_SUCCESS;
}

We take the lock, and then go over the list, removing and freeing each item. Finally, we update the stats to zero items and zero bytes.

Testing

Here is one way to test – having an executable run twice, the first instance pushes some items, and the second one popping items. main creates a data stack with a name. If it’s a new object, it assumes the role of “pusher”. Otherwise, it assumes the role of “popper”:

int main() {
	HANDLE hDataStack = CreateDataStack(nullptr, 0, 100, 
        10 << 20, L"MyDataStack");
	if (!hDataStack) {
		printf("Failed to create data stack (%u)\n", GetLastError());
		return 1;
	}

	printf("Handle created: 0x%p\n", hDataStack);

	if (GetLastError() == ERROR_ALREADY_EXISTS) {
		printf("Opened an existing object... will pop elements\n");
		PopItems(hDataStack);
	}
	else {
		Sleep(5000);

		PushString(hDataStack, "Hello, data stack!");
		PushString(hDataStack, "Pushing another string...");
		for (int i = 1; i <= 10; i++) {
			Sleep(100);
			PushDataStack(hDataStack, &i, sizeof(i));
		}
	}

	CloseHandle(hDataStack);
	return 0;
}

When creating a named object, if GetLastError returns ERROR_ALREADY_EXISTS, it means a handle is returned to an existing object. In our current implementation, this actually won’t work. We have to fix the CreateDataStack implementation like so:

HANDLE hDataStack;
auto status = NtCreateDataStack(&hDataStack, &attr, maxItemSize, maxItemCount, maxSize);
if (NT_SUCCESS(status)) {
	const NTSTATUS STATUS_OBJECT_NAME_EXISTS = 0x40000000;

	if (status == STATUS_OBJECT_NAME_EXISTS) {
		SetLastError(ERROR_ALREADY_EXISTS);
	}
	else {
		SetLastError(0);
	}
	return hDataStack;
}

After calling NtCreateDataStack we fix the returned “error” if the kernel returns STATUS_OBJECT_NAME_EXISTS. Now the previous will work correctly.

PushString is a little helper to push strings:

bool PushString(HANDLE h, std::string const& text) {
	auto ok = PushDataStack(h, (PVOID)text.c_str(), (ULONG)text.length() + 1);
	if (!ok)
		printf("Error in PushString: %u\n", GetLastError());
	return ok;
}

Finally, PopItems does some popping:

void PopItems(HANDLE h) {
	BYTE buffer[256];

	auto tick = GetTickCount64();
	while (GetTickCount64() - tick < 10000) {
		DWORD size = sizeof(buffer);
		if (!PopDataStack(h, buffer, &size) && GetLastError() != ERROR_NO_DATA) {
			printf("Error in PopDataStack (%u)\n", GetLastError());
			break;
		}
		if (size) {
			printf("Popped %u bytes: ", size);
			if (size > sizeof(int))
				printf("%s\n", (PCSTR)buffer);
			else
				printf("%d\n", *(int*)buffer);
		}
		Sleep(300);
	}
}

Not very exciting, but is good enough for this simple test. Here is some output, first from the “pusher” and then the “popper”:

E:\Test>DSTest.exe
Handle created: 0x00000000000000F8
E:\Test>DSTest.exe
Handle created: 0x0000000000000104
Opened an existing object... will popup elements
Popped 4 bytes: 2
Popped 4 bytes: 5
Popped 4 bytes: 8
Popped 4 bytes: 10
Popped 4 bytes: 9
Popped 4 bytes: 7
Popped 4 bytes: 6
Popped 4 bytes: 4
Popped 4 bytes: 3
Popped 4 bytes: 1
Popped 26 bytes: Pushing another string...
Popped 19 bytes: Hello, data stack!

What’s Next?

Are we done? Not quite. Astute readers may have noticed a little problem. What happens if a DataStack object is destroyed (e.g., the last handle to it is closed), but the stack is not empty? That memory will leak, as we have no “desctructor”. Running the “pusher” a few times without a second process that pops items results in a leak. Here is my PoolMonX tool showing the leak:

Notice the “Dstk” tag and the number of allocations being higher that deallocations.

Another feature we are missing is the ability to wait on a DataStack until data is available, if the stack is empty, maybe by calling the WaitForSingleObject API. It would be nice to have that.

Yet another missing element is the ability to query DataStack objects – how much memory is being used, how many items, etc.

We’ll deal with these aspects in the next part.

Implementing Kernel Object Type (Part 2)

In Part 1 we’ve seen how to create a new kernel object type. The natural next step is to implement some functionality associated with the new object type. Before we dive into that, let’s take a broader view of what we’re trying to do. For comparison purposes, we can take an existing kernel object type, such as a Semaphore or a Section, or any other object type, look at how it’s “invoked” to get an idea of what we need to do.

A word of warning: this is a code-heavy post, and assumes the reader is fairly familiar with Win32 and native API conventions, and has basic understanding of device driver writing.

The following diagram shows the call flow when creating a semaphore from user mode starting with the CreateSemaphore(Ex) API:

A process calls the officially documented CreateSemaphore, implemented in kernel32.dll. This calls the native (undocumented) API NtCreateSemaphore, converting arguments as needed from Win32 conventions to native conventions. NtCreateSemaphore has no “real” implementation in user mode, as the kernel is the only one which can create a semaphore (or any other kernel object for that matter). NtDll has code to transition the CPU to kernel mode by using the syscall machine instruction on x64. Before issuing a syscall, the code places a number into the EAX CPU register. This number – system service index, indicates what operation is being requested.

On the kernel side of things, the System Service Dispatcher uses the value in EAX as an index into the System Service Descriptor Table (SSDT) to locate the actual function to call, pointing to the real NtCreateSemaphore implementation. Semaphores are relatively simple objects, so creation is a matter of allocating memory for a KSEMAPHORE structure (and a header), done with OnCreateObject, initializing the structure, and then inserting the object into the system (ObInsertObject).

More complex objects are created similarly, although the actual creation code in the kernel may be more elaborate. Here is a similar diagram for creating a Section object:

As can be seen in the diagram, creating a section involves a private function (MiCreateSection), but the overall process is the same.

We’ll try to mimic creating a DataStack object in a similar way. However, extending NtDll for our purposes is not an option. Even using syscall to make the transition to the kernel is problematic for the following reasons:

  • There is no entry in the SSDT for something like NtCreateDataStack, and we can’t just add an entry because PatchGuard does not like when the SSDT changes.
  • Even if we could add an entry to the SSDT safely, the entry itself is tricky. On x64, it’s not a 64-bit address. Instead, it’s a 28-bit offset from the beginning of the SSDT (the lower 4 bits store the number of parameters passed on the stack), which means the function cannot be too far from the SSDT’s address. Our driver can be loaded to any address, so the offset to anything mapped may be too large to be stored in an SSDT entry.
  • We could fix that problem perhaps by adding code in spare bytes at the end of the kernel mapped PE image, and add a JMP trampoline call to our real function…

Not easy, and we still have the PatchGuard issue. Instead, we’ll go about it in a simpler way – use DeviceIoControl (or the native NtDeviceIoControlFile) to pass the parameters to our driver. The following diagram illustrates this:

We’ll keep the “Win32 API” functions and “Native APIs” implemented in the same DLL for convenience. Let’s from the top, moving from user space to kernel space. Implementing CreateDataStack involves converting Win32 style arguments to native-style arguments before calling NtCreateDataStack. Here is the beginning:

HANDLE CreateDataStack(_In_opt_ SECURITY_ATTRIBUTES* sa, 
    _In_ ULONG maxItemSize, _In_ ULONG maxItemCount, 
    _In_ ULONG_PTR maxSize, _In_opt_ PCWSTR name) {

Notice the similarity to functions like CreateSemaphore, CreateMutex, CreateFileMapping, etc. An optional name is accepted, as DataStack objects can be named.

Native APIs work with UNICODE_STRINGs and OBJECT_ATTRIBUTES, so we need to do some work to be able to call the native API:

NTSTATUS NTAPI NtCreateDataStack(_Out_ PHANDLE DataStackHandle, 
    _In_opt_ POBJECT_ATTRIBUTES DataStackAttributes, 
    _In_ ULONG MaxItemSize, _In_ ULONG MaxItemCount, ULONG_PTR MaxSize);

We start by building an OBJECT_ATTRIBUTES:

UNICODE_STRING uname{};
if (name && *name) {
	RtlInitUnicodeString(&uname, name);
}
OBJECT_ATTRIBUTES attr;
InitializeObjectAttributes(&attr, 
	uname.Length ? &uname : nullptr, 
	OBJ_CASE_INSENSITIVE | (sa && sa->bInheritHandle ? OBJ_INHERIT : 0) | (uname.Length ? OBJ_OPENIF : 0),
	uname.Length ? GetUserDirectoryRoot() : nullptr, 
	sa ? sa->lpSecurityDescriptor : nullptr);

If a name exists, we wrap it in a UNICODE_STRING. The security attributes are used, if provided. The most interesting part is the actual name (if provided). When calling a function like the following:

CreateSemaphore(nullptr, 100, 100, L"MySemaphore");

The object name is not going to be just “MySemaphore”. Instead, it’s going to be something like “\Sessions\1\BaseNamedObjects\MySemaphore”. This is because the Windows API uses “local” session-relative names by default. Our DataStack API should provide the same semantics, which means the base directory in the Object Manager’s namespace for the current session must be used. This is the job of GetUserDirectoryRoot. Here is one way to implement it:

HANDLE GetUserDirectoryRoot() {
	static HANDLE hDir;
	if (hDir)
		return hDir;

	DWORD session = 0;
	ProcessIdToSessionId(GetCurrentProcessId(), &session);

	UNICODE_STRING name;
	WCHAR path[256];
	if (session == 0)
		RtlInitUnicodeString(&name, L"\\BaseNamedObjects");
	else {
		wsprintfW(path, L"\\Sessions\\%u\\BaseNamedObjects", session);
		RtlInitUnicodeString(&name, path);
	}
	OBJECT_ATTRIBUTES dirAttr;
	InitializeObjectAttributes(&dirAttr, &name, OBJ_CASE_INSENSITIVE, nullptr, nullptr);
	NtOpenDirectoryObject(&hDir, DIRECTORY_QUERY, &dirAttr);
	return hDir;
}

We just need to do that once, since the resulting directory handle can be stored in a global/static variable for the lifetime of the process; we won’t even bother closing the handle. The native NtOpenDirectoryObject is used to open a handle to the correct directory and return it. Notice that for session 0, there is a special rule: its directory is simply “\BaseNamedObjects”.

There is a snag in the above handling, as it’s incomplete. UWP processes have their own object directory based on their AppContainer SID, which looks like “\Sessions\1\AppContainerNamedObjects\{AppContainerSid}”, which the code above is not dealing with. I’ll leave that as an exercise for the interested coder.

Back in CreateDataStack – the session-relative directory handle is stored in the OBJECT_ATTRIBUTES RootDirectory member. Now we can call the native API:

HANDLE hDataStack;
auto status = NtCreateDataStack(&hDataStack, &attr, maxItemSize, maxItemCount, maxSize);
if (NT_SUCCESS(status))
	return hDataStack;

SetLastError(RtlNtStatusToDosError(status));
return nullptr;

If we get a failed status, we convert it to a Win32 error with RtlNtStatusToDosError and call SetLastError to make it available to the caller via the usual GetLastError. Here is the full CreateDataStack function for easier reference:

HANDLE CreateDataStack(_In_opt_ SECURITY_ATTRIBUTES* sa, 
    _In_ ULONG maxItemSize, _In_ ULONG maxItemCount, 
    _In_ ULONG_PTR maxSize, _In_opt_ PCWSTR name) {
	UNICODE_STRING uname{};
	if (name && *name) {
		RtlInitUnicodeString(&uname, name);
	}
	OBJECT_ATTRIBUTES attr;
	InitializeObjectAttributes(&attr, 
		uname.Length ? &uname : nullptr, 
		OBJ_CASE_INSENSITIVE | (sa && sa->bInheritHandle ? OBJ_INHERIT : 0) | (uname.Length ? OBJ_OPENIF : 0),
		uname.Length ? GetUserDirectoryRoot() : nullptr, 
		sa ? sa->lpSecurityDescriptor : nullptr);
	
	HANDLE hDataStack;
	auto status = NtCreateDataStack(&hDataStack, &attr, maxItemSize, maxItemCount, maxSize);
	if (NT_SUCCESS(status))
		return hDataStack;

	SetLastError(RtlNtStatusToDosError(status));
	return nullptr;
}

Next, we need to handle the native implementation. Since we just call our driver, we package the arguments in a helper structure and send it to the driver via NtDeviceIoControlFile:

NTSTATUS NTAPI NtCreateDataStack(_Out_ PHANDLE DataStackHandle,
    _In_opt_ POBJECT_ATTRIBUTES DataStackAttributes, 
    _In_ ULONG MaxItemSize, _In_ ULONG MaxItemCount, ULONG_PTR MaxSize) {
	DataStackCreate data;
	data.MaxItemCount = MaxItemCount;
	data.MaxItemSize = MaxItemSize;
	data.ObjectAttributes = DataStackAttributes;
	data.MaxSize = MaxSize;

	IO_STATUS_BLOCK ioStatus;
	return NtDeviceIoControlFile(g_hDevice, nullptr, nullptr,
        nullptr, &ioStatus, IOCTL_DATASTACK_CREATE, 
        &data, sizeof(data), DataStackHandle, sizeof(HANDLE));
}

Where is g_Device coming from? When our DataStack.Dll is loaded into a process, we can open a handle to the device exposed by the driver (which we have yet to implement). In fact, if we can’t obtain a handle, the DLL should fail to load:

HANDLE g_hDevice = INVALID_HANDLE_VALUE;

bool OpenDevice() {
	UNICODE_STRING devName;
	RtlInitUnicodeString(&devName, L"\\Device\\KDataStack");
	OBJECT_ATTRIBUTES devAttr;
	InitializeObjectAttributes(&devAttr, &devName, 0, nullptr, nullptr);
	IO_STATUS_BLOCK ioStatus;
	return NT_SUCCESS(NtOpenFile(&g_hDevice, GENERIC_READ | GENERIC_WRITE, &devAttr, &ioStatus, 0, 0));
}

void CloseDevice() {
	if (g_hDevice != INVALID_HANDLE_VALUE) {
		CloseHandle(g_hDevice);
		g_hDevice = INVALID_HANDLE_VALUE;
	}
}

BOOL APIENTRY DllMain(HMODULE hModule, DWORD reason, LPVOID) {
	switch (reason) {
		case DLL_PROCESS_ATTACH:
			DisableThreadLibraryCalls(hModule);
			return OpenDevice();

		case DLL_THREAD_ATTACH:
		case DLL_THREAD_DETACH:
		case DLL_PROCESS_DETACH:
			CloseDevice();
			break;
	}
	return TRUE;
}

OpenDevice uses the native NtOpenFile to open a handle, as the driver does not provide a symbolic link to make it slightly harder to reach it directly from user mode. If OpenDevice returns false, the DLL will unload.

Kernel Space

Now we move to the kernel side of things. Our driver must create a device object and expose IOCTLs for calls made from user mode. The additions to DriverEntry are pretty standard:

extern "C" NTSTATUS
DriverEntry(PDRIVER_OBJECT DriverObject, PUNICODE_STRING RegistryPath) {
	UNREFERENCED_PARAMETER(RegistryPath);

	auto status = DsCreateDataStackObjectType();
	if (!NT_SUCCESS(status)) {
		return status;
	}

	UNICODE_STRING devName = RTL_CONSTANT_STRING(L"\\Device\\KDataStack");
	PDEVICE_OBJECT devObj;
	status = IoCreateDevice(DriverObject, 0, &devName, FILE_DEVICE_UNKNOWN, 0, FALSE, &devObj);
	if (!NT_SUCCESS(status))
		return status;

	DriverObject->DriverUnload = OnUnload;
	DriverObject->MajorFunction[IRP_MJ_CREATE] = 
    DriverObject->MajorFunction[IRP_MJ_CLOSE] =
		[](PDEVICE_OBJECT, PIRP Irp) -> NTSTATUS {
		Irp->IoStatus.Status = STATUS_SUCCESS;
		IoCompleteRequest(Irp, IO_NO_INCREMENT);
		return STATUS_SUCCESS;
		};

	DriverObject->MajorFunction[IRP_MJ_DEVICE_CONTROL] = OnDeviceControl;

	return STATUS_SUCCESS;
}

The driver creates a single device object with the name “\Device\DataStack” that was used in DllMain to open a handle to that device. IRP_MJ_CREATE and IRP_MJ_CLOSE are supported to make the driver usable. Finally, IRP_MJ_DEVICE_CONTROL handling is set up (OnDeviceControl).

The job of OnDeviceControl is to propagate the data provided by helper structures to the real implementation of the native APIs. Here is the code that covers IOCTL_DATASTACK_CREATE:

NTSTATUS OnDeviceControl(PDEVICE_OBJECT, PIRP Irp) {
	auto stack = IoGetCurrentIrpStackLocation(Irp);
	auto& dic = stack->Parameters.DeviceIoControl;
	auto len = 0U;
	auto status = STATUS_INVALID_DEVICE_REQUEST;

	switch (dic.IoControlCode) {
		case IOCTL_DATASTACK_CREATE:
		{
			auto data = (DataStackCreate*)Irp->AssociatedIrp.SystemBuffer;
			if (dic.InputBufferLength < sizeof(*data)) {
				status = STATUS_BUFFER_TOO_SMALL;
				break;
			}
			HANDLE hDataStack;
			status = NtCreateDataStack(&hDataStack, 
                data->ObjectAttributes, 
                data->MaxItemSize, 
                data->MaxItemCount, 
                data->MaxSize);
			if (NT_SUCCESS(status)) {
				len = IoIs32bitProcess(Irp) ? sizeof(ULONG) : sizeof(HANDLE);
				memcpy(data, &hDataStack, len);
			}
			break;
		}
	}

	Irp->IoStatus.Status = status;
	Irp->IoStatus.Information = len;
	IoCompleteRequest(Irp, IO_NO_INCREMENT);
	return status;
}

NtCreateDataStack is called with the unpacked arguments. The only trick here is the use of IoIs32bitProcess to check if the calling process is 32-bit. If so, 4 bytes should be copied back as the handle instead of 8 bytes.

The real work of creating a DataStack object (finally), falls on NtCreateDataStack. First, we need to have a structure that manages DataStack objects. Here it is:

struct DataStack {
	LIST_ENTRY Head;
	FAST_MUTEX Lock;
	ULONG Count;
	ULONG MaxItemCount;
	ULONG_PTR Size;
	ULONG MaxItemSize;
	ULONG_PTR MaxSize;
};

The details are not important now, since we’re dealing with object creation only. But we should initialize the structure properly when the object is created. The first major step is telling the kernel to create a new object of DataStack type:

NTSTATUS NTAPI NtCreateDataStack(_Out_ PHANDLE DataStackHandle,
    _In_opt_ POBJECT_ATTRIBUTES DataStackAttributes, 
    _In_ ULONG MaxItemSize, _In_ ULONG MaxItemCount, ULONG_PTR MaxSize) {
	auto mode = ExGetPreviousMode();
	extern POBJECT_TYPE g_DataStackType;
	//
	// sanity check
	//
	if (g_DataStackType == nullptr)
		return STATUS_NOT_FOUND;

	DataStack* ds;
	auto status = ObCreateObject(mode, g_DataStackType, DataStackAttributes, mode, 
		nullptr, sizeof(DataStack), 0, 0, (PVOID*)&ds);
	if (!NT_SUCCESS(status)) {
		KdPrint(("Error in ObCreateObject (0x%X)\n", status));
		return status;
	}

ObCreateObject looks like this:

NTSTATUS NTAPI ObCreateObject(
	_In_ KPROCESSOR_MODE ProbeMode,
	_In_ POBJECT_TYPE ObjectType,
	_In_opt_ POBJECT_ATTRIBUTES ObjectAttributes,
	_In_ KPROCESSOR_MODE OwnershipMode,
	_Inout_opt_ PVOID ParseContext,
	_In_ ULONG ObjectBodySize,
	_In_ ULONG PagedPoolCharge,
	_In_ ULONG NonPagedPoolCharge,
	_Deref_out_ PVOID* Object);

ExGetPreviousMode returns the caller’s mode (UserMode or KernelMode enum values), and based off of that we ask ObCreateObject to make the relevant probing and security checks. ObjectType is our DataStack type object, ObjectBodySize is sizeof(DataStack), our data structure. The last parameter is where the object pointer is returned.

If this succeeds, we need to initialize the structure appropriately, and then add the object to the system “officially”, where the object header would be built as well:

DsInitializeDataStack(ds, MaxItemSize, MaxItemCount, MaxSize);
HANDLE hDataStack;
status = ObInsertObject(ds, nullptr, DATA_STACK_ALL_ACCESS, 0, nullptr, &hDataStack);
if (NT_SUCCESS(status)) {
	*DataStackHandle = hDataStack;
}
else {
	KdPrint(("Error in ObInsertObject (0x%X)\n", status));
}
return status;

DsInitializeDataStack is a helper function to initialize an empty DataStack:

void DsInitializeDataStack(DataStack* DataStack, ULONG MaxItemSize, ULONG MaxItemCount, ULONG_PTR MaxSize) {
	InitializeListHead(&DataStack->Head);
	ExInitializeFastMutex(&DataStack->Lock);
	DataStack->Count = 0;
	DataStack->MaxItemCount = MaxItemCount;
	DataStack->Size = 0;
	DataStack->MaxItemSize = MaxItemSize;
	DataStack->MaxSize = MaxSize;
}

This is it for CreateDataStack and its chain of called functions. Handling OpenDataStack is similar, and simpler, as the heavy lifting is done by the kernel.

Opening an Existing DataStack Object

OpenDataStack attempts to open a handle to an existing DataStack object by name:

HANDLE OpenDataStack(_In_ ACCESS_MASK desiredAccess, _In_ BOOL inheritHandle, _In_ PCWSTR name) {
	if (name == nullptr || *name == 0) {
		SetLastError(ERROR_INVALID_NAME);
		return nullptr;
	}

	UNICODE_STRING uname;
	RtlInitUnicodeString(&uname, name);
	OBJECT_ATTRIBUTES attr;
	InitializeObjectAttributes(&attr,
		&uname,
		OBJ_CASE_INSENSITIVE | (inheritHandle ? OBJ_INHERIT : 0),
		GetUserDirectoryRoot(),
		nullptr);
	HANDLE hDataStack;
	auto status = NtOpenDataStack(&hDataStack, desiredAccess, &attr);
	if (NT_SUCCESS(status))
		return hDataStack;

	SetLastError(RtlNtStatusToDosError(status));
	return nullptr;
}

Again, from a high-level perspective it looks similar to APIs like OpenSemaphore or OpenEvent. NtOpenDataStack will make a call to the driver via NtDeviceIoControlFile, packing the arguments:

NTSTATUS NTAPI NtOpenDataStack(_Out_ PHANDLE DataStackHandle, 
    _In_ ACCESS_MASK DesiredAccess, 
    _In_ POBJECT_ATTRIBUTES DataStackAttributes) {
	DataStackOpen data;
	data.DesiredAccess = DesiredAccess;
	data.ObjectAttributes = DataStackAttributes;

	IO_STATUS_BLOCK ioStatus;
	return NtDeviceIoControlFile(g_hDevice, nullptr, nullptr, nullptr, &ioStatus,
		IOCTL_DATASTACK_OPEN, &data, sizeof(data), DataStackHandle, sizeof(HANDLE));
}

Finally, the implementation of NtOpenDataStack in the kernel is surprisingly simple:

NTSTATUS NTAPI NtOpenDataStack(_Out_ PHANDLE DataStackHandle, 
    _In_ ACCESS_MASK DesiredAccess, 
    _In_ POBJECT_ATTRIBUTES DataStackAttributes) {
	return ObOpenObjectByName(DataStackAttributes, g_DataStackType, ExGetPreviousMode(),
		nullptr, DesiredAccess, nullptr, DataStackHandle);
}

The simplicity is thanks to the generic ObOpenObjectByName kernel API, which is not documented, but is exported, that attempts to open a handle to any named object:

NTSTATUS ObOpenObjectByName(
	_In_ POBJECT_ATTRIBUTES ObjectAttributes,
	_In_ POBJECT_TYPE ObjectType,
	_In_ KPROCESSOR_MODE AccessMode,
	_Inout_opt_ PACCESS_STATE AccessState,
	_In_opt_ ACCESS_MASK DesiredAccess,
	_Inout_opt_ PVOID ParseContext,
	_Out_ PHANDLE Handle);

That’s it for creating and opening a DataStack object. Let’s test it!

Testing

After deploying the driver to a test machine, we can write simple code to create a DataStack object (named or unnamed), and see if it works. Then, we’ll close the handle:

#include <Windows.h>
#include <stdio.h>
#include "..\DataStack\DataStackAPI.h"

int main() {
	HANDLE hDataStack = CreateDataStack(nullptr, 0, 100, 10 << 20, L"MyDataStack");
	if (!hDataStack) {
		printf("Failed to create data stack (%u)\n", GetLastError());
		return 1;
	}

	printf("Handle created: 0x%p\n", hDataStack);

	auto hOpen = OpenDataStack(GENERIC_READ, FALSE, L"MyDataStack");
	if (!hOpen) {
		printf("Failed to open data stack (%u)\n", GetLastError());
		return 1;
	}

	CloseHandle(hDataStack);
	CloseHandle(hOpen);
	return 0;
}

Here is what Process Explorer shows when the handle is open, but not yet closed:

Let’s check the kernel debugger:

kd> !object \Sessions\2\BaseNamedObjects\MyDataStack
Object: ffffc785bb6e8430  Type: (ffffc785ba4fd830) DataStack
    ObjectHeader: ffffc785bb6e8400 (new version)
    HandleCount: 1  PointerCount: 32769
    Directory Object: ffff92013982fe70  Name: MyDataStack
lkd> dt nt!_OBJECT_TYPE ffffc785ba4fd830
   +0x000 TypeList         : _LIST_ENTRY [ 0xffffc785`bb6e83e0 - 0xffffc785`bb6e83e0 ]
   +0x010 Name             : _UNICODE_STRING "DataStack"
   +0x020 DefaultObject    : (null) 
   +0x028 Index            : 0x4c 'L'
   +0x02c TotalNumberOfObjects : 1
   +0x030 TotalNumberOfHandles : 1
   +0x034 HighWaterNumberOfObjects : 1
   +0x038 HighWaterNumberOfHandles : 2
...

After opening the second handle (by name), the debugger reports two handles (different run):

lkd> !object ffffc585f68e25f0
Object: ffffc585f68e25f0  Type: (ffffc585ee55df10) DataStack
    ObjectHeader: ffffc585f68e25c0 (new version)
    HandleCount: 2  PointerCount: 3
    Directory Object: ffffaf8deb3c60a0  Name: MyDataStack

The source code can be found here.

In future parts, we’ll implement the actual DataStack functionality.

Creating Kernel Object Type (Part 1)

Windows provides much of its functionality via kernel objects. Common examples are processes, threads, mutexes, semaphores, sections, and many more. We can see the object types supported on a particular Windows system by using a tool such as Object Explorer, or in a more limited way – WinObj. Here is a view from Object Explorer:

Every object type has a name (e.g. “Process”), an index, the pool to use for allocating memory for these kind of objects (typically Non Paged pool or Paged pool), and a few more properties. The “dynamic” part in the above screenshot shows that an object type keeps track of the number of objects and handles currently used for that type. Object types are themselves objects, as is perhaps evident from the fact that there is an object type called “Type” (index 2, the first one), and its number of “objects” is the number of object types supported on this version of Windows.

User mode clients use kernel objects by invoking APIs. For example, CreateProcess creates a process object and a thread object, returning handles to both. OpenProcess, on the other hand, tries to obtain a handle to an existing process object, given its process ID and the access mask requested. Similar APIs exist for other object types. All this should be fairly familiar to reader of this blog.

A New Kernel Object Type

Can we create a new kernel object type, that provides some useful functionality to user-mode (and kernel-mode) clients? Perhaps we should first ask, why would we want to do that? As an alternative, we can create a kernel driver that exposes the desired functionality through I/O control codes, invoked with DeviceIoControl by clients. We can certainly create nice wrappers that provide nicer-looking functions so that clients do not need to see the DeviceIoControl calls.

I can see at two reasons to go the “new object type” approach:

  • It’s a great learning opportunity, and could be fun 🙂
  • We get lots of things for free, such as handle and objects management (handle count, ref count), sharing capabilities, just like any other kernel object, and some common APIs clients are already familiar with, like CloseHandle.

OK, let’s assume we want to go down this route. How do we create an object type, or a “generic” kernel object, for that matter. As it turns out, the kernel functions needed are exported, but they are not documented. We’ll use them anyway 😉

We’ll create an Empty WDM Driver in Visual Studio, delete the INF file so we are left with an empty project with the correct settings for the compiler and linker. For more information on creating driver projects, consult the official documentation, or my book, “Windows Kernel Programming, 2nd edition“.

We’ll add a C++ file to the project, and write our DriverEntry routine. At first, its only job is to create a new type object:

extern "C" NTSTATUS
DriverEntry(PDRIVER_OBJECT DriverObject, PUNICODE_STRING) {
    DriverObject->DriverUnload = OnUnload;
    return DsCreateDataStackObjectType();
}

The kernel object type we’ll implement is called “DataStack”, and it’s supposed to provide a stack-like functionality. You may be wondering what’s so special about that? Every language/library under the sun has some stack data structure. Implemented as kernel objects, these data stacks offer some benefits that are normally unavailable:

  • Thread Synchronization, so the data stack can be accessed freely by clients. Data race prevention is the burden of the implementation.
  • These data stacks can be shared between processes, something not offered by any stack implementation you find in languages/libraries.

You could argue that it would be possible to implement such data stacks on top of Section (File Mapping) objects, which allow sharing of memory, with some API that does all the heavy lifting. This is true in essence, but not ideal. The section could be misused by accessing it directly without regard to the data stack implemented. And besides, it’s not the point. You could come up with another kind of object that would not lend itself to easy implementation in other ways.

Back to DriverEntry: The only call is to a helper function, whose purpose is to create the object type. Creating an object type is done with ObCreateObjectType, declared like so:

NTSTATUS NTAPI ObCreateObjectType(
	_In_ PUNICODE_STRING TypeName,
	_In_ POBJECT_TYPE_INITIALIZER ObjectTypeInitializer,
	_In_opt_ PSECURITY_DESCRIPTOR sd,
	_Deref_out_ POBJECT_TYPE* ObjectType);

TypeName is the type name for the new type, which must be unique. ObjectTypeInitializer provides various properties for the type object, some of which we’ll examine momentarily. sd is an optional security descriptor to assign to the new type object, where NULL means the kernel will provide an appropriate default. ObjectType is the returned object type pointer, if successful. The POBJECT_TYPE is not defined in all its glory in the WDK headers, so it’s treated as a PVOID, but that’s fine. We won’t need to look inside.

The simplest way to create the type object would be like so:

UNICODE_STRING typeName = RTL_CONSTANT_STRING(L"DataStack");
OBJECT_TYPE_INITIALIZER init{ sizeof(init) };
auto status = ObCreateObjectType(&typeName, &init, nullptr,
    &g_DataStackType);

The OBJECT_TYPE_INITIALIZER has a Length first member, which must be initialized to the size of the structure, as is common in many Windows APIs. The rest of the structure is zeroed out, which is good enough for our first attempt. The returned pointer lands in a global variable (g_DataStackType), that we can use if needed.

The Unload routine may try to remove the new object type like so:

void OnUnload(PDRIVER_OBJECT DriverObject) {
    UNREFERENCED_PARAMETER(DriverObject);
    ObDereferenceObject(g_DataStackType);
}

Let’s see the effect this could has when the driver is deployed and loaded. First, Here is Object Explorer on a Windows 11 VM where the driver is deployed:

Notice the new object type, with an index of 76 and the name “DataStack”. There are zero objects and zero handles for this kind of object right now (no big surprise there). Let’s see what the kernel debugger has to say:

lkd> !object \objecttypes\datastack
Object: ffff8385bd5ff570 Type: (ffff8385b26a8d00) Type
ObjectHeader: ffff8385bd5ff540 (new version)
HandleCount: 0 PointerCount: 2
Directory Object: ffffc9067828b730 Name: DataStack

Clearly there is such a object type, and it has 2 references, one of which we are holding in our kernel variable. We can examine the object in its more specific role as a object type:

lkd> dt nt!_OBJECT_TYPE ffff8385bd5ff570
   +0x000 TypeList         : _LIST_ENTRY [ 0xffff8385`bd5ff570 - 0xffff8385`bd5ff570 ]
   +0x010 Name             : _UNICODE_STRING "DataStack"
   +0x020 DefaultObject    : (null) 
   +0x028 Index            : 0x4c 'L'
   +0x02c TotalNumberOfObjects : 0
   +0x030 TotalNumberOfHandles : 0
   +0x034 HighWaterNumberOfObjects : 0
   +0x038 HighWaterNumberOfHandles : 0
   +0x040 TypeInfo         : _OBJECT_TYPE_INITIALIZER
   +0x0b8 TypeLock         : _EX_PUSH_LOCK
   +0x0c0 Key              : 0x61746144
   +0x0c8 CallbackList     : _LIST_ENTRY [ 0xffff8385`bd5ff638 - 0xffff8385`bd5ff638 ]
   +0x0d8 SeMandatoryLabelMask : 0
   +0x0dc SeTrustConstraintMask : 0

Note the Name and the fact that there are zero objects and handles.

Let’s see what happens when we unload the driver. Since we’re dereferencing our reference (g_DataStackType), the object type is still alive, as the kernel holds to another reference (this was generated in a different run of the system, so the addresses are not the same):

lkd> !object \objecttypes\datastack
Object: ffffc081d94fd330 Type: (ffffc081cd6af5e0) Type
ObjectHeader: ffffc081d94fd300 (new version)
HandleCount: 0 PointerCount: 1
Directory Object: ffff968b2c233a10 Name: DataStack

Why do we have another reference? The type object is permanent, as we can see if we examine its object header:

lkd> dt nt!_OBJECT_HEADER ffffc081d94fd300
+0x000 PointerCount : 0n1
+0x008 HandleCount : 0n0
+0x008 NextToFree : (null)
+0x010 Lock : _EX_PUSH_LOCK
+0x018 TypeIndex : 0xc5 ''
+0x019 TraceFlags : 0 ''
+0x019 DbgRefTrace : 0y0
+0x019 DbgTracePermanent : 0y0
+0x01a InfoMask : 0x3 ''
+0x01b Flags : 0x13 ''
+0x01b NewObject : 0y1
+0x01b KernelObject : 0y1
+0x01b KernelOnlyAccess : 0y0
+0x01b ExclusiveObject : 0y0
+0x01b PermanentObject : 0y1
…

We could remove the “permanent” flag from the type object by making it “temporary” (a.k.a. normal) in our Unload routine, like so:

HANDLE hType;
auto status = ObOpenObjectByPointer(g_DataStackType,
    OBJ_KERNEL_HANDLE, nullptr, 0, nullptr, KernelMode, &hType);
if (NT_SUCCESS(status)) {
    status = ZwMakeTemporaryObject(hType);
    ZwClose(hType);
}
ObDereferenceObject(g_DataStackType);

Calling ZwMakeTemporaryObject (a documented API) removes the permanent bit, so that ObDereferenceObject removes the last reference of the DataStack object type. Unfortunately, this works too well – it also causes the system to crash (BSOD), and that’s because the kernel does not expect type objects to be deleted. It makes sense, since objects of that type may still be alive. Even if the kernel could determine that no objects of that type are alive right now, and allow the deletion, what would that mean for future creations? Worse, it’s possible to create objects privately without a header (very common in the kernel), which means the kernel is unaware of these objects to begin with. The bottom line is, type objects cannot be destroyed safely. In our case, it means the driver should remain alive at all times, but regardless, it should not attempt to destroy the type object.

Object Type Customization

The code to create the DataStack object type did not do any customizations. Possible customizations are available via the OBJECT_TYPE_INITIALIZER structure:

typedef struct _OBJECT_TYPE_INITIALIZER {
	USHORT Length;
	union {
		USHORT Flags;
		struct {
			UCHAR CaseInsensitive : 1;
			UCHAR UnnamedObjectsOnly : 1;
			UCHAR UseDefaultObject : 1;
			UCHAR SecurityRequired : 1;
			UCHAR MaintainHandleCount : 1;
			UCHAR MaintainTypeList : 1;
			UCHAR SupportsObjectCallbacks : 1;
			UCHAR CacheAligned : 1;
			UCHAR UseExtendedParameters : 1;
			UCHAR _Reserved : 7;
		};
	};

	ULONG ObjectTypeCode;
	ULONG InvalidAttributes;
	GENERIC_MAPPING GenericMapping;
	ULONG ValidAccessMask;
	ULONG RetainAccess;
	POOL_TYPE PoolType;
	ULONG DefaultPagedPoolCharge;
	ULONG DefaultNonPagedPoolCharge;
	OB_DUMP_METHOD DumpProcedure;
	OB_OPEN_METHOD OpenProcedure;
	OB_CLOSE_METHOD CloseProcedure;
	OB_DELETE_METHOD DeleteProcedure;
	OB_PARSE_METHOD ParseProcedure;
	OB_SECURITY_METHOD SecurityProcedure;
	OB_QUERYNAME_METHOD QueryNameProcedure;
	OB_OKAYTOCLOSE_METHOD OkayToCloseProcedure;
	ULONG WaitObjectFlagMask;
	USHORT WaitObjectFlagOffset;
	USHORT WaitObjectPointerOffset;
} OBJECT_TYPE_INITIALIZER, * POBJECT_TYPE_INITIALIZER;

This is quite a structure. The various *Procedure members are callbacks. You can find their prototypes in the ReactOS source code, but for now you can just replace all of them with an opaque PVOID to make it easier to deal with the structure. At this point, we’ll customize our object type’s creation like so:

UNICODE_STRING typeName = RTL_CONSTANT_STRING(L"DataStack");
OBJECT_TYPE_INITIALIZER init{ sizeof(init) };
init.PoolType = NonPagedPoolNx;
init.DefaultNonPagedPoolCharge = sizeof(DataStack);
init.ValidAccessMask = DATA_STACK_ALL_ACCESS;
GENERIC_MAPPING mapping{
    STANDARD_RIGHTS_READ | DATA_STACK_QUERY,
    STANDARD_RIGHTS_WRITE | DATA_STACK_PUSH | DATA_STACK_POP | 
        DATA_STACK_CLEAR,
    STANDARD_RIGHTS_EXECUTE | SYNCHRONIZE, DATA_STACK_ALL_ACCESS
};
init.GenericMapping = mapping;

auto status = ObCreateObjectType(&typeName, &init, nullptr,
    &g_DataStackType);

The PoolType member indicates from which pool objects of this type should be allocated. I’ve selected the Non Paged pool with no execute allowed. DataStack is the structure we’ll use for the implementation of the type. We’ll see what that looks like in the next post. For now, we indicate to the kernel that the base memory consumption of objects of DataStack type is the size of that structure.

Next, we see some constants being used that I have defined in a file that is going to be shared between the driver and user mode clients that has some definitions, similar to other object kinds:

#define DATA_STACK_QUERY	0x1
#define DATA_STACK_PUSH		0x2
#define DATA_STACK_POP		0x4
#define DATA_STACK_CLEAR	0x8

#define DATA_STACK_ALL_ACCESS (STANDARD_RIGHTS_REQUIRED | SYNCHRONIZE | DATA_STACK_QUERY | DATA_STACK_PUSH | DATA_STACK_POP | DATA_STACK_CLEAR)

These #defines provide specific access mask bits for objects of the DataStack type. We’ll use these in the implementation so that only powerful-enough handles would allow the relevant access. In the object type creation we use these in the ValidAccessMask member to indicate what is valid to request by clients, and also to provide generic mapping. Generic mapping is a standard feature used by Windows to map generic rights (GENERIC_READ, GENERIC_WRITE, GENERIC_EXECUTE, and GENERIC_ALL) to specific rights appropriate for the object type. You can see these mappings in Object Explorer for all object types. For example, if a client asks for GENERIC_READ when opening a DataStack object, the access requested is going to be DATA_STACK_QUERY.

What’s Next?

We have an object type, that’s great! But we can’t create objects of this type, nor use it in any way. We’re missing the actual implementation. From a user-mode perspective, we’d like to expose an API, not much different in spirit than other object types:

NTSTATUS NTAPI NtCreateDataStack(
	_Out_ PHANDLE DataStackHandle, 
	_In_opt_ POBJECT_ATTRIBUTES DataStackAttributes, 
	_In_ ULONG MaxItemSize, 
	_In_ ULONG MaxItemCount, 
	ULONG_PTR MaxSize);
NTSTATUS NTAPI NtOpenDataStack(
	_Out_ PHANDLE DataStackHandle, 
	_In_ ACCESS_MASK DesiredAccess, 
	_In_opt_ POBJECT_ATTRIBUTES DataStackAttributes);
NTSTATUS NTAPI NtQueryDataStack(
	_In_ HANDLE DataStackHandle, 
	_In_ DataStackInformationClass InformationClass, 
	_Out_ PVOID Buffer, 
	_In_ ULONG BufferSize, 
	_Out_opt_ PULONG ReturnLength);
NTSTATUS NTAPI NtPushDataStack(
	_In_ HANDLE DataStackHandle, 
	_In_ PVOID Item, 
	_In_ ULONG ItemSize);
NTSTATUS NTAPI NtPopDataStack(
	_In_ HANDLE DataStackHandle, 
	_Out_ PVOID Buffer, 
	_Inout_ PULONG BufferSize);
NTSTATUS NTAPI NtClearDataStack(_In_ HANDLE DataStackHandle);

if you’re familiar with the Windows Native API, the “spirit” of these DataStack API is the same. The big questions are, how do we implement these APIs – in user mode and kernel mode? We’ll look into it in the next post.

I have not provided a prebuilt project for this part. Feel free to type things yourself, as there is not too much code at this point. In the next post, I’ll provide a Github repo that has all the code. See you then!

Kernel Programming MasterClass

It’s been a while since I have taught a public class. I am happy to launch a new class that combines Windows Kernel Programming and Advanced Windows Kernel Programming into a 6-day (48 hours) masterclass. The full syllabus can be found here.

There is a special bonus for those registering for this class: you get one free recorded course from Windows Internals and Programming (trainsec.net)!

For those who have attended the Windows Kernel Programming class, and wish to capture the more “advanced” stuff, I offer one of two options:

  • Join the second part (3 days) of the training, at 60% of the entire course cost.
  • Register for the entire course with a 20% discount, and get the free recorded course.

The course is planned to stretch from mid-December to late-January, in 4-hour chunks to make it easier to combine with other activities and also have the time to do lab exercises (very important for truly understanding the material). Yes, I know christmas is in the middle there, I’ll keep the last week of December free 🙂

The course will be conducted remotely using MS Teams or similar.

Dates and times (not final, but unlikely to change much, if at all):

  • Dec 2023: 12, 14, 19, 21: 12pm-4pm EST (9am-1pm PST)
  • Jan 2024: 2, 4, 9, 11, 16, 18, 23, 25: 12pm-4pm EST (9am-1pm PST)

Training cost:

  • Early bird (until Nov 22): 1150 USD
  • After Nov 22: 1450 USD

If you’d like to register, please write to zodiacon@live.com with your name, company name (if any), and time zone. If you have any question, use the same email or DM me on X (Twitter) or Linkedin.

Next Windows Kernel Programming Class

I’m happy to announce the next 5-day virtual Windows Kernel Programming class to be held in October. The syllabus for the class can be found here. A notable addition to the class is an introduction to the Kernel Mode Driver Framework (KMDF).

Dates and Times (all in October 2022), times based on London:
11 (full day): 4pm to 12am
12 (full day): 4pm to 12am
13 (half day): 4pm to 8pm
17 (half day): 4pm to 8pm
18 (full day): 4pm to 12am
19 (half day): 4pm to 8pm
20 (half day): 4pm to 8pm

The class will be recorded and provided to the participants.

Cost:
900 USD if paid by an individual
1700 USD if paid by a company
Previous participants of my classes get 10% off. Multiple participants from the same company get a discount as well (talk to me).

Registration
To register, send email to zodiacon@live.com and provide the name(s) and email(s) of the participant(s), the company name (if any), and your time zone (for my information, although I cannot change course times).

Feel free to contact me for any questions or comments via email, twitter (@zodiacon) or Linkedin.

Registration is open for the Windows Internals training

My schedule has been a mess in recent months, and continues to be so for the next few months. However, I am opening registration today for the Windows Internals training with some date changes from my initial plan.

Here are the dates and times (all based on London time) – 5 days total:

  • July 6: 4pm to 12am (full day)
  • July 7: 4pm to 8pm
  • July 11: 4pm to 12am (full day)
  • July 12, 13, 14, 18, 19: 4pm to 8pm

Training cost is 800 USD, if paid by an individual, or 1500 USD if paid by a company. Participants from Ukraine (please provide some proof) are welcome with a 90% discount (paying 80 USD, individual payments only).

If you’d like to register, please send me an email to zodiacon@live.com with “Windows Internals training” in the title, provide your full name, company (if any), preferred contact email, and your time zone. The basic syllabus can be found here. if you’ve sent me an email before when I posted about my upcoming classes, you don’t have to do that again – I will send full details soon.

The sessions will be recorded, so can watch any part you may be missing, or that may be somewhat overwhelming in “real time”.

As usual, if you have any questions, feel free to send me an email, or DM me on twitter (@zodiacon) or Linkedin (https://www.linkedin.com/in/pavely/).

Next Windows Kernel Programming Training

Today I’m announcing the next public remote Windows Kernel Programming training. This is a 5-day training scheduled for October: 4, 5, 7, 11, 13. Times: 12pm to 8pm, London Time.

The syllabus can be found here. It may be slightly modified by the time the class starts, but not by much. This is a development-heavy course, so be prepared to write lots of code!

Cost: 800 USD if paid by an individual, 1500 USD if paid by a company. Previous participants of the my classes get 10% discount. Multiple participants from the same company are entitled to a discount (email me for the details).

To register, send an email to zodiacon@live.com and specify “Windows Kernel Programming Training” in the title. The email should include your name, preferred email for communication, and company name (if any).

The training sessions will be recorded and provided to the participants.

Please read carefully the pre-requisites for this class. You should especially be comfortable coding in C (any C++ used in the class will be explained). In case of any doubt, talk to me.
If you have any questions, feel free to shoot me an email, or DM me on twitter (@zodiacon) or Linkedin (https://www.linkedin.com/in/pavely/).