
A while back I blogged about the differences between the virtual desktop feature exposed to users on Windows 10/11, and the Desktops tool from Sysinternals. In this post, I’d like to shed some more light on Window Stations, desktops, and windows. I assume you have read the aforementioned blog post before continuing.
We know that Window Stations are contained in sessions. Can we enumerate these? The EnumWindowStations API is available in the Windows API, but it only returns the Windows Stations in the current session. There is no “EnumSessionWindowStations”. Window Stations, however, are named objects, and so are visible in tools such as WinObj (running elevated):
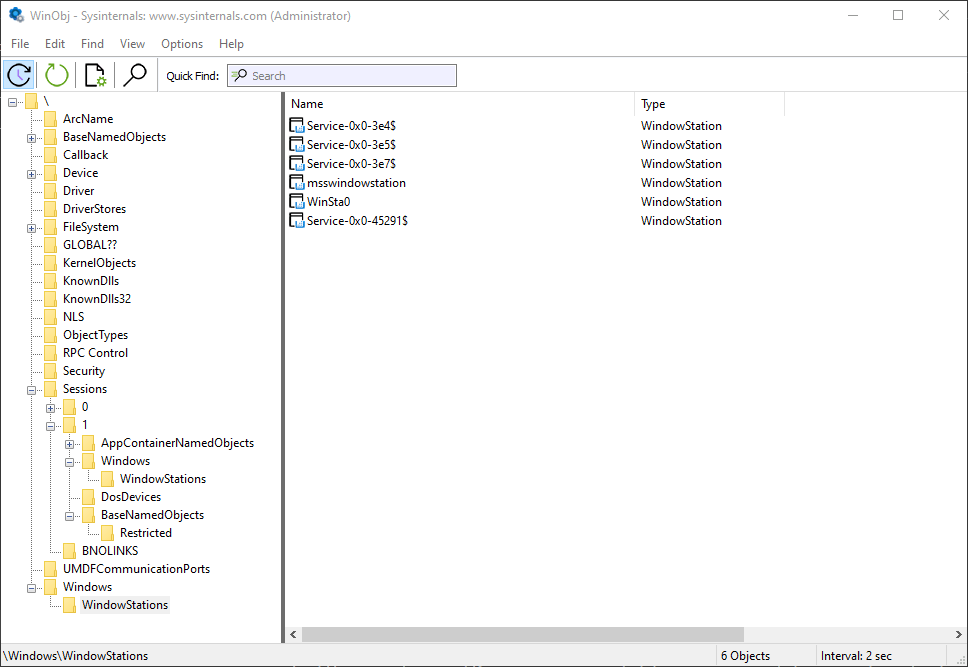
Window stations in session 0
The Window Stations in session 0 are at \Windows\WindowStations
The Window Stations in session x are at \Sessions\x\Windows\WindowStations
The OpenWindowStation API only accepts a “local” name, under the callers session. The native NtUserOpenWindowStation API (from Win32u.dll) is more flexible, accepting a full object name:
HWINSTA NtUserOpenWindowStation(POBJECT_ATTRIBUTES attr, ACCESS_MASK access);
Here is an example that opens the “msswindowstation” Window Station:
#include <Windows.h>
#include <winternl.h>

#pragma comment(lib, "ntdll")

HWINSTA NTAPI _NtUserOpenWindowStation(_In_ POBJECT_ATTRIBUTES attr, _In_ ACCESS_MASK access);
int main() {
	// force Win32u.DLL to load
	::LoadLibrary(L"user32");
	auto NtUserOpenWindowStation = (decltype(_NtUserOpenWindowStation)*)
		::GetProcAddress(::GetModuleHandle(L"win32u"), "NtUserOpenWindowStation");

	UNICODE_STRING winStaName;
	RtlInitUnicodeString(&winStaName, L"\\Windows\\WindowStations\\msswindowstation");
	OBJECT_ATTRIBUTES winStaAttr;
	InitializeObjectAttributes(&winStaAttr, &winStaName, 0, nullptr, nullptr);
	auto hWinSta = NtUserOpenWindowStation(&winStaAttr, READ_CONTROL);
	if (hWinSta) {
        // do something with hWinSta
        ::CloseWindowStation(hWinSta);
    }
You may or may not have enough power to open a handle with the required access – depending on the Window Station in question. Those in session 0 are hardly accessible from non-session 0 processes, even with the SYSTEM account. You can examine their security descriptor with the kernel debugger (as other tools will return access denied):
lkd> !object \Windows\WindowStations\msswindowstation
Object: ffffe103f5321c00  Type: (ffffe103bb0f0ae0) WindowStation
    ObjectHeader: ffffe103f5321bd0 (new version)
    HandleCount: 4  PointerCount: 98285
    Directory Object: ffff808433e412b0  Name: msswindowstation
lkd> dt nt!_OBJECT_HEADER ffffe103f5321bd0

   +0x000 PointerCount     : 0n98285
   +0x008 HandleCount      : 0n4
   +0x008 NextToFree       : 0x00000000`00000004 Void
   +0x010 Lock             : _EX_PUSH_LOCK
   +0x018 TypeIndex        : 0xa2 ''
   +0x019 TraceFlags       : 0 ''
   +0x019 DbgRefTrace      : 0y0
   +0x019 DbgTracePermanent : 0y0
   +0x01a InfoMask         : 0xe ''
   +0x01b Flags            : 0 ''
   +0x01b NewObject        : 0y0
   +0x01b KernelObject     : 0y0
   +0x01b KernelOnlyAccess : 0y0
   +0x01b ExclusiveObject  : 0y0
   +0x01b PermanentObject  : 0y0
   +0x01b DefaultSecurityQuota : 0y0
   +0x01b SingleHandleEntry : 0y0
   +0x01b DeletedInline    : 0y0
   +0x01c Reserved         : 0
   +0x020 ObjectCreateInfo : 0xfffff801`21c53940 _OBJECT_CREATE_INFORMATION
   +0x020 QuotaBlockCharged : 0xfffff801`21c53940 Void
   +0x028 SecurityDescriptor : 0xffff8084`3da8aa6c Void
   +0x030 Body             : _QUAD
lkd> !sd 0xffff8084`3da8aa60
->Revision: 0x1
->Sbz1    : 0x0
->Control : 0x8014
            SE_DACL_PRESENT
            SE_SACL_PRESENT
            SE_SELF_RELATIVE
->Owner   : S-1-5-18
->Group   : S-1-5-18
->Dacl    :
->Dacl    : ->AclRevision: 0x2
->Dacl    : ->Sbz1       : 0x0
->Dacl    : ->AclSize    : 0x1c
->Dacl    : ->AceCount   : 0x1
->Dacl    : ->Sbz2       : 0x0
->Dacl    : ->Ace[0]: ->AceType: ACCESS_ALLOWED_ACE_TYPE
->Dacl    : ->Ace[0]: ->AceFlags: 0x0
->Dacl    : ->Ace[0]: ->AceSize: 0x14
->Dacl    : ->Ace[0]: ->Mask : 0x0000011b
->Dacl    : ->Ace[0]: ->SID: S-1-1-0
You can become SYSTEM to help with access by using PsExec from Sysinternals to launch a command window (or whatever) as SYSTEM but still run in the interactive session:
psexec -s -i -d cmd.exe
If all else fails, you may need to use the “Take Ownership” privilege to make yourself the owner of the object and change its DACL to allow yourself full access. Apparently, even that won’t work, as getting something from a Window Station in another session seems to be blocked (see replies in Twitter thread). READ_CONTROL is available to get some basic info.
Here is a screenshot of Object Explorer running under SYSTEM that shows some details of the “msswindowstation” Window Station:

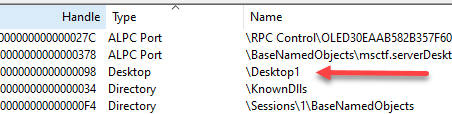
Guess which processes hold handles to this hidden Windows Station?

Once you are able to get a Window Station handle, you may be able to go one step deeper by enumerating desktops, if you managed to get at least WINSTA_ENUMDESKTOPS access mask:
::EnumDesktops(hWinSta, [](auto deskname, auto param) -> BOOL {
	printf(" Desktop: %ws\n", deskname);
	auto h = (HWINSTA)param;
	return TRUE;
	}, (LPARAM)hWinSta);
Going one level deeper, you can enumerate the top-level windows in each desktop (if any). For that you will need to connect the process to the Window Station of interest and then call EnumDesktopWindows:
void DoEnumDesktopWindows(HWINSTA hWinSta, PCWSTR name) {
	if (::SetProcessWindowStation(hWinSta)) {
		auto hdesk = ::OpenDesktop(name, 0, FALSE, DESKTOP_READOBJECTS);
		if (!hdesk) {
			printf("--- failed to open desktop %ws (%d)\n", name, ::GetLastError());
			return;
		}
		static WCHAR pname[MAX_PATH];
		::EnumDesktopWindows(hdesk, [](auto hwnd, auto) -> BOOL {
			static WCHAR text[64];
			if (::IsWindowVisible(hwnd) && ::GetWindowText(hwnd, text, _countof(text)) > 0) {
				DWORD pid;
				auto tid = ::GetWindowThreadProcessId(hwnd, &pid);
				auto hProcess = ::OpenProcess(PROCESS_QUERY_LIMITED_INFORMATION, FALSE, pid);
				BOOL exeNameFound = FALSE;
				PWSTR exeName = nullptr;
				if (hProcess) {
					DWORD size = MAX_PATH;
					exeNameFound = ::QueryFullProcessImageName(hProcess, 0, pname, &size);
					::CloseHandle(hProcess);
					if (exeNameFound) {
						exeName = ::wcsrchr(pname, L'\\');
						if (exeName == nullptr)
							exeName = pname;
						else
							exeName++;
					}
				}
				printf("  HWND: 0x%08X PID: 0x%X (%d) %ws TID: 0x%X (%d): %ws\n",
					(DWORD)(DWORD_PTR)hwnd, pid, pid,
					exeNameFound ? exeName : L"", tid, tid, text);
			}
			return TRUE;
			}, 0);
		::CloseDesktop(hdesk);
	}
}
Calling SetProcessWindowStation can only work with a Windows Station that belongs to the current session.
Here is an example output for the interactive session (Window Stations enumerated with EnumWindowStations):
Window station: WinSta0
 Desktop: Default
  HWND: 0x00010E38 PID: 0x4D04 (19716) Zoom.exe TID: 0x5FF8 (24568): ZPToolBarParentWnd
  HWND: 0x000A1C7A PID: 0xB804 (47108) VsDebugConsole.exe TID: 0xDB50 (56144): D:\Dev\winsta\x64\Debug\winsta.exe
  HWND: 0x00031DE8 PID: 0xBF40 (48960) devenv.exe TID: 0x94E8 (38120): winsta - Microsoft Visual Studio Preview
  HWND: 0x00031526 PID: 0x1384 (4996) msedge.exe TID: 0xE7C (3708): zodiacon/ObjectExplorer: Explore Kernel Objects on Windows and
  HWND: 0x00171A9A PID: 0xA40C (41996)  TID: 0x9C08 (39944): WindowStation (\Windows\WindowStations\msswindowstation)
  HWND: 0x000319D0 PID: 0xA40C (41996)  TID: 0x9C08 (39944): Object Manager - Object Explorer 2.0.2.0 (Administrator)
  HWND: 0x001117DC PID: 0x253C (9532) ObjExp.exe TID: 0x9E10 (40464): Object Manager - Object Explorer 2.0.2.0 (Administrator)
  HWND: 0x00031CA8 PID: 0xBE5C (48732) devenv.exe TID: 0xC250 (49744): OpenWinSta - Microsoft Visual Studio Preview (Administrator)
  HWND: 0x000B1884 PID: 0xA8A0 (43168) DbgX.Shell.exe TID: 0xA668 (42600):  - KD '', Local Connection  - WinDbg 1.2306.12001.0 (Administra
...
  HWND: 0x000101C8 PID: 0x3598 (13720) explorer.exe TID: 0x359C (13724): Program Manager
Window station: Service-0x0-45193$
 Desktop: sbox_alternate_desktop_0x6A80
 Desktop: sbox_alternate_desktop_0xA94C
 Desktop: sbox_alternate_desktop_0x3D8C
 Desktop: sbox_alternate_desktop_0x7EF8
 Desktop: sbox_alternate_desktop_0x72FC
 Desktop: sbox_alternate_desktop_0x27B4
 Desktop: sbox_alternate_desktop_0x6E80
 Desktop: sbox_alternate_desktop_0x6C54
 Desktop: sbox_alternate_desktop_0x68C8
 Desktop: sbox_alternate_desktop_0x691C
 Desktop: sbox_alternate_desktop_0x4150
 Desktop: sbox_alternate_desktop_0x6254
 Desktop: sbox_alternate_desktop_0x5B9C
 Desktop: sbox_alternate_desktop_0x59B4
 Desktop: sbox_alternate_desktop_0x1384
 Desktop: sbox_alternate_desktop_0x5480
The desktops in the Window Station “Service-0x0-45193$” above don’t seem to have top-level visible windows.
You can also access the clipboard and atom table of a given Windows Station, if you have a powerful enough handle. I’ll leave that as an exercise as well.
Finally, what about session enumeration? That’s the easy part – no need to call NtOpenSession with Session objects that can be found in the “\KernelObjects” directory in the Object Manager’s namespace – the WTS family of functions can be used. Specifically, WTSEnumerateSessionsEx can provide some important properties of a session:
void EnumSessions() {
	DWORD level = 1;
	PWTS_SESSION_INFO_1 info;
	DWORD count = 0;
	::WTSEnumerateSessionsEx(WTS_CURRENT_SERVER_HANDLE, &level, 0, &info, &count);
	for (DWORD i = 0; i < count; i++) {
		auto& data = info[i];
		printf("Session %d (%ws) Username: %ws\\%ws State: %s\n", data.SessionId, data.pSessionName,
			data.pDomainName ? data.pDomainName : L"NT AUTHORITY", data.pUserName ? data.pUserName : L"SYSTEM",
			StateToString((WindowStationState)data.State));
    }
	::WTSFreeMemory(info);
}
What about creating a process to use a different Window Station and desktop? One member of the STARTUPINFO structure passed to CreateProcess (lpDesktop) allows setting a desktop name and an optional Windows Station name separated by a backslash (e.g. “MyWinSta\MyDesktop”).
There is more to Window Stations and Desktops that meets the eye… this should give interested readers a head start in doing further research.