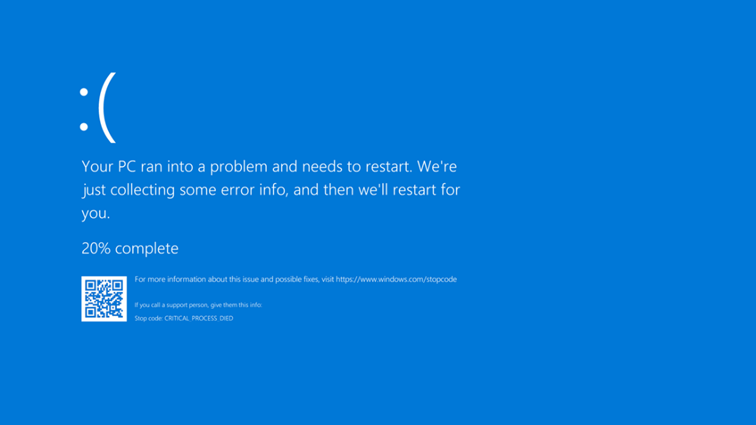
Millions of machines around the world crashed a few days ago, showing the dreaded “Blue Screen of Death” (BSOD), affecting banks, airports, hospitals, and many other businesses, all using the Windows OS and CrowdStrike’s Endpoint Detection and Response (EDR) software. What was going on? How can such a calamity happen in one single swoop?
First, foul play was suspected – a cyber security attack perhaps. But it turned out to be a bad update of CrowdStrike’s “Falcon” software agent that caused all this mess. What is a BSOD anyway?
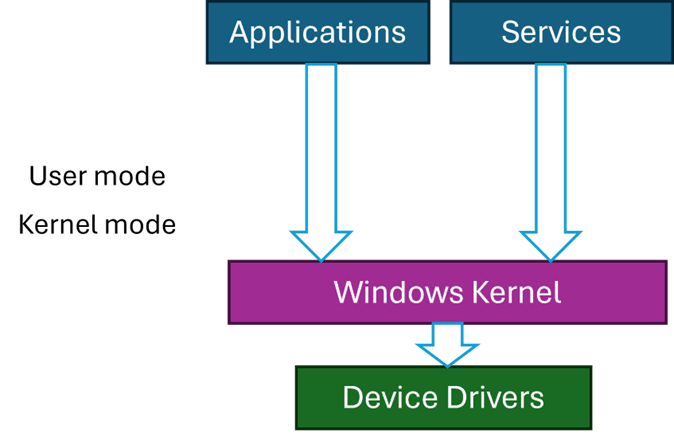
Code running on Windows can run in two primary modes – user mode and kernel mode. User mode is restricted in its access, which cannot harm the OS. This is the mode applications run with – such as Explorer, Word, Notepad, and any other application. Kernel mode, however, has (almost) unlimited power. But, as the American hero movies like to say, “With great power comes great responsibility” – and this is where things can go wrong.
Kernel code is trusted, by definition, because it can do anything. The Windows kernel is the main part of kernel space, but third-party components may be installed in the kernel, called device drivers. Classic device drivers are required to manage hardware devices – connecting them to the rest of the OS. The fact that you can move your cursor with the mouse, see something on the screen, hear game sounds, etc., means there are device drivers dealing with the hardware correctly, some of which are not written by Microsoft.
If a driver misbehaves, such as causing an exception to occur, the system crashes with the infamous BSOD. This is not some kind of punishment, but a protection mechanism. If a driver misbehaves (or any other kernel component), it is best to stop now, rather than letting the code continue execution which might cause more damage, like data corruption, and even prevent Windows from starting successfully.
Third party drivers are the only entities that Microsoft has no full control over. Drivers must be properly signed, but that only guarantees that they have not been tampered with, as it does not necessarily guarantee quality.
Most Windows systems have some Anti-virus or EDR software protecting them. By default, you get Windows Defender, but there are more powerful EDRs out there, CrowdStrike’s Falcon being one of the leaders in this space.
The “incident” involved a bad update that caused a BSOD when Windows restarted. Restarting again did not help, as a BSOD was showing immediately because of a bug in the driver when it’s loaded and initialized. The only recourse was to boot the system in Safe Mode, where only a minimal set of drivers is loaded, disable the problematic driver, and reboot again. Unfortunately, this has to be done manually on millions of machines.
The Windows kernel treats all kernel components in the same way, regardless of whether that component is from Microsoft or not. Any driver, no matter how insignificant, that causes an unhandled exception, will crash the system with a BSOD. Maybe it would be wise to somehow designate drivers as “important” or “not that important” so they may be treated differently in case of failure. But that is not how Windows works, and in any case, an anti-malware driver is likely to be tagged as “important”.
This entire incident certainly raises questions and concerns – a single point of failure has shown itself in full force. Perhaps a different approach to handling kernel components should be considered.
Personally, I was never comfortable with Windows uniform treatment of kernel components and drivers, but in practice it’s unclear what would be a good way to deal with such exceptions. One alternative is to write drivers in user mode, and many are written in this way, especially to handle relatively slow devices, like USB devices. This works well, but is not good enough for an EDR’s needs.
Perhaps specifically for anti-malware drivers, any unhandled exception should be treated differently by disabling the driver in some way. Not easy to do – the driver has typically registered with the kernel (e.g. PsSetCreateProcessNotifyRoutineExand others), its callbacks may be running right now – how would the kernel “disable” it safely. I don’t think there is a safe way to do that without significant changes in driver protocols. The best one case do (in theory) is issue a BSOD, but disable the offending driver automatically, so that the next restart will work, and a warning can be issued to the user.
This is not ideal, but is certainly better than the alternative experienced in the recent crash. Why is it not ideal? First, the system will be unprotected, unless some default (like Defender) would automatically take over. Second, it’s difficult to determine with 100% certainty that the driver causing the crash is the ultimate culprit. For example, another (buggy) driver may write to anywhere in kernel space, including memory that may belong to our anti-malware driver, and that write operation does not cause an immediate crash since the memory is valid. Later, our driver will stumble upon the bad data and crash. Even so, some kind of mechanism to prevent the widespread crash must be set in place.
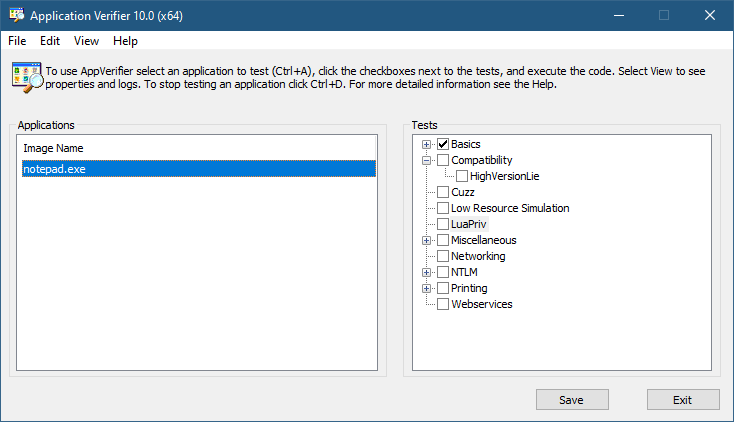
The Application Verifier tool that is part of the Windows SDK provide a way to analyze processes for various types of misbehavior. The GUI provided looks like the following:
Application Verifier application window
To add an application, you can browse your file system and select an executable. The Application Verifier settings are based around the executable name only – not a full path. This is because verifier settings are stored in a subkey under Image File Execution Options with the name of the executable. For the notepad example above, you’ll find the following in the Registry:
Key for notepad.exe under the IFEO subkey
This IFEO subkey is used for NT Global Flags settings, one of which is using the Application Verifier. The GlobalFlag value is shown to be 0x100, which is the bit used for the verifier. Another way to set it without any extra information is using the GFlags tool, part of the Debugging Tools for Windows package:
GFlags tool
The Application Verifier lists a bunch of DLLs under the VerifierDLLs value. Each one must be located in the system directory (e.g., c:\Windows\System32). Full paths are not supported; this is intentional, because the list of DLLs are going to be loaded to any process running the specified executable, and it would be risky to load DLLs from arbitrary locations in the file system. The system directory, as well as the IFEO key are normally write-accessible by administrators only.
The list of verifier DLLs is selected based on the set of tests selected by the user on the right hand side of the GUI. You’ll find subkeys that are used by the system-provided verifier DLLs with more settings related to the tests selected.
The nice thing about any verifier DLL specified, is that these DLLs are loaded early in the process lifetime, by verifier.dll (in itself loaded by NTDLL.dll), before any other DLLs are loaded into the process. Even attaching a debugger to the process while launching it would “miss” the loading of these DLLs.
This behavior makes this technique attractive for injecting a DLL into arbitrary processes. It’s even possible to enable Application Verifier globally and even dynamically (without the need to restart the system), so that these DLLs are injected into all processes (except protected processes).
Writing a Verifier DLL
Application Verifier tests descriptions is not the focus of this post. Rather, we’ll look into what it takes to create such a DLL that can be injected early and automatically into processes of our choice. As we’ll see, it’s not just about mere injection. The verifier infrastructure (part of verifier.dll) provides convenient facilities to hook functions.
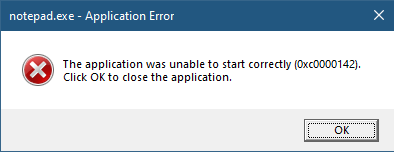
If we create a standard DLL, set up the verifier entries while adding our DLL to the list of verifier DLLs (possibly removing the “standard” ones), and try to run our target executable (say, notepad), we get the following nasty message box:
The process shuts down, which means that if a verifier DLL fails to be properly processed, the process terminates rather than “skipping” the DLL.
Launching notepad with WinDbg spits the following output:
Clearly the DLL did not initialize correctly, which is what the NTSTATUS 0xc0000142 was trying to tell us in the message box.
DLLs are initialized with the DllMain function that typically looks like this:
BOOL WINAPI DllMain(HMODULE hModule, DWORD reason, PVOID lpReserved) {
	switch (reason) {
		case DLL_PROCESS_ATTACH:
		case DLL_THREAD_ATTACH:
		case DLL_THREAD_DETACH:
		case DLL_PROCESS_DETACH:
			break;
	}
	return TRUE;
}
The classic four values shown are used by the DLL to run code when it’s loaded into a process (DLL_PROCESS_ATTACH), unloaded from a process (DLL_PROCESS_DETACH), a thread is created in the process (DLL_THREAD_ATTACH), and thread is exiting in the process (DLL_THREAD_DETACH). It turns out that there is a fifth value, which must be used with verifiier DLLs:
#define DLL_PROCESS_VERIFIER 4
Returning TRUE from such a case is not nearly enough. Instead, a structure expected by the caller of DllMain must be initialized and its address provided in lpReserved. The following structures and callback type definitions are needed:
That’s quite a list. The main structure is RTL_VERIFIER_PROVIDER_DESCRIPTOR that has a pointer to an array of RTL_VERIFIER_DLL_DESCRIPTOR (the last element in the array must end with all zeros), which in itself points to an array of RTL_VERIFIER_THUNK_DESCRIPTOR , used for specifying functions to hook. There are a few callbacks as well. At a minimum, we can define this descriptor like so (no hooking, no special code in callbacks):
This time it works. MyVerify.dll loads right after verifier.dll (which is the one managing verify DLLs).
Hooking Functions
As mentioned before, we can use the verifier engine’s support for hooking functions in arbitrary DLLs. Let’s give this a try by hooking into a couple of functions, GetMessage and CreateFile. First, we need to set up the structures for the hooks on a per-DLL basis:
The second NULL in each triplet is where the original address of the hooked function is stored by the verifier engine. Now we fill the structure with the list of DLLs, pointing to the hook arrays:
The last thing is to actually implement the hooks:
BOOL WINAPI HookGetMessage(PMSG msg, HWND hWnd, UINT filterMin, UINT filterMax) {
	// get original function
	static const auto orgGetMessage = (decltype(::GetMessageW)*)user32Hooks[0].ThunkOldAddress;
	auto result = orgGetMessage(msg, hWnd, filterMin, filterMax);
	char text[128];
	sprintf_s(text, "Received message 0x%X for hWnd 0x%p\n", msg->message, msg->hwnd);
	OutputDebugStringA(text);
	return result;
}

HANDLE WINAPI HookCreateFile(PCWSTR path, DWORD access, DWORD share, LPSECURITY_ATTRIBUTES sa, DWORD cd, DWORD flags, HANDLE hTemplate) {
	// get original function
	static const auto orgCreateFile = (decltype(::CreateFileW)*)kernelbaseHooks[0].ThunkOldAddress;
	auto hFile = orgCreateFile(path, access, share, sa, cd, flags, hTemplate);
	char text[512];
	if (hFile == INVALID_HANDLE_VALUE)
		sprintf_s(text, "Failed to open file %ws (%u)\n", path, ::GetLastError());
	else
		sprintf_s(text, "Opened file %ws successfuly (0x%p)\n", path, hFile);

	OutputDebugStringA(text);
	return hFile;
}
The hooks just send some output with OutputDebugString. Here is an excerpt output when running notepad under a debugger:
ModLoad: 00007ff7`6dfa0000 00007ff7`6dfd8000   notepad.exe
ModLoad: 00007ffd`978f0000 00007ffd`97ae8000   ntdll.dll
ModLoad: 00007ffd`1f650000 00007ffd`1f6c4000   C:\Windows\System32\verifier.dll
Page heap: pid 0xEF18: page heap enabled with flags 0x3.
AVRF: notepad.exe: pid 0xEF18: flags 0x81643027: application verifier enabled
ModLoad: 00007ffd`25b80000 00007ffd`25d24000   C:\Windows\SYSTEM32\MyVerify.dll
ModLoad: 00007ffd`97650000 00007ffd`9770d000   C:\Windows\System32\KERNEL32.dll
ModLoad: 00007ffd`951b0000 00007ffd`954a6000   C:\Windows\System32\KERNELBASE.dll
ModLoad: 00007ffd`963e0000 00007ffd`9640b000   C:\Windows\System32\GDI32.dll
ModLoad: 00007ffd`95790000 00007ffd`957b2000   C:\Windows\System32\win32u.dll
ModLoad: 00007ffd`95090000 00007ffd`951a7000   C:\Windows\System32\gdi32full.dll
...
ModLoad: 00007ffd`964f0000 00007ffd`965bd000   C:\Windows\System32\OLEAUT32.dll
ModLoad: 00007ffd`96d10000 00007ffd`96d65000   C:\Windows\System32\shlwapi.dll
ModLoad: 00007ffd`965d0000 00007ffd`966e4000   C:\Windows\System32\MSCTF.dll
Opened file C:\Windows\Fonts\staticcache.dat successfuly (0x0000000000000164)
ModLoad: 00007ffd`7eac0000 00007ffd`7eb6c000   C:\Windows\System32\TextShaping.dll
ModLoad: 00007ffc`ed750000 00007ffc`ed82e000   C:\Windows\System32\efswrt.dll
ModLoad: 00007ffd`90880000 00007ffd`909d7000   C:\Windows\SYSTEM32\wintypes.dll
ModLoad: 00007ffd`8bf90000 00007ffd`8bfad000   C:\Windows\System32\MPR.dll
ModLoad: 00007ffd`8cae0000 00007ffd`8cce3000   C:\Windows\System32\twinapi.appcore.dll
Opened file C:\Windows\Registration\R000000000025.clb successfuly (0x00000000000001C4)
ModLoad: 00007ffd`823b0000 00007ffd`82416000   C:\Windows\System32\oleacc.dll
...
Received message 0x31F for hWnd 0x00000000001F1776
Received message 0xC17C for hWnd 0x00000000001F1776
Received message 0xF for hWnd 0x00000000001F1776
Received message 0xF for hWnd 0x00000000003010C0
Received message 0xF for hWnd 0x0000000000182E7A
Received message 0x113 for hWnd 0x00000000003319A8
...
ModLoad: 00007ffd`80e20000 00007ffd`80fd4000   C:\Windows\System32\WindowsCodecs.dll
ModLoad: 00007ffd`94ee0000 00007ffd`94f04000   C:\Windows\System32\profapi.dll
Opened file C:\Users\Pavel\AppData\Local\IconCache.db successfuly (0x0000000000000724)
ModLoad: 00007ffd`3e190000 00007ffd`3e1f6000   C:\Windows\System32\thumbcache.dll
Opened file C:\Users\Pavel\AppData\Local\Microsoft\Windows\Explorer\iconcache_idx.db successfuly (0x0000000000000450)
Opened file C:\Users\Pavel\AppData\Local\Microsoft\Windows\Explorer\iconcache_16.db successfuly (0x000000000000065C)
ModLoad: 00007ffd`90280000 00007ffd`90321000   C:\Windows\SYSTEM32\policymanager.dll
This application verifier technique is an interesting one, and fairly easy to use. The full example can be found at https://github.com/zodiacon/VerifierDLL.
I’m happy to open registration for the next 5 dayWindowsInternals training to be conducted in November in the following dates and from 11am to 7pm, Eastern Standard Time (EST) (8am to 4pm PST): 21, 22, 28, 29, 30.
The syllabus can be found here (some modifications possible, but the general outline should remain).
Training cost is 900 USD if paid by an individual, or 1800 USD if paid by a company. Participants in any of my previous training classes get 10% off.
If you’d like to register, please send me an email to zodiacon@live.com with “Windows Internals training” in the title, provide your full name, company (if any), preferred contact email, and your time zone.
The sessions will be recorded, so you can watch any part you may be missing, or that may be somewhat overwhelming in “real time”.
One of the new Windows 10 features visible to users is the support for additional “Desktops”. It’s now possible to create additional surfaces on which windows can be used. This idea is not new – it has been around in the Linux world for many years (e.g. KDE, Gnome), where users have 4 virtual desktops they can use. The idea is that to prevent clutter, one desktop can be used for web browsing, for example, and another desktop can be used for all dev work, and yet a third desktop could be used for all social / work apps (outlook, WhatsApp, Facebook, whatever).
To create an additional virtual desktop on Windows 10, click on the Task View button on the task bar, and then click the “New Desktop” button marked with a plus sign.
Now you can switch between desktops by clicking the appropriate desktop button and then launch apps as usual. It’s even possible (by clicking Task View again) to move windows from desktop to desktop, or to request that a window be visible on all desktops.
The Sysinternals tools had a tool called “Desktops” for many years now. It too allows for creation of up to 4 desktops where applications can be launched. The question is – is this Desktops tool the same as the Windows 10 virtual desktops feature? Not quite.
First, some background information. In the kernel object hierarchy under a session object, there are window stations, desktops and other objects. Here’s a diagram summarizing this tree-like relationship:
As can be seen in the diagram, a session contains a set of Window Stations. One window station can be interactive, meaning it can receive user input, and is always called winsta0. If there are other window stations, they are non-interactive.
Each window station contains a set of desktops. Each of these desktops can hold windows. So at any given moment, an interactive user can interact with a single desktop under winsta0. Upon logging in, a desktop called “Default” is created and this is where all the normal windows appear. If you click Ctrl+Alt+Del for example, you’ll be transferred to another desktop, called “Winlogon”, that was created by the winlogon process. That’s why your normal windows “disappear” – you have been switched to another desktop where different windows may exist. This switching is done by a documented function – SwitchDesktop.
And here lies the difference between the Windows 10 virtual desktops and the Sysinternals desktops tool. The desktops tool actually creates desktop objects using the CreateDesktop API. In that desktop, it launches Explorer.exe so that a taskbar is created on that desktop – initially the desktop has nothing on it. How can desktops launch a process that by default creates windows in a different desktop? This is possible to do with the normal CreateProcess function by specifying the desktop name in the STARTUPINFO structure’s lpDesktop member. The format is “windowstation\desktop”. So in the desktops tool case, that’s something like “winsta0\Sysinternals Desktop 1”. How do I know the name of the Sysinternals desktop objects? Desktops can be enumerated with the EnumDesktops API. I’ve written a small tool, that enumerates window stations and desktops in the current session. Here’s a sample output when one additional desktop has been created with “desktops”:
In the Windows 10 virtual desktops feature, no new desktops are ever created. Win32k.sys just manipulates the visibility of windows and that’s it. Can you guess why? Why doesn’t Window 10 use the CreateDesktop/SwitchDesktop APIs for its virtual desktop feature?
The reason has to do with some limitations that exist on desktop objects. For one, a window (technically a thread) that is bound to a desktop cannot be switched to another; in other words, there is no way to transfer a windows from one desktop to another. This is intentional, because desktops provide some protection. For example, hooks set with SetWindowsHookEx can only be set on the current desktop, so cannot affect other windows in other desktops. The Winlogon desktop, as another example, has a strict security descriptor that prevents non system-level users from accessing that desktop. Otherwise, that desktop could have been tampered with.
The virtual desktops in Windows 10 is not intended for security purposes, but for flexibility and convenience (security always “contradicts” convenience). That’s why it’s possible to move windows between desktops, because there is no real “moving” going on at all. From the kernel’s perspective, everything is still on the same “Default” desktop.
The next public remote Windows kernel Programming class I will be delivering is scheduled for April 15 to 18. It’s going to be very similar to the first one I did at the end of January (with some slight modifications and additions).
Cost: 1950 USD. Early bird (register before March 30th): 1650 USD
I have not yet finalized the time zone the class will be “targeting”. I will update in a few weeks on that.
If you’re interested in registering, please email zodiacon@live.com with the subject “Windows Kernel Programming class” and specify your name, company (if any) and time zone. I’ll reply by providing more information.
Feel free to contact me for questions using the email or through twitter (@zodiacon).
The complete syllabus is outlined below:
Duration:
4 Days
Target Audience:
Experienced windows developers, interested in developing kernel mode drivers
Objectives:
· Understand the Windows kernel driver programming model
· Write drivers for monitoring processes, threads, registry and some types of objects
· Use documented kernel hooking mechanisms
· Write basic file system mini-filter drivers
Pre Requisites:
· At least 2 years of experience working with the Windows API
· Basic understanding of Windows OS concepts such as processes, threads, virtual memory and DLLs
Software requirements:
· Windows 10 Pro 64 bit (latest stable version)
· Visual Studio 2017 + latest update
· Windows 10 SDK (latest)
· Windows 10 WDK (latest)
· Virtual Machine for testing and debugging
Instructor: Pavel Yosifovich
Abstract
The cyber security industry has grown considerably in recent years, with more sophisticated attacks and consequently more defenders. To have a fighting chance against these kinds of attacks, kernel mode drivers must be employed, where nothing (at least nothing from user mode) can escape their eyes.
The course provides the foundations for the most common software device drivers that are useful not just in cyber security, but also other scenarios, where monitoring and sometimes prevention of operations is required. Participants will write real device drivers with useful features they can then modify and adapt to their particular needs.
Syllabus
Module 1: Windows Internals quick overview
Processes
Virtual memory
Threads
System architecture
User / kernel transitions
Introduction to WinDbg
Windows APIs
Objects and handles
Summary
Module 2: The I/O System
I/O System overview
Device Drivers
The Windows Driver Model (WDM)
The Kernel Mode Driver Framework (KMDF)
Other device driver models
Driver types
Software drivers
Driver and device objects
I/O Processing and Data Flow
Accessing devices
Asynchronous I/O
Summary
Module 3: Kernel programming basics
Setting up for Kernel Development
Basic Kernel types and conventions
C++ in a kernel driver
Creating a driver project
Building and deploying
The kernel API
Strings
Linked Lists
The DriverEntry function
The Unload routine
Installation
Testing
Debugging
Summary
Lab: deploy a driver
Module 4: Building a simple driver
Creating a device object
Exporting a device name
Building a driver client
Driver dispatch routines
Introduction to I/O Request Packets (IRPs)
Completing IRPs
Handling DeviceIoControl calls
Testing the driver
Debugging the driver
Using WinDbg with a virtual machine
Summary
Lab: open a process for any access; zero driver; debug a driver
Module 5: Kernel mechanisms
Interrupt Request Levels (IRQLs)
Deferred Procedure Calls (DPCs)
Dispatcher objects
Low IRQL Synchronization
Spin locks
Work items
Summary
Module 6: Process and thread monitoring
Motivation
Process creation/destruction callback
Specifying process creation status
Thread creation/destruction callback
Notifying user mode
Writing a user mode client
Preventing potentially malicious processes from executing
Summary
Lab: monitoring process/thread activity; prevent specific processes from running; protecting processes
Module 7: Object and registry notifications
Process/thread object notifications
Pre and post callbacks
Registry notifications
Performance considerations
Reporting results to user mode
Summary
Lab: protect specific process from termination; simple registry monitor
Module 8: File system mini filters
File system model
Filters vs. mini filters
The Filter Manager
Filter registration
Pre and Post callbacks
File name information
Contexts
File system operations
Filter to user mode communication
Debugging mini-filters
Summary
Labs: protect a directory from file deletion; backup file before deletion
AppContainers are the sanboxes typically used to run UWP processes (also known as metro, store, modern…). A process within an AppContainer runs with an Integrity Level of low, which effectively means it has no access to almost everything, as the default integrity level of objects (such as files) is Medium. This means code running inside an AppContainer can’t do any sigtnificant damage because of that lack of access. Furthermore, from an Object Manager perspective, named objects created by an AppContainer are stored under its own object manager directory, based on an identifier known as AppContainer SID. This means one AppContainer cannot interfere with another’s objects.
For example, if a process not in an AppContainer creates a mutex named “abc”, its full name is really “\Sessions\1\BaseNamedObjects\abc” (assuming the process runs in session 1). On the other hand, if AppContainer A creates a mutex named “abc”, its full name is something like “\Sessions\1\AppContainerNamedObjects\S-1-15-2-466767348-3739614953-2700836392-1801644223-4227750657-1087833535-2488631167\abc”, meaning it can nevr interfere with another AppContainer or any process running outside of an AppContainer.
Although AppContainers were created specifically for store apps, theye can also be used to execute “normal” applications, providing the same level of security and isolation. Let’s see how to do that.
First, we need to create the AppContainer and obtain an AppContainer SID. This SID is based on a hash of the container name. In the UWP world, this name is made up of the application package and the 13 digits of the signer’s hash. For normal applications, we can select any string; selecting the same string would yield the same SID – which means we can actually use it to “bundle” several processes into the same AppContainer.
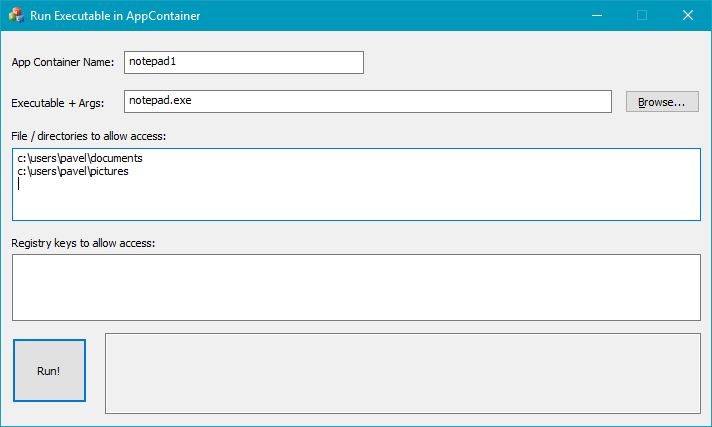
The first step is to create an AppContainer profile (error handling ommitted):
The containerName argument is the important one. If the function fails, it probably means the container profile exists already. In that case, we need to extract the SID from the existing profile:
The next step is prepare for process creation. The absolute minimum is to initialize a process attribute list with a SECURITY_CAPABILITIES structure to indicate we want the process to be created inside an AppContainer. As part of this, we can specify capabilities this AppContainer should have, such as internet access, access to the documents library and any other capabilities as defined by the Windows Runtime:
We can try this with the usual first victim, Notepad. Notepad launches and everyhing seems OK. However, if we try to open almost any file by using Notepad’s File/Open menu item, we’ll see that notepad has no access to usual things, such as “my documents” or “my pictures”. This is because it’s runnign with Low Integrity Level and files are defaulted to Medium integrity level:
“AppContainer” in Process Explorer implies Low integirty level.
If we would want Notepad to have access to the user’s files, such as documents and pictures, we would have to set explict permissions on these objects allowing access to the AppContainer SID. Functions to use include SetNamedSecurityInfo (see the project on Github for the full code).
I’ve created a simple application to test these things. We can specify a container name, an executable path and click “Run” to execute in in AppContainer. We can add folders/files that would get full permissions:
Let’s now try a more interesting application – Windows Media Player (yes, I know, who uses the old Media Player these days? But it’s an interesting example). Windows Media Player has the (annoying?) feature where you can only run a single instance of it at any given time. The way this works is that WMP creates a mutex with a very specific name, “Microsoft_WMP_70_CheckForOtherInstanceMutex“, if it already exists, it sends a message to its buddy (a previous instance of WMP) and then terminates. A simple trick we can do with Process Explorer is to close that handle and then launching another WMP.
Let’s try something different: let’s run WMP in an AppContainer. Then let’s run another one in a different AppContainer. Will we get two instances?
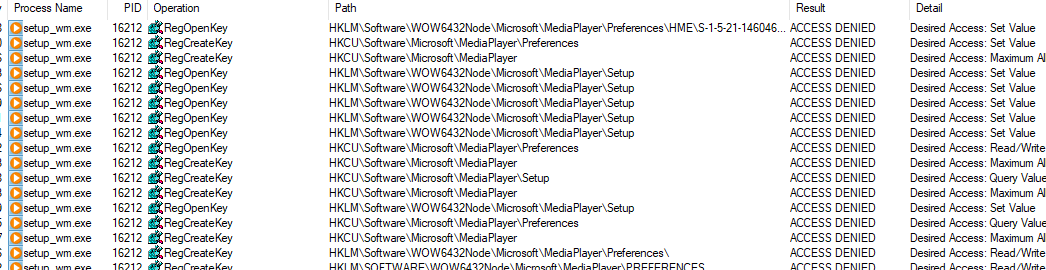
Running WMP in this way popus up its helper, setup_wm.exe which asks for the initial settings for WMP. Clicking “Express Settings” closes the dialog but it then it comes up again! And again! You can’t get rid of it, unless you close the dialog and then WMP does not launch. Can you guess why is that?
If you guessed “permissions” – you are correct. Running Process Monitor when this dialog comes up and filtering for “ACCESS DENIED” shows something like this:
Clearly, some keys need access so the settings can be saved. The tool allows adding these keys and setting full permissions for them:
Now we can run WMP in two different containers (change the container name and re-run) and they both run just fine. That’s becuase each mutex now has a unique name prefixed with the AppContainer SID of the relevant AppContainer: