
In Part 1 we’ve seen how to create a new kernel object type. The natural next step is to implement some functionality associated with the new object type. Before we dive into that, let’s take a broader view of what we’re trying to do. For comparison purposes, we can take an existing kernel object type, such as a Semaphore or a Section, or any other object type, look at how it’s “invoked” to get an idea of what we need to do.
A word of warning: this is a code-heavy post, and assumes the reader is fairly familiar with Win32 and native API conventions, and has basic understanding of device driver writing.
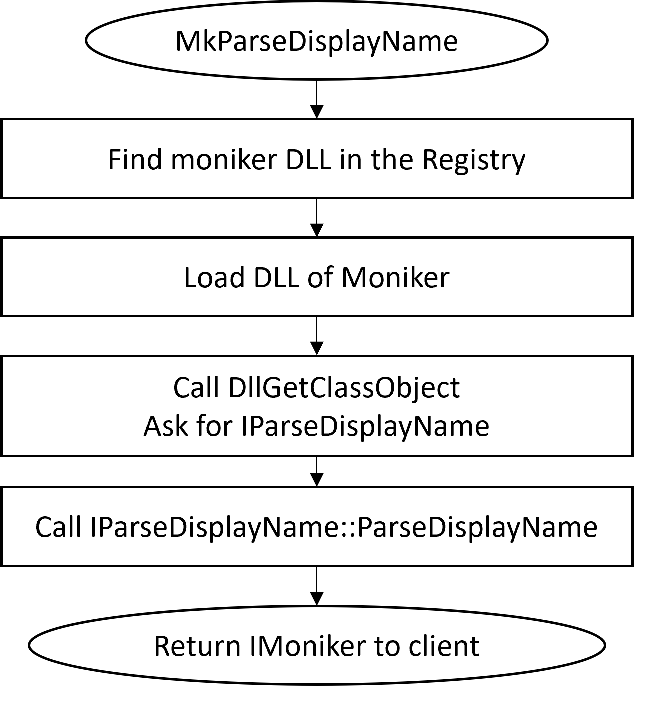
The following diagram shows the call flow when creating a semaphore from user mode starting with the CreateSemaphore(Ex) API:

A process calls the officially documented CreateSemaphore, implemented in kernel32.dll. This calls the native (undocumented) API NtCreateSemaphore, converting arguments as needed from Win32 conventions to native conventions. NtCreateSemaphore has no “real” implementation in user mode, as the kernel is the only one which can create a semaphore (or any other kernel object for that matter). NtDll has code to transition the CPU to kernel mode by using the syscall machine instruction on x64. Before issuing a syscall, the code places a number into the EAX CPU register. This number – system service index, indicates what operation is being requested.
On the kernel side of things, the System Service Dispatcher uses the value in EAX as an index into the System Service Descriptor Table (SSDT) to locate the actual function to call, pointing to the real NtCreateSemaphore implementation. Semaphores are relatively simple objects, so creation is a matter of allocating memory for a KSEMAPHORE structure (and a header), done with OnCreateObject, initializing the structure, and then inserting the object into the system (ObInsertObject).
More complex objects are created similarly, although the actual creation code in the kernel may be more elaborate. Here is a similar diagram for creating a Section object:

As can be seen in the diagram, creating a section involves a private function (MiCreateSection), but the overall process is the same.
We’ll try to mimic creating a DataStack object in a similar way. However, extending NtDll for our purposes is not an option. Even using syscall to make the transition to the kernel is problematic for the following reasons:
- There is no entry in the SSDT for something like
NtCreateDataStack, and we can’t just add an entry because PatchGuard does not like when the SSDT changes. - Even if we could add an entry to the SSDT safely, the entry itself is tricky. On x64, it’s not a 64-bit address. Instead, it’s a 28-bit offset from the beginning of the SSDT (the lower 4 bits store the number of parameters passed on the stack), which means the function cannot be too far from the SSDT’s address. Our driver can be loaded to any address, so the offset to anything mapped may be too large to be stored in an SSDT entry.
- We could fix that problem perhaps by adding code in spare bytes at the end of the kernel mapped PE image, and add a
JMPtrampoline call to our real function…
Not easy, and we still have the PatchGuard issue. Instead, we’ll go about it in a simpler way – use DeviceIoControl (or the native NtDeviceIoControlFile) to pass the parameters to our driver. The following diagram illustrates this:

We’ll keep the “Win32 API” functions and “Native APIs” implemented in the same DLL for convenience. Let’s from the top, moving from user space to kernel space. Implementing CreateDataStack involves converting Win32 style arguments to native-style arguments before calling NtCreateDataStack. Here is the beginning:
HANDLE CreateDataStack(_In_opt_ SECURITY_ATTRIBUTES* sa,
    _In_ ULONG maxItemSize, _In_ ULONG maxItemCount,
    _In_ ULONG_PTR maxSize, _In_opt_ PCWSTR name) {
Notice the similarity to functions like CreateSemaphore, CreateMutex, CreateFileMapping, etc. An optional name is accepted, as DataStack objects can be named.
Native APIs work with UNICODE_STRINGs and OBJECT_ATTRIBUTES, so we need to do some work to be able to call the native API:
NTSTATUS NTAPI NtCreateDataStack(_Out_ PHANDLE DataStackHandle,
    _In_opt_ POBJECT_ATTRIBUTES DataStackAttributes,
    _In_ ULONG MaxItemSize, _In_ ULONG MaxItemCount, ULONG_PTR MaxSize);
We start by building an OBJECT_ATTRIBUTES:
UNICODE_STRING uname{};
if (name && *name) {
	RtlInitUnicodeString(&uname, name);
}
OBJECT_ATTRIBUTES attr;
InitializeObjectAttributes(&attr,
	uname.Length ? &uname : nullptr,
	OBJ_CASE_INSENSITIVE | (sa && sa->bInheritHandle ? OBJ_INHERIT : 0) | (uname.Length ? OBJ_OPENIF : 0),
	uname.Length ? GetUserDirectoryRoot() : nullptr,
	sa ? sa->lpSecurityDescriptor : nullptr);
If a name exists, we wrap it in a UNICODE_STRING. The security attributes are used, if provided. The most interesting part is the actual name (if provided). When calling a function like the following:
CreateSemaphore(nullptr, 100, 100, L"MySemaphore");
The object name is not going to be just “MySemaphore”. Instead, it’s going to be something like “\Sessions\1\BaseNamedObjects\MySemaphore”. This is because the Windows API uses “local” session-relative names by default. Our DataStack API should provide the same semantics, which means the base directory in the Object Manager’s namespace for the current session must be used. This is the job of GetUserDirectoryRoot. Here is one way to implement it:
HANDLE GetUserDirectoryRoot() {
	static HANDLE hDir;
	if (hDir)
		return hDir;

	DWORD session = 0;
	ProcessIdToSessionId(GetCurrentProcessId(), &session);

	UNICODE_STRING name;
	WCHAR path[256];
	if (session == 0)
		RtlInitUnicodeString(&name, L"\\BaseNamedObjects");
	else {
		wsprintfW(path, L"\\Sessions\\%u\\BaseNamedObjects", session);
		RtlInitUnicodeString(&name, path);
	}
	OBJECT_ATTRIBUTES dirAttr;
	InitializeObjectAttributes(&dirAttr, &name, OBJ_CASE_INSENSITIVE, nullptr, nullptr);
	NtOpenDirectoryObject(&hDir, DIRECTORY_QUERY, &dirAttr);
	return hDir;
}
We just need to do that once, since the resulting directory handle can be stored in a global/static variable for the lifetime of the process; we won’t even bother closing the handle. The native NtOpenDirectoryObject is used to open a handle to the correct directory and return it. Notice that for session 0, there is a special rule: its directory is simply “\BaseNamedObjects”.
There is a snag in the above handling, as it’s incomplete. UWP processes have their own object directory based on their AppContainer SID, which looks like “\Sessions\1\AppContainerNamedObjects\{AppContainerSid}”, which the code above is not dealing with. I’ll leave that as an exercise for the interested coder.
Back in CreateDataStack – the session-relative directory handle is stored in the OBJECT_ATTRIBUTES RootDirectory member. Now we can call the native API:
HANDLE hDataStack;
auto status = NtCreateDataStack(&hDataStack, &attr, maxItemSize, maxItemCount, maxSize);
if (NT_SUCCESS(status))
	return hDataStack;

SetLastError(RtlNtStatusToDosError(status));
return nullptr;
If we get a failed status, we convert it to a Win32 error with RtlNtStatusToDosError and call SetLastError to make it available to the caller via the usual GetLastError. Here is the full CreateDataStack function for easier reference:
HANDLE CreateDataStack(_In_opt_ SECURITY_ATTRIBUTES* sa,
    _In_ ULONG maxItemSize, _In_ ULONG maxItemCount,
    _In_ ULONG_PTR maxSize, _In_opt_ PCWSTR name) {
	UNICODE_STRING uname{};
	if (name && *name) {
		RtlInitUnicodeString(&uname, name);
	}
	OBJECT_ATTRIBUTES attr;
	InitializeObjectAttributes(&attr,
		uname.Length ? &uname : nullptr,
		OBJ_CASE_INSENSITIVE | (sa && sa->bInheritHandle ? OBJ_INHERIT : 0) | (uname.Length ? OBJ_OPENIF : 0),
		uname.Length ? GetUserDirectoryRoot() : nullptr,
		sa ? sa->lpSecurityDescriptor : nullptr);

	HANDLE hDataStack;
	auto status = NtCreateDataStack(&hDataStack, &attr, maxItemSize, maxItemCount, maxSize);
	if (NT_SUCCESS(status))
		return hDataStack;

	SetLastError(RtlNtStatusToDosError(status));
	return nullptr;
}
Next, we need to handle the native implementation. Since we just call our driver, we package the arguments in a helper structure and send it to the driver via NtDeviceIoControlFile:
NTSTATUS NTAPI NtCreateDataStack(_Out_ PHANDLE DataStackHandle,
    _In_opt_ POBJECT_ATTRIBUTES DataStackAttributes,
    _In_ ULONG MaxItemSize, _In_ ULONG MaxItemCount, ULONG_PTR MaxSize) {
	DataStackCreate data;
	data.MaxItemCount = MaxItemCount;
	data.MaxItemSize = MaxItemSize;
	data.ObjectAttributes = DataStackAttributes;
	data.MaxSize = MaxSize;

	IO_STATUS_BLOCK ioStatus;
	return NtDeviceIoControlFile(g_hDevice, nullptr, nullptr,
        nullptr, &ioStatus, IOCTL_DATASTACK_CREATE,
        &data, sizeof(data), DataStackHandle, sizeof(HANDLE));
}
Where is g_Device coming from? When our DataStack.Dll is loaded into a process, we can open a handle to the device exposed by the driver (which we have yet to implement). In fact, if we can’t obtain a handle, the DLL should fail to load:
HANDLE g_hDevice = INVALID_HANDLE_VALUE;

bool OpenDevice() {
	UNICODE_STRING devName;
	RtlInitUnicodeString(&devName, L"\\Device\\KDataStack");
	OBJECT_ATTRIBUTES devAttr;
	InitializeObjectAttributes(&devAttr, &devName, 0, nullptr, nullptr);
	IO_STATUS_BLOCK ioStatus;
	return NT_SUCCESS(NtOpenFile(&g_hDevice, GENERIC_READ | GENERIC_WRITE, &devAttr, &ioStatus, 0, 0));
}

void CloseDevice() {
	if (g_hDevice != INVALID_HANDLE_VALUE) {
		CloseHandle(g_hDevice);
		g_hDevice = INVALID_HANDLE_VALUE;
	}
}

BOOL APIENTRY DllMain(HMODULE hModule, DWORD reason, LPVOID) {
	switch (reason) {
		case DLL_PROCESS_ATTACH:
			DisableThreadLibraryCalls(hModule);
			return OpenDevice();

		case DLL_THREAD_ATTACH:
		case DLL_THREAD_DETACH:
		case DLL_PROCESS_DETACH:
			CloseDevice();
			break;
	}
	return TRUE;
}
OpenDevice uses the native NtOpenFile to open a handle, as the driver does not provide a symbolic link to make it slightly harder to reach it directly from user mode. If OpenDevice returns false, the DLL will unload.
Kernel Space
Now we move to the kernel side of things. Our driver must create a device object and expose IOCTLs for calls made from user mode. The additions to DriverEntry are pretty standard:
extern "C" NTSTATUS
DriverEntry(PDRIVER_OBJECT DriverObject, PUNICODE_STRING RegistryPath) {
	UNREFERENCED_PARAMETER(RegistryPath);

	auto status = DsCreateDataStackObjectType();
	if (!NT_SUCCESS(status)) {
		return status;
	}

	UNICODE_STRING devName = RTL_CONSTANT_STRING(L"\\Device\\KDataStack");
	PDEVICE_OBJECT devObj;
	status = IoCreateDevice(DriverObject, 0, &devName, FILE_DEVICE_UNKNOWN, 0, FALSE, &devObj);
	if (!NT_SUCCESS(status))
		return status;

	DriverObject->DriverUnload = OnUnload;
	DriverObject->MajorFunction[IRP_MJ_CREATE] =
    DriverObject->MajorFunction[IRP_MJ_CLOSE] =
		[](PDEVICE_OBJECT, PIRP Irp) -> NTSTATUS {
		Irp->IoStatus.Status = STATUS_SUCCESS;
		IoCompleteRequest(Irp, IO_NO_INCREMENT);
		return STATUS_SUCCESS;
		};

	DriverObject->MajorFunction[IRP_MJ_DEVICE_CONTROL] = OnDeviceControl;

	return STATUS_SUCCESS;
}
The driver creates a single device object with the name “\Device\DataStack” that was used in DllMain to open a handle to that device. IRP_MJ_CREATE and IRP_MJ_CLOSE are supported to make the driver usable. Finally, IRP_MJ_DEVICE_CONTROL handling is set up (OnDeviceControl).
The job of OnDeviceControl is to propagate the data provided by helper structures to the real implementation of the native APIs. Here is the code that covers IOCTL_DATASTACK_CREATE:
NTSTATUS OnDeviceControl(PDEVICE_OBJECT, PIRP Irp) {
	auto stack = IoGetCurrentIrpStackLocation(Irp);
	auto& dic = stack->Parameters.DeviceIoControl;
	auto len = 0U;
	auto status = STATUS_INVALID_DEVICE_REQUEST;

	switch (dic.IoControlCode) {
		case IOCTL_DATASTACK_CREATE:
		{
			auto data = (DataStackCreate*)Irp->AssociatedIrp.SystemBuffer;
			if (dic.InputBufferLength < sizeof(*data)) {
				status = STATUS_BUFFER_TOO_SMALL;
				break;
			}
			HANDLE hDataStack;
			status = NtCreateDataStack(&hDataStack,
                data->ObjectAttributes,
                data->MaxItemSize,
                data->MaxItemCount,
                data->MaxSize);
			if (NT_SUCCESS(status)) {
				len = IoIs32bitProcess(Irp) ? sizeof(ULONG) : sizeof(HANDLE);
				memcpy(data, &hDataStack, len);
			}
			break;
		}
	}

	Irp->IoStatus.Status = status;
	Irp->IoStatus.Information = len;
	IoCompleteRequest(Irp, IO_NO_INCREMENT);
	return status;
}
NtCreateDataStack is called with the unpacked arguments. The only trick here is the use of IoIs32bitProcess to check if the calling process is 32-bit. If so, 4 bytes should be copied back as the handle instead of 8 bytes.
The real work of creating a DataStack object (finally), falls on NtCreateDataStack. First, we need to have a structure that manages DataStack objects. Here it is:
struct DataStack {
	LIST_ENTRY Head;
	FAST_MUTEX Lock;
	ULONG Count;
	ULONG MaxItemCount;
	ULONG_PTR Size;
	ULONG MaxItemSize;
	ULONG_PTR MaxSize;
};
The details are not important now, since we’re dealing with object creation only. But we should initialize the structure properly when the object is created. The first major step is telling the kernel to create a new object of DataStack type:
NTSTATUS NTAPI NtCreateDataStack(_Out_ PHANDLE DataStackHandle,
    _In_opt_ POBJECT_ATTRIBUTES DataStackAttributes,
    _In_ ULONG MaxItemSize, _In_ ULONG MaxItemCount, ULONG_PTR MaxSize) {
	auto mode = ExGetPreviousMode();
	extern POBJECT_TYPE g_DataStackType;
	//
	// sanity check
	//
	if (g_DataStackType == nullptr)
		return STATUS_NOT_FOUND;

	DataStack* ds;
	auto status = ObCreateObject(mode, g_DataStackType, DataStackAttributes, mode,
		nullptr, sizeof(DataStack), 0, 0, (PVOID*)&ds);
	if (!NT_SUCCESS(status)) {
		KdPrint(("Error in ObCreateObject (0x%X)\n", status));
		return status;
	}
ObCreateObject looks like this:
NTSTATUS NTAPI ObCreateObject(
	_In_ KPROCESSOR_MODE ProbeMode,
	_In_ POBJECT_TYPE ObjectType,
	_In_opt_ POBJECT_ATTRIBUTES ObjectAttributes,
	_In_ KPROCESSOR_MODE OwnershipMode,
	_Inout_opt_ PVOID ParseContext,
	_In_ ULONG ObjectBodySize,
	_In_ ULONG PagedPoolCharge,
	_In_ ULONG NonPagedPoolCharge,
	_Deref_out_ PVOID* Object);
ExGetPreviousMode returns the caller’s mode (UserMode or KernelMode enum values), and based off of that we ask ObCreateObject to make the relevant probing and security checks. ObjectType is our DataStack type object, ObjectBodySize is sizeof(DataStack), our data structure. The last parameter is where the object pointer is returned.
If this succeeds, we need to initialize the structure appropriately, and then add the object to the system “officially”, where the object header would be built as well:
DsInitializeDataStack(ds, MaxItemSize, MaxItemCount, MaxSize);
HANDLE hDataStack;
status = ObInsertObject(ds, nullptr, DATA_STACK_ALL_ACCESS, 0, nullptr, &hDataStack);
if (NT_SUCCESS(status)) {
	*DataStackHandle = hDataStack;
}
else {
	KdPrint(("Error in ObInsertObject (0x%X)\n", status));
}
return status;
DsInitializeDataStack is a helper function to initialize an empty DataStack:
void DsInitializeDataStack(DataStack* DataStack, ULONG MaxItemSize, ULONG MaxItemCount, ULONG_PTR MaxSize) {
	InitializeListHead(&DataStack->Head);
	ExInitializeFastMutex(&DataStack->Lock);
	DataStack->Count = 0;
	DataStack->MaxItemCount = MaxItemCount;
	DataStack->Size = 0;
	DataStack->MaxItemSize = MaxItemSize;
	DataStack->MaxSize = MaxSize;
}
This is it for CreateDataStack and its chain of called functions. Handling OpenDataStack is similar, and simpler, as the heavy lifting is done by the kernel.
Opening an Existing DataStack Object
OpenDataStack attempts to open a handle to an existing DataStack object by name:
HANDLE OpenDataStack(_In_ ACCESS_MASK desiredAccess, _In_ BOOL inheritHandle, _In_ PCWSTR name) {
	if (name == nullptr || *name == 0) {
		SetLastError(ERROR_INVALID_NAME);
		return nullptr;
	}

	UNICODE_STRING uname;
	RtlInitUnicodeString(&uname, name);
	OBJECT_ATTRIBUTES attr;
	InitializeObjectAttributes(&attr,
		&uname,
		OBJ_CASE_INSENSITIVE | (inheritHandle ? OBJ_INHERIT : 0),
		GetUserDirectoryRoot(),
		nullptr);
	HANDLE hDataStack;
	auto status = NtOpenDataStack(&hDataStack, desiredAccess, &attr);
	if (NT_SUCCESS(status))
		return hDataStack;

	SetLastError(RtlNtStatusToDosError(status));
	return nullptr;
}
Again, from a high-level perspective it looks similar to APIs like OpenSemaphore or OpenEvent. NtOpenDataStack will make a call to the driver via NtDeviceIoControlFile, packing the arguments:
NTSTATUS NTAPI NtOpenDataStack(_Out_ PHANDLE DataStackHandle,
    _In_ ACCESS_MASK DesiredAccess,
    _In_ POBJECT_ATTRIBUTES DataStackAttributes) {
	DataStackOpen data;
	data.DesiredAccess = DesiredAccess;
	data.ObjectAttributes = DataStackAttributes;

	IO_STATUS_BLOCK ioStatus;
	return NtDeviceIoControlFile(g_hDevice, nullptr, nullptr, nullptr, &ioStatus,
		IOCTL_DATASTACK_OPEN, &data, sizeof(data), DataStackHandle, sizeof(HANDLE));
}
Finally, the implementation of NtOpenDataStack in the kernel is surprisingly simple:
NTSTATUS NTAPI NtOpenDataStack(_Out_ PHANDLE DataStackHandle,
    _In_ ACCESS_MASK DesiredAccess,
    _In_ POBJECT_ATTRIBUTES DataStackAttributes) {
	return ObOpenObjectByName(DataStackAttributes, g_DataStackType, ExGetPreviousMode(),
		nullptr, DesiredAccess, nullptr, DataStackHandle);
}
The simplicity is thanks to the generic ObOpenObjectByName kernel API, which is not documented, but is exported, that attempts to open a handle to any named object:
NTSTATUS ObOpenObjectByName(
	_In_ POBJECT_ATTRIBUTES ObjectAttributes,
	_In_ POBJECT_TYPE ObjectType,
	_In_ KPROCESSOR_MODE AccessMode,
	_Inout_opt_ PACCESS_STATE AccessState,
	_In_opt_ ACCESS_MASK DesiredAccess,
	_Inout_opt_ PVOID ParseContext,
	_Out_ PHANDLE Handle);
That’s it for creating and opening a DataStack object. Let’s test it!
Testing
After deploying the driver to a test machine, we can write simple code to create a DataStack object (named or unnamed), and see if it works. Then, we’ll close the handle:
#include <Windows.h>
#include <stdio.h>
#include "..\DataStack\DataStackAPI.h"

int main() {
	HANDLE hDataStack = CreateDataStack(nullptr, 0, 100, 10 << 20, L"MyDataStack");
	if (!hDataStack) {
		printf("Failed to create data stack (%u)\n", GetLastError());
		return 1;
	}

	printf("Handle created: 0x%p\n", hDataStack);

	auto hOpen = OpenDataStack(GENERIC_READ, FALSE, L"MyDataStack");
	if (!hOpen) {
		printf("Failed to open data stack (%u)\n", GetLastError());
		return 1;
	}

	CloseHandle(hDataStack);
	CloseHandle(hOpen);
	return 0;
}
Here is what Process Explorer shows when the handle is open, but not yet closed:

Let’s check the kernel debugger:
kd> !object \Sessions\2\BaseNamedObjects\MyDataStack
Object: ffffc785bb6e8430  Type: (ffffc785ba4fd830) DataStack
    ObjectHeader: ffffc785bb6e8400 (new version)
    HandleCount: 1  PointerCount: 32769
    Directory Object: ffff92013982fe70  Name: MyDataStack
lkd> dt nt!_OBJECT_TYPE ffffc785ba4fd830
   +0x000 TypeList         : _LIST_ENTRY [ 0xffffc785`bb6e83e0 - 0xffffc785`bb6e83e0 ]
   +0x010 Name             : _UNICODE_STRING "DataStack"
   +0x020 DefaultObject    : (null)
   +0x028 Index            : 0x4c 'L'
   +0x02c TotalNumberOfObjects : 1
   +0x030 TotalNumberOfHandles : 1
   +0x034 HighWaterNumberOfObjects : 1
   +0x038 HighWaterNumberOfHandles : 2
...
After opening the second handle (by name), the debugger reports two handles (different run):
lkd> !object ffffc585f68e25f0
Object: ffffc585f68e25f0  Type: (ffffc585ee55df10) DataStack
    ObjectHeader: ffffc585f68e25c0 (new version)
    HandleCount: 2  PointerCount: 3
    Directory Object: ffffaf8deb3c60a0  Name: MyDataStack
The source code can be found here.
In future parts, we’ll implement the actual DataStack functionality.