Structured Storage is a Windows technology that abstracts the notions of files and directories behind COM interfaces – mainly IStorageand IStream. Its primary intent is to provide a way to have a file system hierarchy within a single physical file.
Structured Storage has been around for many years, where its most famous usage was in Microsoft Office files (*.doc, *.ppt, *.xls, etc.) – before Office moved to the extended file formats (*.docx, *.pptx, etc.). Of course, the old formats are still very much supported.
The Structured Storage interfaces (IStorage representing a directory, and IStream representing a file) are just that – interfaces. To actually use them, some implementation must be available. Windows provided an implementation of Structured Storage called Compound Files. These terms are sometime used interchangeably, but the distinction is important: Compound Files is just one implementation of Structured Storage – there could be others. Compound Files does not implement everything that could be implemented based on the defined Structured Storage interfaces, but it implements a lot, definitely enough to make it useful.
You can download an old tool (but still works well) called SSView, which can be used to graphically view the contents of physical files that were created by using the Compound File implementation. Here is a screenshot of SSView, looking at some DOC file:
Here is a more interesting example – information persisted using Sysinternals Autoruns tool (discussed later):
A more interesting hierarchy is clearly visible – although it’s all in a single file!
The Main Interfaces
The IStorage interface represents a “directory”, that can contain other directories and “files”, represented as IStream interface implementations. To get started a physical file can be created with StgCreateStorageExor an existing file opened with StgOpenStorageEx. Both return an IStorage pointer on success. From there, methods on IStorage can be called to create or open other directories (storages) and/or files (streams).
The most useful methods on IStorage are CreateStorage, CreateStream, OpenStorage and OpenStream. Enumeration of storages/streams is possible with EnumElements. Here is an example for opening a compound file for read access (filename is from a command line argument):
CComPtr<IStorage> spStg;
auto hr = ::StgOpenStorageEx(argv[1], STGM_READ | STGM_SHARE_EXCLUSIVE,
	STGFMT_STORAGE, 0, nullptr, nullptr, __uuidof(IStorage), reinterpret_cast<void**>(&spStg));
if (FAILED(hr)) {
	printf("Failed to open file (0x%X)\n", hr);
	return hr;
}
The following demonstrates enumerating the hierarchy of a given storage, recursively:
Each item has a name, but streams (“files”) can have data. The cbSize member of STATSTG returns that size. A stream is just an abstraction over a bunch of bytes. To actually read/write from/to a stream, it needs to be opened with IStorage::OpenStream before accessing the data with IStream::Read, IStream::Write and similar methods.
More on Streams
The IStream interface is used in various places within the Windows API, not just part of Structured Storage. It represents an abstraction over a buffer, that in theory could be anywhere – that’s the nice thing about an abstraction. Given an IStream pointer, you can read, wrote, seek, copy to another stream, clone, and even commit/revert a transaction, if supported by the implementation. Compound Files, by the way, doesn’t support transactions on streams.
Outside of Structured Storage, streams can be obtained in several ways.
The CreateStreamOnHGlobal API creates a memory buffer over an optional HGLOBAL (can be NULL to allocate a new one) and returns an IStream pointer to that memory buffer. This is useful when dealing with the clipboard for example, as it requires an HGLOBAL, which may not be convenient to work with. By getting an IStream pointer, the code can work with it (maybe reading it from another stream, or manually populating it with data), and then calling GetHGlobalFromStream to get the underlying HGLOBAL before passing it to the clipboard (e.g. SetClipboardData).
A stream can also be obtained for a file directly by calling SHCreateStreamOnFile, providing a convenient access to file data, abstracted as IStream.
Another case where IStream makes an appearance is in ActiveX controls persistence.
Yet another example of using IStream is as a way to “package” information for COM object’s state that would allow creating a proxy to that object from a different apartment by calling CoMarshalInterThreadInterfaceInStream(probably the longest-name COM API), that captures the state required (as an IStream) to pass to another apartment, where the corresponding CoGetInterfaceAndReleaseStreamcan be called to generate a proxy to the original object, if needed.
Case Study: Autoruns
Back in 2021 when I was working for the Sysinternals team, one of my tasks was to modernize Autoruns from a GUI perspective. I thought I would take this opportunity to do a significant rewrite, so that it would be easier to maintain the tool and improve it as needed. Fortunately, Mark Russinovich was onboard with that, although my time estimate for this project was way off 🙂 But I digress.
One of the features of Autoruns is the ability to save the information provided by the tool so it can be loaded later, possibly on a different machine. This is non-trivial, as some of the information is not easy to persist, such as icons. I don’t recall if the old Autoruns persisted them, but I definitely wanted to do so.
The old Autoruns format was sequential in nature, storing structures of data linearly in the file. Any new properties that needed to be added would require offset changes, which forced changing the format “version” and make the correct decisions when reading a file in an various “old” formats.
I wanted to make persistence more flexible, so I decided to change the format completely to be a compound file. With this scheme, adding new properties would not cause any issues – a new stream may be added, but other streams are not disturbed. The code could just ignore properties (could be storages and/or streams) it wasn’t aware of. This made the format extensible by definition, immune to any offset changes, and very easy to view using tools, like SSView. The above screenshot is from an Autoruns-persisted file.
Persisting icons, by the way, becomes pretty easy, because ImageList objects, used by Autoruns to hold collection of icons can be persisted to a stream with a single function call: ImageList_Write; very convenient!
Conclusion
The Structured Storage idea is a powerful one, and the Compound File implementation provided by Windows is pretty good and flexible. One of the reasons Microsoft moved Office to a new format was the need to make files smaller, so the new extended formats are ZIP compressed. Their internal format changed as well, and is not using Compound Files for the most part. A Structured Storage file could be compressed, saving disk space, while still maintaining convenient access using storages and streams.
I’m happy to announce 3 upcoming remote training classes to be held in June and July.
Windows System Programming
This is a 5-day class, split into 10 half-days. The syllabus can be found here.
All times are 11am to 3pm ET (8am to 11am, PT) (4pm to 8pm, London time)
June: 7, 8, 12, 14, 15, 19, 21, 22, 26, 28
Cost: 950 USD if paid by an individual, 1900 USD if paid by a company.
COM Programming
This is a 3-day course, split into 6 half-days. The syllabus can be found here.
All times are 11am to 3pm ET (8am to 11am, PT) (4pm to 8pm, London time)
July: 10, 11, 12, 17, 18, 19
Cost: 750 USD (if paid by an individual), 1500 USD if paid by a company.
x64 Architecture and Programming
This is a brand new, 3 day class, split into 6 half-days, that covers the x64 processor architecture, programming in general, and programming in the context of Windows. The syllabus is not finalized yet, but it will cover at least the following topics:
General architecture and brief history
Registers
Addressing modes
Stand-alone assembly programs
Mixing assembly with C/C++
MSVC compiler-generated assembly
Operating modes: real, protected, long (+paging)
Major instruction groups
Macros
Shellcode
BIOS and assembly
July: 24, 25, 26, 31, August: 1, 2
Cost: 750 USD (if paid by an individual), 1500 USD if paid by a company.
Registration
If you’d like to register, please send me an email to zodiacon@live.com and provide the name of the training class of interest, your full name, company (if any), preferred contact email, and your time zone. Previous participants in my classes get 10% off. If you register for more than one class, the second (and third) are 10% off as well.
The sessions will be recorded, so you can watch any part you may be missing, or that may be somewhat overwhelming in “real time”.
Today I’m happy to announce the next COM Programming class to be held in February 2023. The syllabus for the 3 day class can be found here. The course will be delivered in 6 half-days (4 hours each).
Dates: February (7, 8, 9, 14, 15, 16). Times: 11am to 3pm EST (8am to 12pm PST) (4pm to 8pm UT) Cost: 750USD (if paid by an individual), 1400 USD (if paid by a company).
Half days should make it comfortable enough even if you’re not in an ideal time zone.
The class will be conducted remotely using Microsoft Teams.
What you need to know before the class: You should be comfortable using Windows on a Power User level. Concepts such as processes, threads, DLLs, and virtual memory should be understood fairly well. You should have experience writing code in C and some C++. You don’t have to be an expert, but you must know C and basic C++ to get the most out of this class. In case you have doubts, talk to me.
Participants in my Windows Internals and Windows System Programming classes have the required knowledge for the class.
We’ll start by looking at why COM was created in the first place, and then build clients and servers, digging into various mechanisms COM provides. See the syllabus for more details.
Previous students in my classes get 10% off. Multiple participants from the same company get a discount (email me for the details).
To register, send an email to zodiacon@live.com with the title “COM Programming Training”, and write the name(s), email(s) and time zone(s) of the participants.
Clients program against interfaces, never concrete classes.
Location transparency – clients need not know where the actual object is (in-process, out-of-process, another machine).
Although simple in principle, there are many details involved in COM, as those with COM experience are well aware. In this post, I’d like to introduce one extensibility aspect of COM called Monikers.
The idea of a moniker is to provide some way to identify and locate specific objects based on string names instead of some custom mechanism. Windows provides some implementations of monikers, most of which are related to Object Linking and Embedding (OLE), most notably used in Microsoft Office applications. For example, when an Excel chart is embedded in a Word document as a link, an Item moniker is used to point to that specific chart using a string with a specific format understood by the moniker mechanism and the specific monikers involved. This also suggests that monikers can be combined, which is indeed the case. For example, a cell in some Excel document can be located by going to a specific sheet, then a specific range, then a specific cell – each one could be pointed to by a moniker, that when chained together can locate the required object.
Let’s start with perhaps the simplest example of an existing moniker implementation – the Class moniker. This moniker can be used to replace a creation operation. Here is an example that creates a COM object using the “standard” mechanism of calling CoCreateInstance:
#include <shlobjidl.h>
//...
CComPtr<IShellWindows> spShell;
auto hr = spShell.CoCreateInstance(__uuidof(ShellWindows));
I use the ATL smart pointers (#include <atlcomcli.h> or <atlbase.h>). The interface and class I’m using is just an example – any standard COM class would work. The CoCreateInstance method calls the real CoCreateInstance. To make it clearer, here is the CoCreateInstance call without using the helper provided by the smart pointer:
CComPtr<IShellWindows> spShell;
auto hr = ::CoCreateInstance(__uuidof(ShellWindows), nullptr,
    CLSCTX_ALL, __uuidof(IShellWindows),
    reinterpret_cast<void**>(&spShell));
CoCreateInstance itself is a glorified wrapper for calling CoGetClassObjectto retrieve a class factory, requesting the standard IClassFactory interface, and then calling CreateInstance on it:
CComPtr<IClassFactory> spCF;
auto hr = ::CoGetClassObject(__uuidof(ShellWindows),
    CLSCTX_ALL, nullptr, __uuidof(IClassFactory),
    reinterpret_cast<void**>(&spCF));
if (SUCCEEDED(hr)) {
    CComPtr<IShellWindows> spShell;
    hr = spCF->CreateInstance(nullptr, __uuidof(IShellWindows),
        reinterpret_cast<void**>(&spShell));
    if (SUCCEEDED(hr)) {
        // use spShell
    }
}
Here is where the Class moniker comes in: It’s possible to get a class factory directly using a string like so:
Using CoGetObject is the most convenient way in C++ to locate an object based on a moniker. The moniker name is the string provided to CoGetObject. It starts with a ProgID of sorts followed by a colon. The rest of the string is to be interpreted by the moniker behind the scenes. With the class factory in hand, the code can use IClassFactory::CreateInstance just as with the previous example.
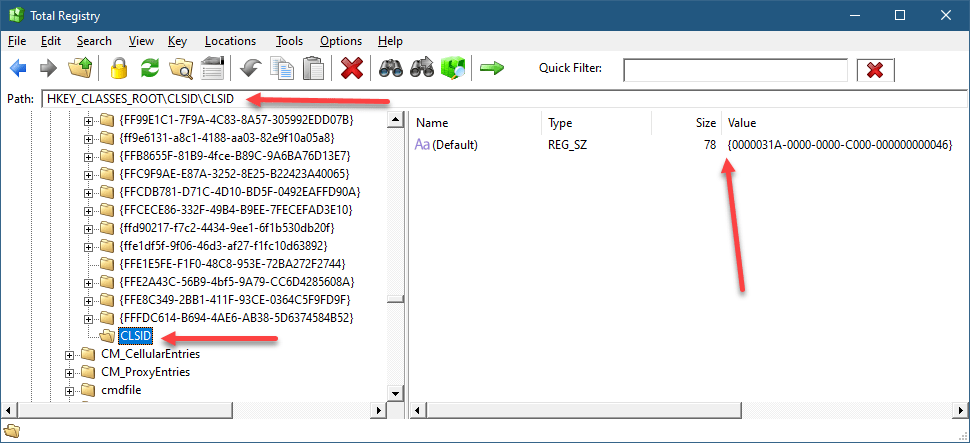
How does it work? As is usual with COM, the Registry is involved. If you open RegEdit or TotalRegistry and navigate to HKYE_CLASSES_ROOT, ProgIDs are all there. One of them is “clsid” – yes, it’s a bit weird perhaps, but the entry point to the moniker system is that ProgID. Each ProgID should have a CLSID subkey pointing to the class ID of the moniker. So here, the key is HKCR\CLSID\CLSID!
Class Moniker Registration
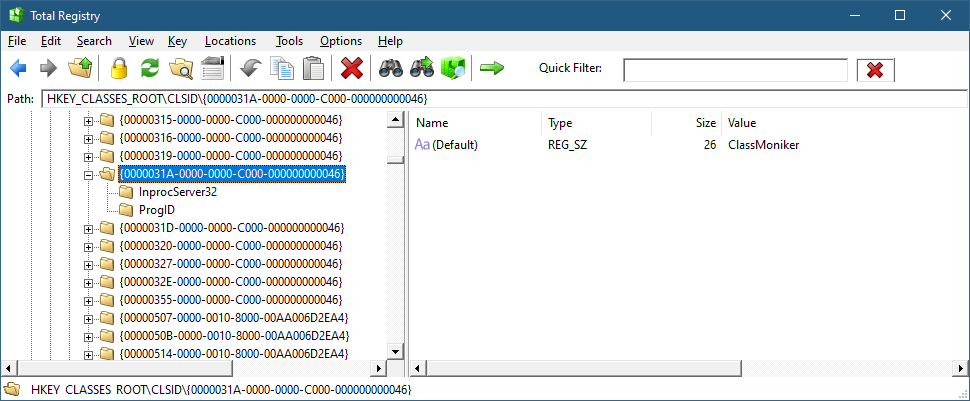
Of course, other monikers have different names (not CLSID). If we follow the CLSID on the right to the normal location for COM CLSID registration (HKCR\CLSID), this is what we find:
Class moniker
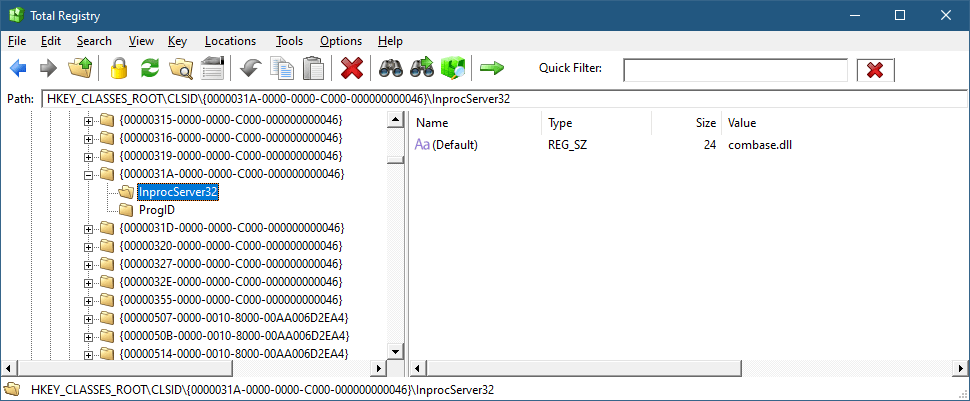
And the InProcServer32 subkey points to Combase.dll, the DLL implementing the COM infrastructure:
Class Moniker Implementation
At this point, we know how the class moniker got discovered, but it’s still not clear what is that moniker and where is it anyway?
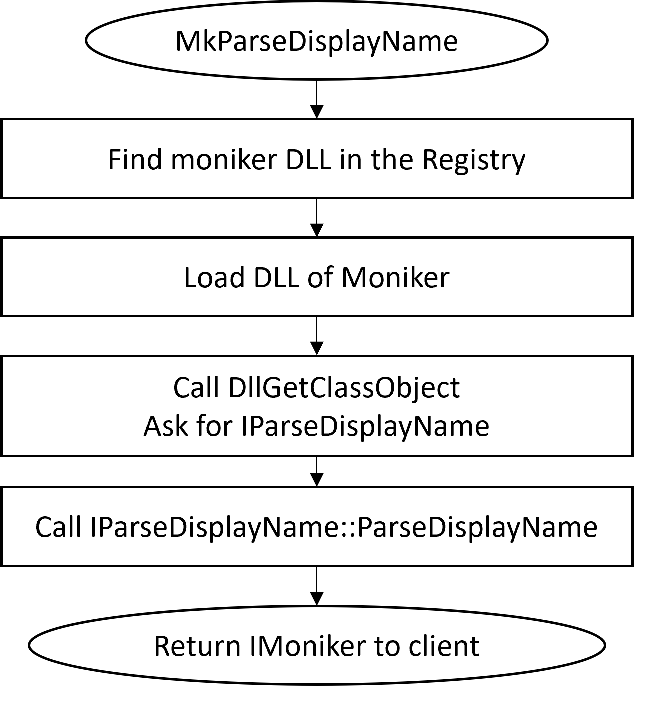
As mentioned earlier, CoGetObjectis the simplest way to get an object from a moniker, as it hides the details of the moniker itself. CoGetObject is a shortcut for calling MkParseDisplayName– the real entry point to the COM moniker namespace. Here is the full way to get a class moniker by going through the moniker:
MkParseDisplayName takes a “display name” – a string, and attempts to locate the moniker based on the information in the Registry (it actually has some special code for certain OLE stuff which is not interesting in this context). The Bind Context is a helper object that can (in the general case) contain an arbitrary set of properties that can be used by the moniker to customize the way it interprets the display name. The class moniker does not use any property, but it’s still necessary to provide the object even if it has no interesting data in it. If successful, MkParseDisplayName returns the moniker interface pointer, implementing the IMoniker interface that all monikers must implement. IMonikeris somewhat a scary interface, having 20 methods (excluding IUnknown). Fortunately, not all have to be implemented. We’ll get to implementing our own moniker soon.
The primary method in IMoniker is BindToObject, which is tasked of interpreting the display name, if possible, and returning the real object that the client is trying to locate. The client provides the interface it expects the target object to implement – IClassFactory in the case of a class moniker.
You might be wondering what’s the point of the class moniker if you could simply create the required object directly with the normal class factory. One advantage of the moniker is that a string is involved, which allows “late binding” of sorts, and allows other languages, such as scripting languages, to create COM objects indirectly. For example, VBScript provides the GetObject function that calls CoGetObject.
Implementing a Moniker
Some details are still missing, such as how does the moniker object itself gets created? To show that, let’s implement our own moniker. We’ll call it the Process Moniker – its purpose is to locate a COM process object we’ll implement that allows working with a Windows Process object.
Here is an example of something a client would do to find a process object based on its PID, and then display its executable path:
BIND_OPTS opts{ sizeof(opts) };
CComPtr<IWinProcess> spProcess;
auto hr = ::CoGetObject(L"process:3284",
    &opts, __uuidof(IWinProcess),
    reinterpret_cast<void**>(&spProcess));
if (SUCCEEDED(hr)) {
    CComBSTR path;
    if (S_OK == spProcess->get_ImagePath(&path)) {
        printf("Image path: %ws\n", path.m_str);
    }
}
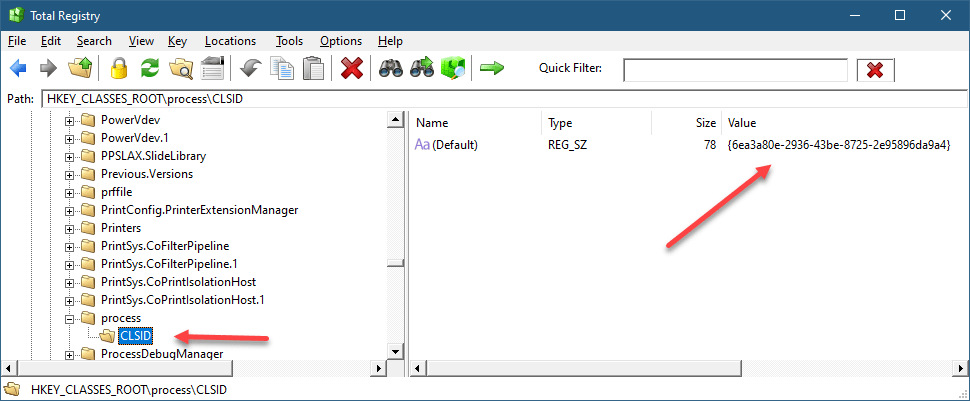
The IWinProcess is the interface our process object implements, but there is no need to know its CLSID (in fact, it has none, and is created privately by the moniker). The display name “prcess:3284” identifies the string “process” as the moniker name, meaning there must be a subkey under HKCR named “process” for this to have any chance of working. And under the “process” key there must be the CLSID of the moniker. Here is the final result:
process moniker
The CLSID of the process moniker must be registered normally like all COM classes. The text after the colon is passed to the moniker which should interpret it in a way that makes sense for that moniker (or fail trying). In our case, it’s supposed to be a PID of an existing process.
Let’s see the main steps needed to implement the process moniker. From a technical perspective, I created an ATL DLL project in Visual Studio (could be an EXE as well), and then added an “ATL Simple Object” class template to get the boilerplate code the ATL template provides. We just need to implement IMoniker – no need for some custom interface. Here is the layout of the class:
Those familiar with the typical code the ATL wizard generates might notice one important difference from the standard template: the class factory. It turns out that monikers are not created by an IClassFactory when called by a client invoking MkParseDisplayName (or its CoGetObject wrapper), but instead must implement the interface IParseDisplayName, which we’ll tackle in a moment. This is why DECLARE_CLASSFACTORY_EX(CMonikerClassFactory) is used to instruct ATL to use a custom class factory which we must implement.
MkParseDisplayName operation
Before we get to that, let’s implement the “main” method – BindToObject. We have to assume that the m_DisplayName member already has the process ID – it will be provided by our class factory that creates our moniker. First, we’ll convert the display name to a number:
Next, we’ll attempt to open a handle to the process:
auto hProcess = ::OpenProcess(PROCESS_QUERY_LIMITED_INFORMATION,
    FALSE, pid);
if (!hProcess)
    return HRESULT_FROM_WIN32(::GetLastError());
If we fail, we just return a failed HRESULT and we’re done. If successful, we can create the WinProcess object, pass the handle and return the interface requested by the client (if supported):
The creation of the object is internal via CComObject<>. The WinProcess COM class is not registered, which is just a matter of choice. I decided, a WinProcess object can only be obtained through the Process Moniker.
The calls to AddRef/Release may be puzzling, but there is a good reason for using them. When creating a CComObject<> object, the reference count of the object is zero. Then, the call to AddRef increments it to 1. Next, if the QueryInterface call succeeds, the ref count is incremented to 2. Then, the Release call decrements it to 1, as that is the correct count when the object is returned to the client. If, however, the call to QI fails, the ref count remains at 1, and the Release call will destroy the object! More elegant than calling delete.
SetHandle is a function in CWinProcess (outside the IWinProcess interface) that passes the handle to the object.
The WinProcess COM class is the uninteresting part in all of these, so I created a bare minimum class like so:
The APIs used above are fairly straightforward and of course fully documented.
The last piece of the puzzle is the moniker’s class factory:
class ATL_NO_VTABLE CMonikerClassFactory :
	public ATL::CComObjectRootEx<ATL::CComMultiThreadModel>,
	public IParseDisplayName {
public:
	BEGIN_COM_MAP(CMonikerClassFactory)
		COM_INTERFACE_ENTRY(IParseDisplayName)
	END_COM_MAP()

	// Inherited via IParseDisplayName
	HRESULT __stdcall ParseDisplayName(IBindCtx* pbc, LPOLESTR pszDisplayName, ULONG* pchEaten, IMoniker** ppmkOut) override;
};
Just one method to implement:
HRESULT __stdcall CMonikerClassFactory::ParseDisplayName(
    IBindCtx* pbc, LPOLESTR pszDisplayName,
    ULONG* pchEaten, IMoniker** ppmkOut) {
    auto colon = wcschr(pszDisplayName, L':');
    ATLASSERT(colon);
    if (colon == nullptr)
        return E_INVALIDARG;

    //
    // simplistic, assume all display name consumed
    //
    *pchEaten = (ULONG)wcslen(pszDisplayName);

    CComObject<CProcessMoniker>* pMon;
    auto hr = pMon->CreateInstance(&pMon);
    if (FAILED(hr))
        return hr;

    //
    // provide the process ID
    //
    pMon->m_DisplayName = colon + 1;
    pMon->AddRef();
    hr = pMon->QueryInterface(ppmkOut);
    pMon->Release();
    return hr;
}
First, the colon is searched for, as the display name looks like “process:xxxx”. The “xxxx” part is stored in the resulting moniker, created with CComObject<>, similarly to the CWinProcess earlier. The pchEaten value reports back how many characters were consumed – the moniker factory should parse as much as it understands, because moniker composition may be in play. Hopefully, I’ll discuss that in a future post.
Finally, registration must be added for the moniker. Here is ProcessMoniker.rgs, where the lower part was added to connect the “process” ProgId/moniker name to the CLSID of the process moniker:
HKCR
{
	NoRemove CLSID
	{
		ForceRemove {6ea3a80e-2936-43be-8725-2e95896da9a4} = s 'ProcessMoniker class'
		{
			InprocServer32 = s '%MODULE%'
			{
				val ThreadingModel = s 'Both'
			}
			TypeLib = s '{97a86fc5-ffef-4e80-88a0-fa3d1b438075}'
			Version = s '1.0'
		}
	}
	process = s 'Process Moniker Class'
	{
		CLSID = s '{6ea3a80e-2936-43be-8725-2e95896da9a4}'
	}
}
And that is it. Here is an example client that terminates a process given its ID:
The Windows Registry is one of the most recognized aspects of Windows. It’s a hierarchical database, storing information on a machine-wide basis and on a per-user basis… mostly. In this post, I’d like to examine the major parts of the Registry, including the “real” Registry.
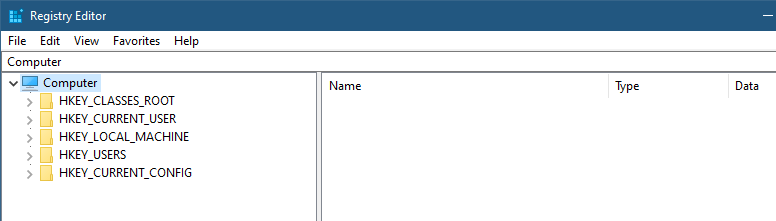
Looking at the Registry is typically done by launching the built-in RegEdit.exe tool, which shows the five “hives” that seem to comprise the Registry:
RegEdit showing the main hives
These so-called “hives” provide some abstracted view of the information in the Registry. I’m saying “abstracted”, because not all of these are true hives. A true hive is stored in a file. The full hive list can be found in the Registry itself – at HKLM\SYSTEM\CurrentControlSet\Control\hivelist (I’ll abbreviate HKEY_LOCAL_MACHINE as HKLM), mapping an internal key name to the file where it’s stored (more on these “internal” key names will be discussed soon):
The hive list
Let’s examine the so-called “hives” as seen in the root RegEdit’s view.
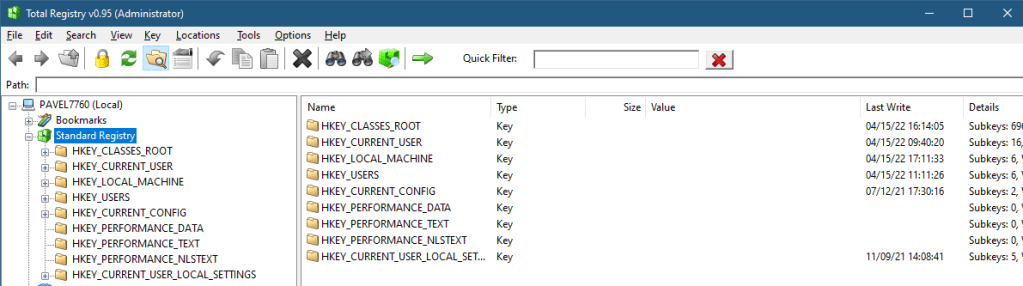
HKEY_LOCAL_MACHINE is the simplest to understand. It contains machine-wide information, most of it stored in files (persistent). Some details related to hardware is built when the system initializes and is only kept in memory while the system is running. Such keys are volatile, since their contents disappear when the system is shut down. There are many interesting keys within HKLM, but my goal is not to go over every key (that would take a full book), but highlight a few useful pieces. HKLM\System\CurrentControlSet\Services is the key where all services and device drivers are installed. Note that “CurrentControlSet” is not a true key, but in fact is a link key, connecting it to something like HKLM\System\ControlSet001. The reason for this indirection is beyond the scope of this post. Regedit does not show this fact directly – there is no way to tell whether a key is a true key or just points to a different key. This is one reason I createdTotal Registry (formerly called Registry Explorer), that shows these kind of nuances:
The liked key seems to have a weird name starting with \REGISTRY\MACHINE\. We’ll get to that shortly.
Other subkeys of note under HKLM include SOFTWARE, where installed applications store their system-level information; SAM and SECURITY, where local security policy and local accounts information are managed. These two subkeys contents is not not visible – even administrators don’t get access – only the SYSTEM account is granted access. One way to see what’s in these keys is to use psexec from Sysinternals to launch RegEdit or TotalRegistry under the SYSTEM account. Here is a command you can run in an elevated command window that will launch RegEdit under the SYSTEM account (if you’re using RegEdit, close it first):
psexec -s -i -d RegEdit
The -s switch indicates the SYSTEM account. -i is critical as to run the process in the interactive session (the default would run it in session 0, where no interactive user will ever see it). The -d switch is optional, and simply returns control to the console while the process is running, rather than waiting for the process to terminate.
The other way to gain access to the SAM and SECURITY subkeys is to use the “Take Ownership” privilege (easy to do when the Permissions dialog is open), and transfer the ownership to an admin user – the owner can specify who can do what with an object, and allow itself full access. Obviously, this is not a good idea in general, as it weakens security.
The BCD00000000 subkey contains the Boot Configuration Data (BCD), normally accessed using the bcdedit.exe tool.
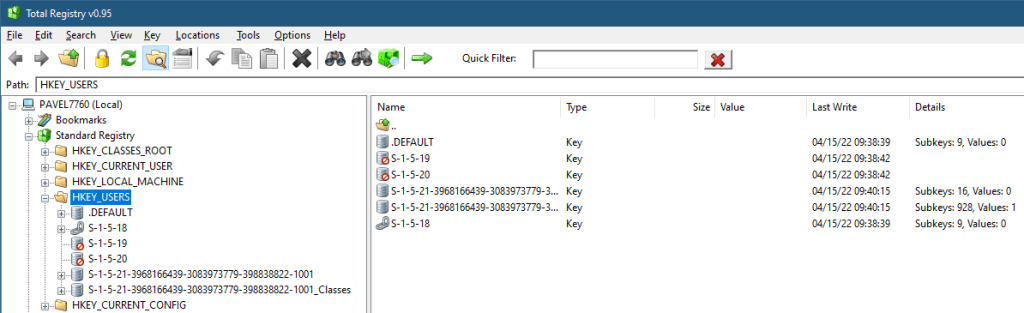
HKEY_USERS – this is the other hive that truly stores data. Its subkeys contain user profiles for all users that ever logged in locally to this machine. Each subkey’s name is a Security ID (SID), in its string representation:
HKEY_USERS
There are 3 well-known SIDs, representing the SYSTEM (S-1-5-18), LocalService (S-1-5-19), and NetworkService (S-1-5-20) accounts. These are the typical accounts used for running Windows Services. “Normal” users get ugly SIDs, such as the one shown – that’s my user’s local SID. You may be wondering what is that “_Classes” suffix in the second key. We’ll get to that as well.
HKEY_CURRENT_USER is a link key, pointing to the user’s subkey under HKEY_USERS running the current process. Obviously, the meaning of “current user” changes based on the process access token looking at the Registry.
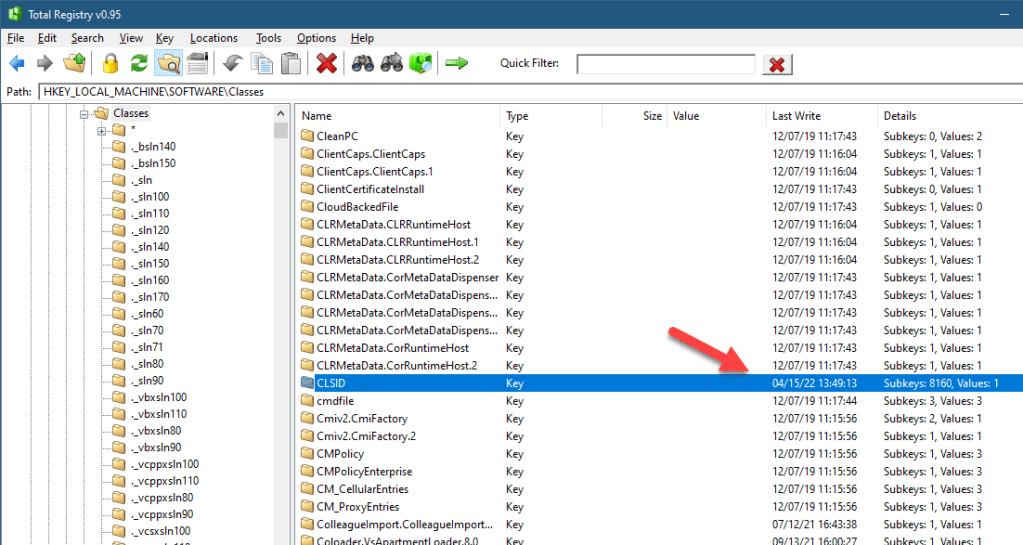
HKEY_CLASSES_ROOT is the most curious of the keys. It’s not a “real” key in the sense that it’s not a hive – not stored in a file. It’s not a link key, either. This key is a “combination” of two keys: HKLM\Software\Classes and HKCU\Software\Classes. In other words, the information in HKEY_CLASSES_ROOT is coming from the machine hive first, but can be overridden by the current user’s hive. What information is there anyway? The first thing is shell-related information, such as file extensions and associations, and all other information normally used by Explorer.exe. The second thing is information related to the Component Object Model (COM). For example, the CLSID subkey holds COM class registration (GUIDs you can pass to CoCreateInstance to (potentially) create a COM object of that class). Looking at the CLSID subkey under HKLM\Software\Classes shows there are 8160 subkeys, or roughly 8160 COM classes registered on my system from HKLM:
HKLM\Software\Classes
Looking at the same key under HKEY_CURRENT_USER tells a different story:
HKCU\Software\Classes
Only 46 COM classes provide extra or overridden registrations. HKEY_CLASSES_ROOT combines both, and uses HKCU in case of a conflict (same key name). This explains the extra “_Classes” subkey within the HKEY_USERS key – it stores the per user stuff (in the file UsrClasses.dat in something like c:\Users\<username>\AppData\Local\Microsoft\Windows).
HKEY_CURRENT_CONFIG is a link to HKLM\SYSTEM\CurrentControlSet\Hardware\Profiles\Current
The list of “standard” hives (the hives accessible by official Windows APIs such as RegOpenKeyEx contains some more that are not shown by Regedit. They can be viewed by TotalReg if the option “Extra Hives” is selected in the View menu. At this time, however, the tool needs to be restarted for this change to take effect (I just didn’t get around to implementing the change dynamically, as it was low on my priority list). Here are all the hives accessible with the official Windows API:
All hives
I’ll let the interested reader to dig further into these “extra” hives. On of these hives deserves special mentioning – HKEY_PERFORMANCE_DATA – it was used in the pre Windows 2000 days as a way to access Performance Counters. Registry APIs had to be used at the time. Fortunately, starting from Windows 2000, a new dedicated API is provided to access Performance Counters (functions starting with Pdh* in <pdh.h>).
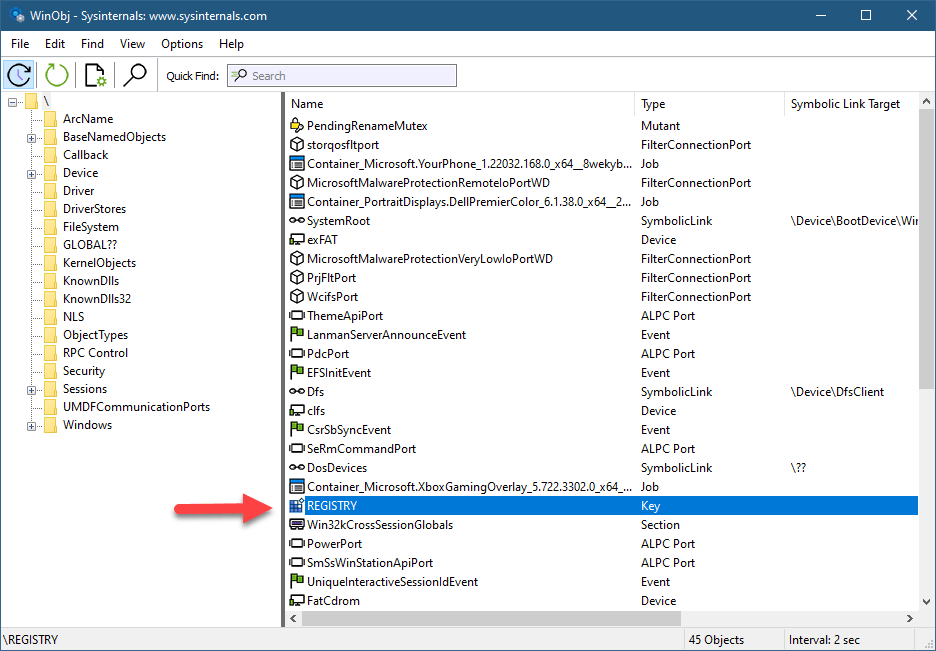
Is this it? Is this the entire Registry? Not quite. As you can see in TotalReg, there is a node called “Registry”, that tells yet another story. Internally, all Registry keys are rooted in a single key called REGISTRY. This is the only named Registry key. You can see it in the root of the Object Manager’s namespace with WinObjfrom Sysinternals:
WinObj from Sysinternals showing the Registry key object
Here is the object details in a Local Kernel debugger:
All other Registry keys are based off of that root key, the Configuration Manager (the kernel component in charge of the Registry) parses the remaining path as expected. This is the real Registry. The official Windows APIs cannot use this path format, but native APIs can. For example, using NtOpenKey (documented as ZwOpenKey in the Windows Driver Kit, as this is a system call) allows such access. This is how TotalReg is able to look at the real Registry.
Clearly, the normal user-mode APIs somehow map the “standard” hive path to the real Registry path. The simplest is the mapping of HKEY_LOCAL_MACHINE to \REGISTRY\MACHINE. Another simple one is HKEY_USERS mapped to \REGISTRY\USER. HKEY_CURRENT_USER is a bit more complex, and needs to be mapped to the per-user hive under \REGISTRY\USER. The most complex is our friend HKEY_CLASSES_ROOT – there is no simple mapping – the APIs have to check if there is per-user override or not, etc.
Lastly, it seems there are keys in the real Registry that cannot be reached from the standard Registry at all:
The real Registry
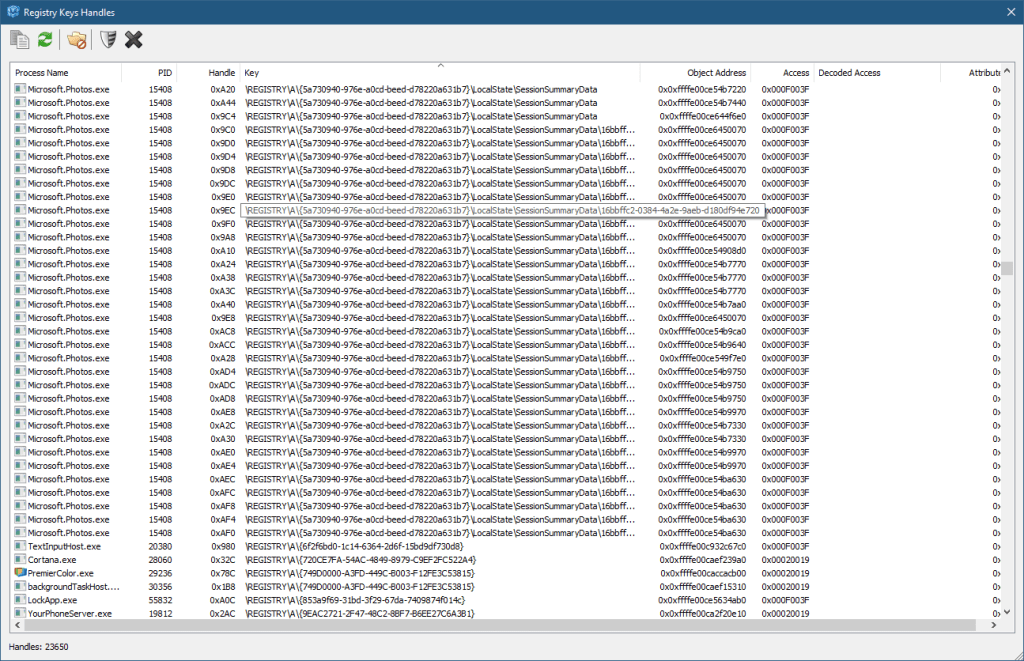
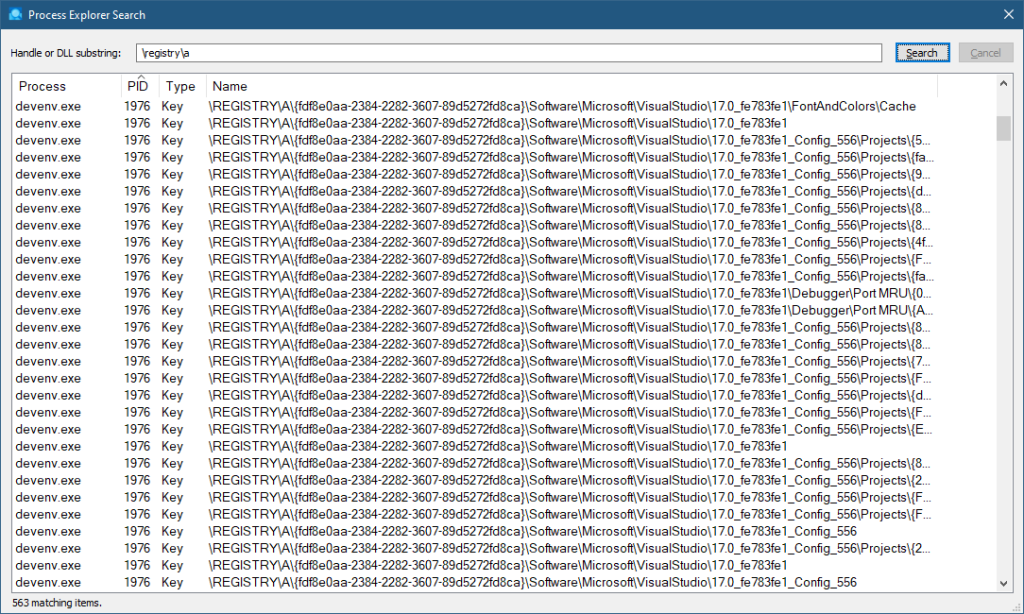
There is a key named “A” which seems inaccessible. This key is used for private keys in processes, very common in Universal Windows Application (UWP) processes, but can be used in other processes as well. They are not accessible generally, not even with kernel code – the Configuration Manager prevents it. You can verify their existence by searching for \Registry\A in tools like Process Explorer or TotalReg itself (by choosing Scan Key Handles from the Tools menu). Here is TotalReg, followed by Process Explorer:
TotalReg key handlesProcess Explorer key handles
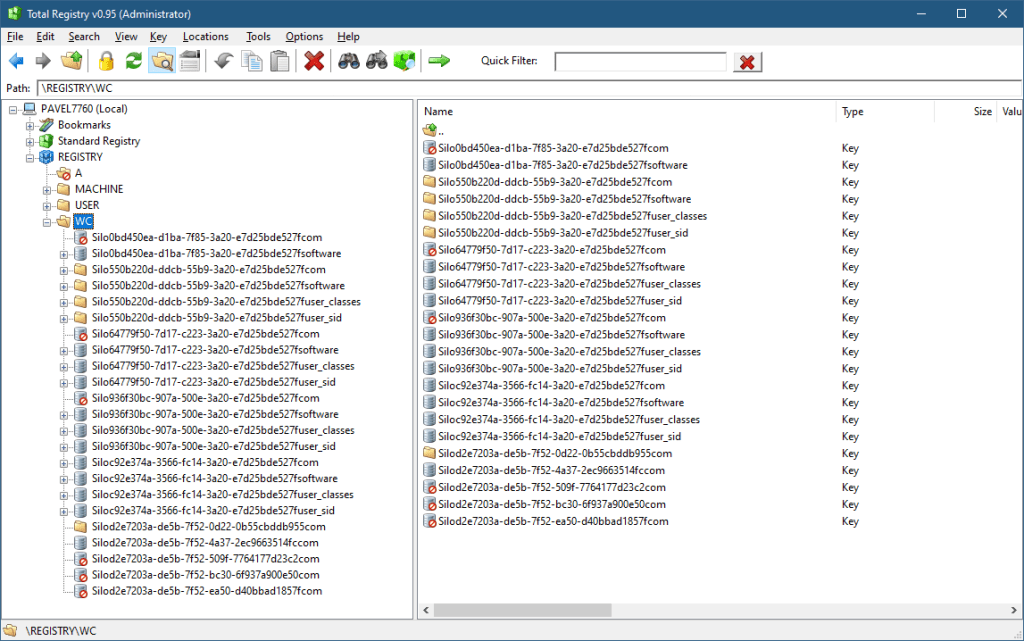
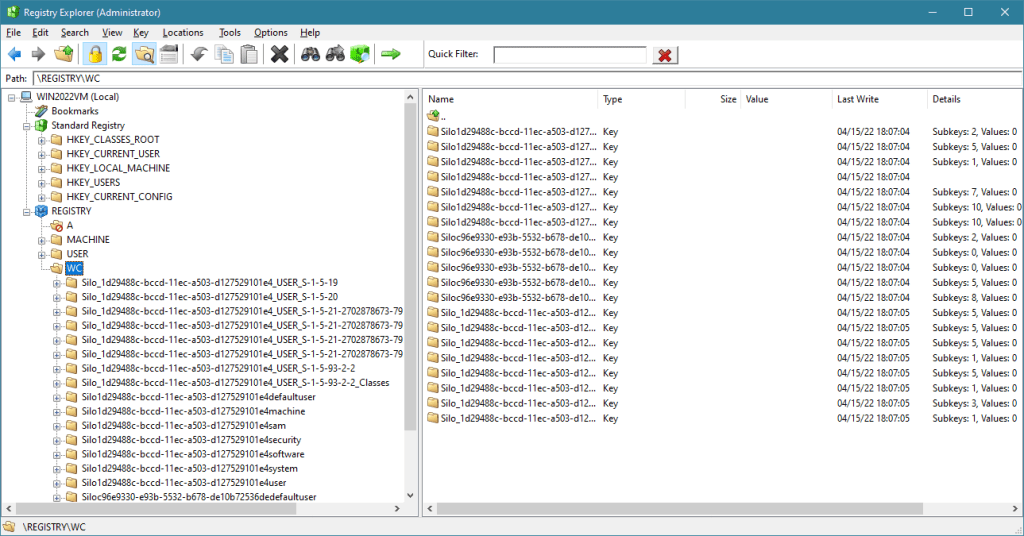
Finally, the WC key is used for Windows Container, internally called Silos. A container (like the ones created by Docker) is an isolated instance of a user-mode OS, kind of like a lightweight virtual machine, but the kernel is not separate (as would be with a true VM), but is provided by the host. Silos are very interesting, but outside the scope of this post.
Briefly, there are two main Silo types: An Application Silo, which is not a true container, and mostly used with application based on the Desktop Bridge technology. A classic example is WinDbg Preview. The second type is Server Silo, which is a true container. A true container must have its file system, Registry, and Object Manager namespace virtualized. This is exactly the role of the WC subkeys – provide the private Registry keys for containers. The Configuration Manager (as well as other parts of the kernel) are Silo-aware, and will redirect Registry calls to the correct subkey, having no effect on the Host Registry or the private Registry of other Silos.
You can examine some aspects of silos with the kernel debugger !silo command. Here is an example from a server 2022 running a Server Silo and the Registry keys under WC:
There you have it. The relatively simple-looking Registry shown in RegEdit is viewed differently by the kernel. Device driver writers find this out relatively early – they cannot use the “abstractions” provided by user mode even if these are sometimes convenient.
Update: the class is cancelled. I guess there weren’t that many people interested in COM this time around.
Today I’m opening registration for the COM Programming class to be held in April. The syllabus for the 3 day class can be found here. The course will be delivered in 6 half-days (4 hours each).
Dates: April (25, 26, 27, 28), May (2, 3). Times: 2pm to 6pm, London time Cost: 700USD (if paid by an individual), 1300 USD (if paid by a company).
The class will be conducted remotely using Microsoft Teams or a similar platform.
What you need to know before the class: You should be comfortable using Windows on a Power User level. Concepts such as processes, threads, DLLs, and virtual memory should be understood fairly well. You should have experience writing code in C and some C++. You don’t have to be an expert, but you must know C and basic C++ to get the most out of this class. In case you have doubts, talk to me.
Participants in my Windows Internals and Windows System Programming classes have the required knowledge for the class.
We’ll start by looking at why COM was created in the first place, and then build clients and servers, digging into various mechanisms COM provides. See the syllabus for more details.
Previous students in my classes get 10% off. Multiple participants from the same company get a discount (email me for the details).
To register, send an email to zodiacon@live.com with the title “COM Training”, and write the name(s), email(s) and time zone(s) of the participants.
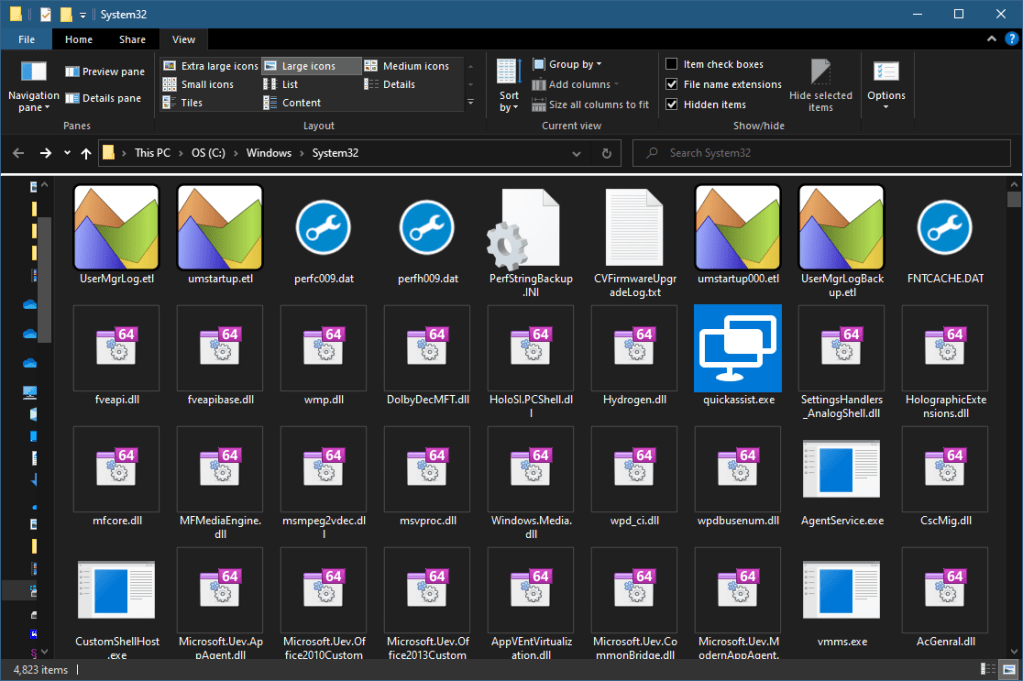
One of the exercises I gave at the recent COM Programming class was to build an Icon Handler that integrates with the Windows Shell, where DLLs should have an icon based on their “bitness” – whether they’re 64-bit or 32-bit Portable Executable (PE).
The Shell provides many opportunities for extensibility. An Icon Handler is one of the simplest, but still requires writing a full-fledged COM component that implements certain interfaces that the shell expects. Here is the result of using the Icon Handler DLL, showing the folders c:\Windows\System32 and c:\Windows\SysWow64 (large icons for easier visibility).
The first step is to create a new ATL project in Visual Studio. I’ll be using Visual Studio 2022, but any recent version would work essentially the same way (e.g. VS 2019, or 2017). Locate the ATL project type by searching in the terrible new project dialog introduced in VS 2019 and still horrible in VS 2022.
ATL (Active Template Library) is certainly not the only way to build COM components. “Pure” C++ would work as well, but ATL provides all the COM boilerplate such as the required exported functions, class factories, IUnknown implementations, etc. Since ATL is fairly “old”, it lacks the elegance of other libraries such as WRL and WinRT, as it doesn’t take advantage of C++11 and later features. Still, ATL has withstood the test of time, is robust, and full featured when it comes to COM, something I can’t say for these other alternatives.
If you can’t locate the ATL project, you may not have ATL installed propertly. Make sure the C++ Desktop development workload is installed using the Visual Studio Installer.
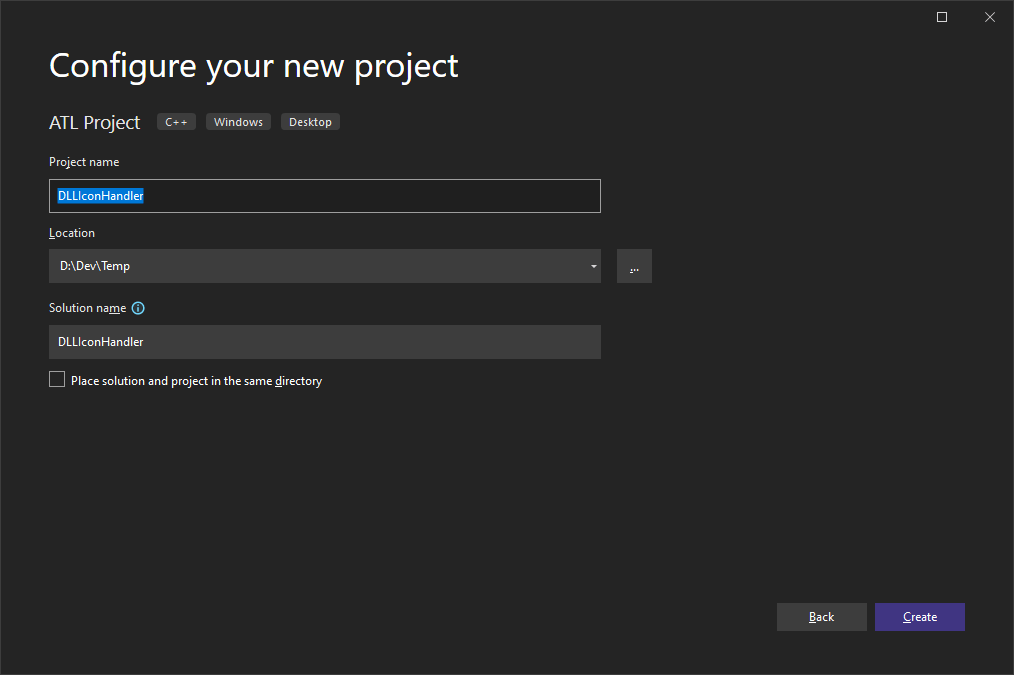
Click Next and select a project name and location:
Click Create to launch the ATL project wizard. Leave all defaults (Dynamic Link Library) and click OK. Shell extensions of all kinds must be DLLs, as these are loaded by Explorer.exe. It’s not ideal in terms of Explorer’s stability, as aun unhandled exception can bring down the entire process, but this is necessary to get good performance, as no inter-process calls are made.
Two projects are created, named DllIconHandler and DllIconHandlerPS. The latter is a proxy/stub DLL that maybe useful if cross-apartment COM calls are made. This is not needed for shell extensions, so the PS project should simply be removed from the solution.
A detailed discussion of COM is way beyond the scope of this post.
The remaining project contains the COM DLL required code, such as the mandatory exported function, DllGetClassObject, and the other optional but recommended exports (DllRegisterServer, DllUnregisterServer, DllCanUnloadNow and DllInstall). This is one of the nice benefits of working with ATL project for COM component development: all the COM boilerplate is implemented by ATL.
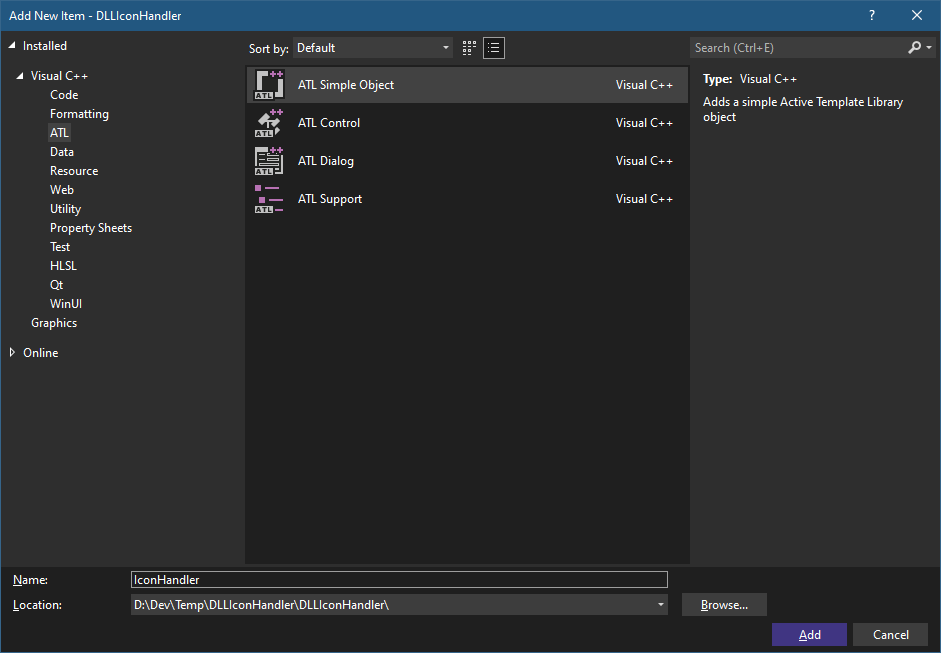
The next step is to add a COM class that will implement our icon handler. Again, we’ll turn to a wizard provided by Visual Studio that provides the fundamentals. Right-click the project and select Add Item… (don’t select Add Class as it’s not good enough). Select the ATL node on the left and ATL Simple Object on the right. Set the name to something like IconHandler:
Click Add. The ATL New Object wizard opens up. The name typed in the Add New Item dialog is used as a basis for generating names for source code elements (like the C++ class) and COM elements (that would be written into the IDL file and the resulting type library). Since we’re not going to define a new interface (we need to implement explorer-defined interfaces), there is no real need to tweak anything. You can click Finish to generate the class.
Three files are added with this last step: IconHandler.h, IconHandler.cpp and IconHandler.rgs. The C++ source files role is obvious – implementing the Icon Handler. The rgs file contains a script in an ATL-provided “language” indicating what information to write to the Registry when this DLL is registered (and what to remove if it’s unregistered).
The IDL (Interface Definition Language) file has also been modified, adding the definitions of the wizard generated interface (which we don’t need) and the coclass. We’ll leave the IDL alone, as we do need it to generate the type library of our component because the ATL registration code uses it internally.
If you look in IconHandler.h, you’ll see that the class implements the IIconHandler empty interface generated by the wizard that we don’t need. It even derives from IDispatch:
class ATL_NO_VTABLE CIconHandler :
	public CComObjectRootEx<CComSingleThreadModel>,
	public CComCoClass<CIconHandler, &CLSID_IconHandler>,
	public IDispatchImpl<IIconHandler, &IID_IIconHandler, &LIBID_DLLIconHandlerLib, /*wMajor =*/ 1, /*wMinor =*/ 0> {
We can leave the IDispatchImpl-inheritance, since it’s harmless. But it’s useless as well, so let’s delete it and also delete the interfaces IIconHandler and IDispatch from the interface map located further down:
class ATL_NO_VTABLE CIconHandler :
	public CComObjectRootEx<CComSingleThreadModel>,
	public CComCoClass<CIconHandler, &CLSID_IconHandler> {
public:
	BEGIN_COM_MAP(CIconHandler)
	END_COM_MAP()
(I have rearranged the code a bit). Now we need to add the interfaces we truly have to implement for an icon handler: IPersistFileand IExtractIcon. To get their definitions, we’ll add an #include for <shlobj_core.h> (this is documented in MSDN). We add the interfaces to the inheritance hierarchy, the COM interface map, and use the Visual Studio feature to add the interface members for us by right-clicking the class name (CIconHandler), pressing Ctrl+. (dot) and selecting Implement all pure virtuals of CIconHandler. The resulting class header looks something like this (some parts omitted for clarity) (I have removed the virtual keyword as it’s inherited and doesn’t have to be specified in derived types):
Now for the implementation. The IPersistFile interface seems non-trivial, but fortunately we just need to implement the Load method for an icon handler. This is where we get the file name we need to inspect. To check whether a DLL is 64 or 32 bit, we’ll add a simple enumeration and a helper function to the CIconHandler class:
The method receives the full path of the DLL we need to examine. How do we know that only DLL files will be delivered? This has to do with the registration we’ll make for the icon handler. We’ll register it for DLL file extensions only, so that other file types will not be provided. Calling GetModuleBitness (shown later) performs the real work of determining the DLL’s bitness and stores the result in m_Bitness (a data member of type ModuleBitness).
All that’s left to do is tell explorer which icon to use. This is the role of IExtractIcon. The Extract method can be used to provide an icon handle directly, which is useful if the icon is “dynamic” – perhaps generated by different means in each case. In this example, we just need to return one of two icons which have been added as resources to the project (you can find those in the project source code. This is also an opportunity to provide your own icons).
For our case, it’s enough to return S_FALSE from Extract that causes explorer to use the information returned from GetIconLocation. Here is its implementation:
The method’s purpose is to return the current (our icon handler DLL) module’s path and the icon index to use. This information is enough for explorer to load the icon itself from the resources. First, we get the module path to where our DLL has been installed. Since this doesn’t change, it’s only retrieved once (with GetModuleFileName) and stored in a static variable (s_ModulePath).
If this fails (unlikely) or the bitness could not be determined (maybe the file was not a PE at all, but just had such an extension), then we return S_FALSE. This tells explorer to use the default icon for the file type (DLL). Otherwise, we store 0 or 1 in piIndex, based on the IDs of the icons (0 corresponds to the lower of the IDs).
Finally, we need to set a flag inside pwFlags to indicate to explorer that this icon extraction is required for every file (GIL_PERINSTANCE). Otherwise, explorer calls IExtractIcon just once for any DLL file, which is the opposite of what we want.
The final piece of the puzzle (in terms of code) is how to determine whether a PE is 64 or 32 bit. This is not the point of this post, as any custom algorithm can be used to provide different icons for different files of the same type. For completeness, here is the code with comments:
CIconHandler::ModuleBitness CIconHandler::GetModuleBitness(PCWSTR path) {
    auto bitness = ModuleBitness::Unknown;
    //
    // open the DLL as a data file
    //
    auto hFile = ::CreateFile(path, GENERIC_READ, FILE_SHARE_READ,
        nullptr, OPEN_EXISTING, 0, nullptr);
    if (hFile == INVALID_HANDLE_VALUE)
        return bitness;

    //
    // create a memory mapped file to read the PE header
    //
    auto hMemMap = ::CreateFileMapping(hFile, nullptr, PAGE_READONLY, 0, 0, nullptr);
    ::CloseHandle(hFile);
    if (!hMemMap)
        return bitness;

    //
    // map the first page (where the header is located)
    //
    auto p = ::MapViewOfFile(hMemMap, FILE_MAP_READ, 0, 0, 1 << 12);
    if (p) {
        auto header = ::ImageNtHeader(p);
        if (header) {
            auto machine = header->FileHeader.Machine;
            bitness = header->Signature == IMAGE_NT_OPTIONAL_HDR64_MAGIC ||
                machine == IMAGE_FILE_MACHINE_AMD64 || machine == IMAGE_FILE_MACHINE_ARM64 ?
                ModuleBitness::Bit64 : ModuleBitness::Bit32;
        }
        ::UnmapViewOfFile(p);
    }
    ::CloseHandle(hMemMap);

    return bitness;
}
To make all this work, there is still one more concern: registration. Normal COM registration is necessary (so that the call to CoCreateInstanceissued by explorer has a chance to succeed), but not enough. Another registration is needed to let explorer know that this icon handler exists, and is to be used for files with the extension “DLL”.
Fortunately, ATL provides a convenient mechanism to add Registry settings using a simple script-like configuration, which does not require any code. The added keys/values have been placed in DllIconHandler.rgs like so:
This sets an icon handler in HKEY_CLASSES_ROOT\DllFile\ShellEx, where the IconHandler value specifies the CLSID of our component. You can find the CLSID in the IDL file where the coclass element is defined:
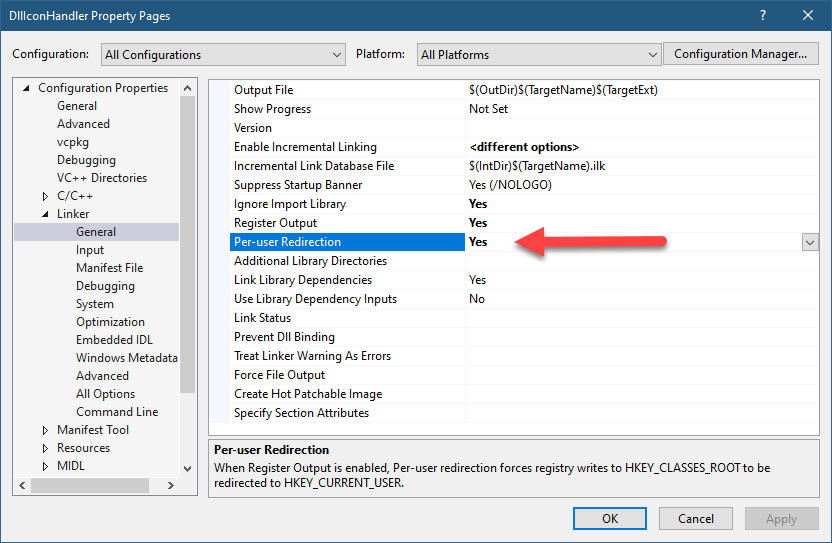
Replace your own CLSID if you’re building this project from scratch. Registration itself is done with the RegSvr32 built-in tool. With an ATL project, a successful build also causes RegSvr32 to be invoked on the resulting DLL, thus performing registration. The default behavior is to register in HKEY_CLASSES_ROOT which uses HKEY_LOCAL_MACHINE behind the covers. This requires running Visual Studio elevated (or an elevated command window if called from outside VS). It will register the icon handler for all users on the machine. If you prefer to register for the current user only (which uses HKEY_CURRENT_USER and does not require running elevated), you can set the per-user registration in VS by going to project properties, clinking on the Linker element and setting per-user redirection:
If you’re registering from outside VS, the per-user registration is achieved with:
regsvr32 /n /i:user <dllpath>
This is it! The full source code is available here.