
Ever since I realized BASIC wasn’t the only living programming language, I thought about writing my own. Who wouldn’t? If you’re a developer, surely this idea popped into your mind at some point. No matter how much you love a particular programming language, you always have some ideas for improvement or even removal of annoying features.
The post assumes you have some background in compilers, and understand concepts like tokenizing (scanning), parsing, and Abstract Syntax Trees (ASTs)
Obviously, writing a programming language is not for the faint of heart. Even before you set out to implement your language, you have to design it first. Or maybe you have some fundamental ideas that would make your language unique, and you may decide to flesh out the details while you’re implementing it.
A new programming language does not have to be “general-purpose” – that is, it could be a “domain specific language” (DSL), which means it’s best suited for certain domain(s) or tasks. This makes your life (usually) at least somewhat easier; in addition, you’ll be unlikely to compete with the gazillion general-purpose languages out there. Still, a general-purpose language might be your goal.
Designing a programming language is a big topic, well outside the scope of this post. I’ll focus on the implementation details, so to speak. There are other considerations for a programming language beyond the language itself – its accompanying standard library, tooling (e.g., some IDE or at least syntax highlighting), debugging, testing, and few more. One decision is whether to make your language compiled or interpreted. This decision may not affect some aspects of the implementation, but it will definitely affect the language’s back-end. You can even support both interpretation and compilation for maximum flexibility.
I played around with the idea of creating a programming language for many years, never really getting very far beyond a basic parser and a minimal interpreter. Lately, I’ve read more about Pratt Parsing, that sparked my interest again. Pratt Parsing is one of many techniques for parsing expressions, something like “a+2*b”, and doing that correctly (parenthesis, operator precedence and associativity). Pratt parsing is really elegant, much more so than other techniques, and it’s also more flexible, supporting (indirectly) ternary operations and other unusual constructs. Once you have an expression parser, the rest of the parser is fairly easy to implement (relatively speaking) using the recursive-descent approach which is well suited for hand-crafted parsers.
Robert Nystrom gives a nice introduction to Pratt Parsing and an elegant idea for implementing it. His implementation is in Java, but there is a link to a C# implementation and even one in Rust. My go-to language is C++ (still), so you know where this is going. I’ve implemented a Pratt parser based on Robert’s ideas, and it turned out very well.
I’ve also been interested in visualization (a term which has way too much stuffed into it), but I thought I’d start small. A popular teaching language in the 80s was LOGO. Although it was treated as a “toy language”, it was a full-blown language, mostly resembling LISP internally.
However, LOGO became famous because of the “Turtle Graphics” built-in support that was provided, which allowed drawing with an imaginary turtle (you could even ask LOGO to show it) that would follow your commands like moving forward, backwards, rotating, lifting the pen and putting it back down. Why not create a fun version of Turtle Graphics with ideas from LOGO?
Here is an example from LOGO to draw a symmetric hexagon:
REPEAT 6 [ FD 100 RT 60 ]
You can probably guess what is going on here. “FD” is “forward” and “RT” is “right”, although it could be mistaken for “rotate”. LOGO supported functions as well, so you could create complex shapes by reusing functions.
My language, called “Logo2” for a lack of originality at this time, tries to capture that fun drawing, but put the syntax more inline with the C-family of functions, which I like more. The above hexagon is written with Logo2 like so:
repeat 6 {
    fd(100); rt(60);
}
Indentation is not significant, so it all could be placed on the same line. You can also define functions and execute them:
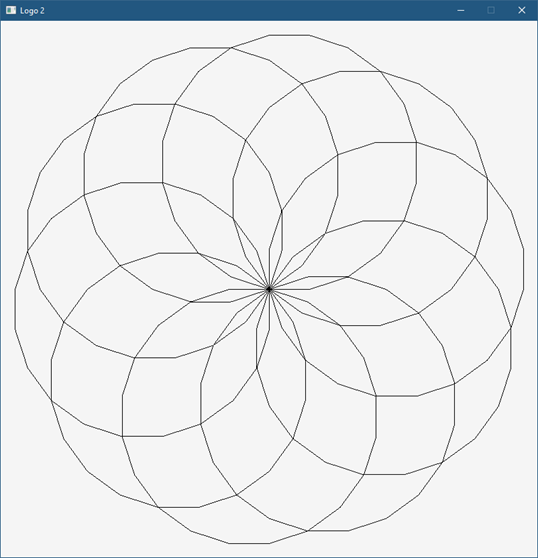
fn circle(size, steps) {
    repeat steps {
        fd(size); rt(360 / steps);
    }
}

repeat 10 {
    circle(80, 20); rt(36);
}
I also added support for colors, with the pencolor(r,g,b) function, something I don’t recall LOGO having in the 80s.
Implementation
There are 3 main projects in the solution (a fourth project in the works to create a simple IDE for easier experimentation):
- Logo2Core – contains the tokenizer, parser, and interpreter.
- Logo2Runtime – contains the runtime support for turtle graphics, currently using GDI+.
- Logo2 – is a simple REPL, that can parse and execute single line statements. If you provide a command line argument, it’s treated as file name to be parsed and executed. Anything not inside a function is executed directly (for now).
The Tokenizer
The tokenizer’s job (Tokenizer class) is to read text and turn it into a bunch of tokens. A token is a single unit of the language, like a number, keyword, identifier, operator, etc. To start tokenization, the Tokenize method can be invoked with the string to tokenize.
The Next() method returns the next token, whereas the Peek() method returns the next token without advancing the stream forward. This means the tokenizer is not doing all the work immediately, but only advanced to the next token when requested. The parser is the one “driving” the tokenizer.
The implementation of the tokenizer is not perfect, but it works well-enough. I didn’t want to use any existing tools like YACC (or BISON), for a couple reasons. For one, I don’t like generated code that I have little control colover. Second, I like to understand what I am writing. Writing a tokenizer is not rocket science, but it’s not trivial, either. And since one of my goals is to experiment, I need the freedom not available with generated code.
The Parser
The parser is much more interesting than the tokenizer (by far). This is where the syntax of the language is fleshed out. Just like with tokenization, usage of tools like LEX (or FLEX) is inappropriate. In fact, most languages have their own hand-written parser. The parser accepts a string to parse (Parse method) or a filename (ParseFile method) and begins the parsing. It calls on the tokenizer when the next token is needed.
The Init method of the parser initializes the tokenizer with the specific tokens it should be able to recognize (like specific keywords and operators), and also initializes its own “parslets” (defined in the above mentioned article) to make Pratt Parsing work. I will not show here the Pratt Parsing part since there’s quite a bit of code there, but here is an example of parsing the “repeat” statement:
std::unique_ptr<RepeatStatement> Parser::ParseRepeatStatement() {
	Next();		// eat "repeat"
	auto times = ParseExpression();

	m_LoopCount++;
	auto block = ParseBlock();
	m_LoopCount--;
    return std::make_unique<RepeatStatement>(
        std::move(times), std::move(block));
}
ParseExpression parses an expression to be used for the argument to repeat. Then ParseBlock is called to parse a curly-brace surrounded block of code. Finally, the result is an AST node representing a “repeat” statement is created, initialized, and returned to the caller.
The m_LoopCount variable is incremented when entering loop parsing and decremented afterwards. This is done so that parsing the keywords break and continue can check if there is any enclosing loop for these keywords to make sense.
Here is ParseBlock:
std::unique_ptr<BlockExpression>
Parser::ParseBlock(std::vector<std::string> const& args) {
	if (!Match(TokenType::OpenBrace))
		AddError(ParserError(ParseErrorType::OpenBraceExpected, Peek()));

	m_Symbols.push(std::make_unique<SymbolTable>(m_Symbols.top().get()));

	for (auto& arg : args) {
		Symbol sym;
		sym.Name = arg;
		sym.Flags = SymbolFlags::None;
		sym.Type = SymbolType::Argument;
		AddSymbol(sym);
	}

	auto block = std::make_unique<BlockExpression>();
	while (Peek().Type != TokenType::CloseBrace) {
		auto stmt = ParseStatement();
		if (!stmt)
			break;
		block->Add(std::move(stmt));
	}
	Next();		// eat close brace
	m_Symbols.pop();
	return block;
}
ParseBlock starts by making sure there is an open curly brace. Then it creates a symbol table and pushes it to be the “current” as there is a new scope within the block. The parameter to ParseBlock is used when parsing a function body, where these “args” are the parameters to the function. If this is the case, they are added to the symbol table as local variables.
The main work is to call ParseStatement as many times as needed until a close brace is encountered. The block is a vector of statements being filled up. Finally, the symbol table is popped and the AST node is returned.
ParseStatement is a big switch that calls the appropriate specific parsing method based on the first token encountered. Here is an excerpt:
std::unique_ptr<Statement> Parser::ParseStatement() {
	auto peek = Peek();
	if (peek.Type == TokenType::Invalid) {
		return nullptr;
	}

	switch (peek.Type) {
		case TokenType::Keyword_Var:
             return ParseVarConstStatement(false);
		case TokenType::Keyword_Const:
             return ParseVarConstStatement(true);
		case TokenType::Keyword_Repeat:
             return ParseRepeatStatement();
		case TokenType::Keyword_While:
             return ParseWhileStatement();
		case TokenType::Keyword_Fn:
             return ParseFunctionDeclaration();
		case TokenType::Keyword_Return:
             return ParseReturnStatement();
        case TokenType::Keyword_Break:
             return ParseBreakContinueStatement(false);
        case TokenType::Keyword_Continue:
             return ParseBreakContinueStatement(true);
	}
	auto expr = ParseExpression();
	if (expr) {
		Match(TokenType::SemiColon);
		return std::make_unique<ExpressionStatement>(std::move(expr));
	}
	AddError(ParserError(ParseErrorType::InvalidStatement, peek));
	return nullptr;
}
If a statement is not recognized, an expression parsing is attempted. This allows using Logo2 as a simple calculator, for example. ParseStatement is where the support for more statements is added based on an initial token.
Once an AST is built by the parser, the next step is to execute the AST by some interpreter. In a more complex language (maybe once it grows some more), some semantic analysis may be appropriate, which is about looking at the usage of the language beyond the syntax. For now, we’ll just interpret what we have, and if any error is encountered it’s going to be a runtime error. Some parsing errors can be caught without semantic analysis, but some cannot.
The Interpreter
The Interpreter class provides the runtime behavior, by “executing” the AST. It receives the root of the AST tree constructed by the parser by implementing the well-known Visitor design pattern, whose purpose here is to decouple between the AST node types and the way they are handled by the interpreter. Alternatively, it would be possible to add a virtual “Execute” or “Eval” method to AST nodes, so the nodes can “evaluate” themselves, but that creates coupling, and goes against the single-responsibility principle (SRP) that states that a class should have one and only one job. Using the visitor pattern also makes it easier to add semantic analysis later without modifying the AST node types.
The gist of the visitor pattern is to have an “Accept” method in the AST nodes that calls back to whoever (the visitor) with the current node details. For example, here it is for a binary operator:
class BinaryExpression : public Expression {
public:
    BinaryExpression(std::unique_ptr<Expression> left,
        Token op, std::unique_ptr<Expression> right);
	Value Accept(Visitor* visitor) const override;

	std::string ToString() const override;

	Expression* Left() const;
	Expression* Right() const;
	Token const& Operator() const;

private:
	std::unique_ptr<Expression> m_Left, m_Right;
	Token m_Operator;
};

Value BinaryExpression::Accept(Visitor* visitor) const {
	return visitor->VisitBinary(this);
}
This same idea is repeated for all concrete AST nodes. The Visitor type is abstract, implemented by the Interpreter class having methods like: VisitBinary, VisitRepeat, etc.
Each one of these “Visit” method’s purpose is to “execute” (or evaluate) that node. Here is an excerpt for the binary expression visiting:
Value Interpreter::VisitBinary(BinaryExpression const* expr) {
    switch (expr->Operator().Type) {
    case TokenType::Add:
       return expr->Left()->Accept(this) + expr->Right()->Accept(this);
    case TokenType::Sub:
       return expr->Left()->Accept(this) - expr->Right()->Accept(this);
    case TokenType::Mul:
       return expr->Left()->Accept(this) * expr->Right()->Accept(this);
    case TokenType::Div:
       return expr->Left()->Accept(this) / expr->Right()->Accept(this);
    }
    return Value();
}
Here it is for “repeat”:
Value Interpreter::VisitRepeat(RepeatStatement const* expr) {
    auto count = Eval(expr->Count());
    if (!count.IsInteger())
        throw RuntimeError(ErrorType::TypeMismatch, expr->Count());

    auto n = count.Integer();
    while (n-- > 0) {
        try {
            Eval(expr->Block());
        }
        catch (BreakOrContinue const& bc) {
            if (!bc.Continue)
                break;
        }
    }
    return nullptr;     // repeat has no return value
}
You should get the idea at this point. (Eval is just a simple wrapper that calls Accept with the provided node).
The Value type used with the above code (the one returned from Accept methods is the way to represent “values” in Logo2. Logo2 is a dynamically typed language (at least for now), so variables can hold any one of a listed of supported types, encapsulated in Value. You can think of that as a C-style union. Specifically, it wraps a std::variant<> C++17 type that currently supports the following: 64-bit integer, 64-bit floating point (double), bool, string (std::string), and null (representing no value). The list of possibilities will increase, allowing user-defined types as well.
Turtle Graphics
The Logo2Runtime project contains the support for managing turtles, and displaying their “drawings”. The Turtle class is a graphics-free type to manage the state of the turtle – its position and heading, but also a list of “command” indicating operations the turtle has been instructed to do, such as drawing a line, changing color, or changing width of drawing. This list is necessary whenever a window’s output needs to be refreshed.
The Window class servers as a wrapper for an HWND, that also has the “power” to draw a set of turtle commands. Here is its DrawTurtle method:
void Window::DrawTurtle(Gdiplus::Graphics& g, Turtle* t) const {
    for (auto& cmd : t->GetCommands()) {
        DrawTurtleCommand(g, t, cmd);
    }
}
Each command does the right thing:
void Window::DrawTurtleCommand(Gdiplus::Graphics& g, Turtle* t,
    TurtleCommand const& cmd) const {
    switch (cmd.Type) {
        case TurtleCommandType::DrawLine:
            g.DrawLine(m_Pen.get(), cmd.Line.From.X,
               cmd.Line.From.Y, cmd.Line.To.X, cmd.Line.To.Y);
            break;

        case TurtleCommandType::SetWidth:
        {
            Color color;
            m_Pen->GetColor(&color);
            m_Pen.reset(new Pen(color, cmd.Width));
            break;
        }

        case TurtleCommandType::SetColor:
        {
            Color color;
            color.SetValue(cmd.Color);
            m_Pen.reset(new Pen(color, m_Pen->GetWidth()));
            break;
        }
    }
}
The graphical objects are GDI+ objects provided by the Windows API. Of course, it would be possible to switch to a different API. I chose GDI+ for its flexibility and 2D capabilities.
The Runtime class ties a turtle and a window together. It holds on to a (single) Turtle object and single Window object. In the future, this is going to be more dynamic, so any number of windows and turtles can be created, even more than one turtle in the same window.
The REPL
A simple REPL is implemented in the Logo2 project. It’s not trivial, as there is a user interface that must be kept alive, meaning messages have to be pumped. This means using functions like gets_s is not good enough, as they block the calling thread. Assuming the UI is on the same thread, this will cause the UI to become non-responsive. For now, the same thread is used, so that no special synchronization is required. The downside is that a custom input “loop” has to be written, and currently it’s very simple, and only supports the BACKSPACE key for typing error correction.
The first step is to get the input, key by key. If there is no key available, messages are pumped. A WM_QUIT message indicates it’s time to exit. Not very elegant, but here goes:
Tokenizer t;
Parser parser(t);
Interpreter inter;
Runtime runtime(inter);
runtime.Init();
runtime.CreateLogoWindow(L"Logo 2", 800, 800);

for (;;) {
	std::print(">> ");
	std::string input;
	int ch = 0;
	MSG msg{};
	while (ch != 13) {
		while (::PeekMessage(&msg, nullptr, 0, 0, PM_REMOVE) &&
                 msg.message != WM_QUIT) {
			::TranslateMessage(&msg);
			::DispatchMessage(&msg);
		}
		if (msg.message == WM_QUIT)
			break;

		if (_kbhit()) {
			ch = _getch();
			if (isprint(ch)) {
				input += (char)ch;
				printf("%c", ch);
			}
			else if (ch == 8) {		// backspace
				printf("\b \b");
				input = input.substr(0, input.length() - 1);
			}
			else {
				if (_kbhit())
					_getch();
			}
		}
	}

	if (msg.message == WM_QUIT)
		break;
Once we have a line of input, it’s time to parse and (if no errors occur), execute:
try {
	printf("\n");
	auto ast = parser.Parse(input);
	if (parser.HasErrors()) {
		for (auto& err : parser.Errors()) {
			printf("Error (%d,%d): %d\n",
               err.ErrorToken.Line, err.ErrorToken.Col, err.Error);
		}
		continue;
	}
	try {
		auto result = ast->Accept(&inter); // execute!
		if (result != nullptr)
			std::println("{}", result.ToString());
	}
	catch (RuntimeError const& err) {
		printf("Runtime error: %d\n", (int)err.Error);
	}
}
catch (ParserError const& err) {
	printf("Error (%d,%d): %d\n", err.ErrorToken.Line,
         err.ErrorToken.Col, err.Error);
	continue;
}
Some parser errors are accumulated in a vector, some throw an exception (errors where it would be difficult for the parser to recover confidently). At runtime, errors could occur as well, such as the wrong types being used with certain operations.
Conclusion
Writing a language can be lots of fun. You can invent your “dream” language. For me, the Logo2 experiment is ongoing. I’m planning to build a simple IDE, to extend the language to support user-defined types, lambdas (with closures), and much more. Your ideas are welcome as well!
The project is at zodiacon/Logo2 (github.com)