Structured Storage is a Windows technology that abstracts the notions of files and directories behind COM interfaces – mainly IStorageand IStream. Its primary intent is to provide a way to have a file system hierarchy within a single physical file.
Structured Storage has been around for many years, where its most famous usage was in Microsoft Office files (*.doc, *.ppt, *.xls, etc.) – before Office moved to the extended file formats (*.docx, *.pptx, etc.). Of course, the old formats are still very much supported.
The Structured Storage interfaces (IStorage representing a directory, and IStream representing a file) are just that – interfaces. To actually use them, some implementation must be available. Windows provided an implementation of Structured Storage called Compound Files. These terms are sometime used interchangeably, but the distinction is important: Compound Files is just one implementation of Structured Storage – there could be others. Compound Files does not implement everything that could be implemented based on the defined Structured Storage interfaces, but it implements a lot, definitely enough to make it useful.
You can download an old tool (but still works well) called SSView, which can be used to graphically view the contents of physical files that were created by using the Compound File implementation. Here is a screenshot of SSView, looking at some DOC file:
Here is a more interesting example – information persisted using Sysinternals Autoruns tool (discussed later):
A more interesting hierarchy is clearly visible – although it’s all in a single file!
The Main Interfaces
The IStorage interface represents a “directory”, that can contain other directories and “files”, represented as IStream interface implementations. To get started a physical file can be created with StgCreateStorageExor an existing file opened with StgOpenStorageEx. Both return an IStorage pointer on success. From there, methods on IStorage can be called to create or open other directories (storages) and/or files (streams).
The most useful methods on IStorage are CreateStorage, CreateStream, OpenStorage and OpenStream. Enumeration of storages/streams is possible with EnumElements. Here is an example for opening a compound file for read access (filename is from a command line argument):
CComPtr<IStorage> spStg;
auto hr = ::StgOpenStorageEx(argv[1], STGM_READ | STGM_SHARE_EXCLUSIVE,
	STGFMT_STORAGE, 0, nullptr, nullptr, __uuidof(IStorage), reinterpret_cast<void**>(&spStg));
if (FAILED(hr)) {
	printf("Failed to open file (0x%X)\n", hr);
	return hr;
}
The following demonstrates enumerating the hierarchy of a given storage, recursively:
Each item has a name, but streams (“files”) can have data. The cbSize member of STATSTG returns that size. A stream is just an abstraction over a bunch of bytes. To actually read/write from/to a stream, it needs to be opened with IStorage::OpenStream before accessing the data with IStream::Read, IStream::Write and similar methods.
More on Streams
The IStream interface is used in various places within the Windows API, not just part of Structured Storage. It represents an abstraction over a buffer, that in theory could be anywhere – that’s the nice thing about an abstraction. Given an IStream pointer, you can read, wrote, seek, copy to another stream, clone, and even commit/revert a transaction, if supported by the implementation. Compound Files, by the way, doesn’t support transactions on streams.
Outside of Structured Storage, streams can be obtained in several ways.
The CreateStreamOnHGlobal API creates a memory buffer over an optional HGLOBAL (can be NULL to allocate a new one) and returns an IStream pointer to that memory buffer. This is useful when dealing with the clipboard for example, as it requires an HGLOBAL, which may not be convenient to work with. By getting an IStream pointer, the code can work with it (maybe reading it from another stream, or manually populating it with data), and then calling GetHGlobalFromStream to get the underlying HGLOBAL before passing it to the clipboard (e.g. SetClipboardData).
A stream can also be obtained for a file directly by calling SHCreateStreamOnFile, providing a convenient access to file data, abstracted as IStream.
Another case where IStream makes an appearance is in ActiveX controls persistence.
Yet another example of using IStream is as a way to “package” information for COM object’s state that would allow creating a proxy to that object from a different apartment by calling CoMarshalInterThreadInterfaceInStream(probably the longest-name COM API), that captures the state required (as an IStream) to pass to another apartment, where the corresponding CoGetInterfaceAndReleaseStreamcan be called to generate a proxy to the original object, if needed.
Case Study: Autoruns
Back in 2021 when I was working for the Sysinternals team, one of my tasks was to modernize Autoruns from a GUI perspective. I thought I would take this opportunity to do a significant rewrite, so that it would be easier to maintain the tool and improve it as needed. Fortunately, Mark Russinovich was onboard with that, although my time estimate for this project was way off 🙂 But I digress.
One of the features of Autoruns is the ability to save the information provided by the tool so it can be loaded later, possibly on a different machine. This is non-trivial, as some of the information is not easy to persist, such as icons. I don’t recall if the old Autoruns persisted them, but I definitely wanted to do so.
The old Autoruns format was sequential in nature, storing structures of data linearly in the file. Any new properties that needed to be added would require offset changes, which forced changing the format “version” and make the correct decisions when reading a file in an various “old” formats.
I wanted to make persistence more flexible, so I decided to change the format completely to be a compound file. With this scheme, adding new properties would not cause any issues – a new stream may be added, but other streams are not disturbed. The code could just ignore properties (could be storages and/or streams) it wasn’t aware of. This made the format extensible by definition, immune to any offset changes, and very easy to view using tools, like SSView. The above screenshot is from an Autoruns-persisted file.
Persisting icons, by the way, becomes pretty easy, because ImageList objects, used by Autoruns to hold collection of icons can be persisted to a stream with a single function call: ImageList_Write; very convenient!
Conclusion
The Structured Storage idea is a powerful one, and the Compound File implementation provided by Windows is pretty good and flexible. One of the reasons Microsoft moved Office to a new format was the need to make files smaller, so the new extended formats are ZIP compressed. Their internal format changed as well, and is not using Compound Files for the most part. A Structured Storage file could be compressed, saving disk space, while still maintaining convenient access using storages and streams.
Asynchronous Procedure Calls (APCs) in Windows are objects that can be attached to threads. Every thread has its own APC queue, where an APC stores a function and arguments to call. The idea is that we’d like the a function to be executed by a specific thread, rather than some arbitrary thread. This is because the process this thread is part of is important for some reason, so the APC (when executed) has full access to that process resources.
Technically, there are user-mode, kernel-mode, and Special kernel-mode APCs, In this post I’ll discuss user mode APCs, those directly supported by the Windows API. (There is also Special user-mode APCs, but these are not generally usable). Here is a conceptual representation of a thread and its APC queues:
A Thread and its APC queues
When a user mode APC is queued to a thread (more on that later), the APC just sits there in the queue, doing nothing. To actually run the APCs currently attached to a thread, that thread must go into an alertable wait (also called alertable state). When in that state, any and all APCs in the thread’s queue execute in sequence. But how does a thread go into an alertable wait?
There are a few functions that can do that. The simplest is SleepEx, the extended Sleep function:
DWORD SleepEx(DWORD msec, BOOL alertable);
If alertable is FALSE, the function is identical to Sleep. Otherwise, the thread sleeps for the designated time (which can be zero), and if any APCs exits in its queue (or appear while it’s sleeping), will execute now, and the sleep is over, in which case the return value from SleepEx is WAIT_IO_COMPLETION rather than zero. A typical call might be SleepEx(0, TRUE) to force all queued APCs to run (if there are any). You can think of this call as a “garbage collection” of APCs. If a thread does not ever go into an alertable wait, any attached APCs will never execute.
Other ways of entering an alertable wait involve using the extended versions of the various wait functions, such as WaitForSingleObjectEx, WaitForMultipleObjectsEx, where an additional Boolean argument is accepted just like SleepEx. MsgWaitForMultipleObjectsExcan do that as well, although the alertable state is specified with a flag (MWMO_ALERTABLE) rather than a Boolean.
Now that know how user mode APCs work, we can try to put them to good use.
Asynchronous I/O Completion
The “classic” use of user mode APCs is to get notified of asynchronous I/O operations. Windows has several mechanisms for this purpose, one of which involves APCs. Specifically, the ReadFileExand WriteFileExAPIs receive an extra parameter (compared to their non-Ex variants) that is a callback to be invoked when the asynchronous I/O operation completes. The catch is, that the callback is wrapped in an APC queued to the requesting thread, which means it can only execute if/when that thread enters an alertable wait. Here is some conceptual code:
HANDLE hFile = ::CreateFile(..., FILE_FLAG_OVERLAPPED, nullptr);
OVERLAPPED ov{};
ov.Offset = ...;
::ReadFileEx(hFile, buffer, size, &ov, OnIoCompleted);
// other work...
// from time to time, execute APCs:
::SleepEx(0, TRUE);
The Completion routine has the following prototype:
In practice, this mechanism of being notified of asynchronous /O completion is not very popular, because it’s usually inconvenient to use the same thread for completion. In fact, the thread might exit before the I/O completed. Still, it’s an option that utilizes APCs.
Injecting a DLL into a Process
It’s sometimes useful to “force” somehow another process to load a DLL you provide. The classic way of achieving that is by using the CreateRemoteThreadAPI, where the “thread function” is set to the address of the LoadLibraryAPS, because a thread’s function and LoadLibrary have the same prototype from a binary perspective – both accept a pointer. LoadLibrary is passed the path of the DLL to load. You can find a video I made to show this classic technique here: https://youtu.be/0jX9UoXYLa4. A full source code example is here: https://github.com/zodiacon/youtubecode/tree/main/Injection.
The problem with this approach is that it’s pretty visible – anti-malware kernel drivers get notified when a thread is created, and if created by a thread in a different process, that may be suspicious from the driver’s perspective. By the way, the “legitimate” usage of CreateRemoteThread is for a debugger to break in forcefully to a target process in an initial attach, by forcing a new thread in the process to call DbgBreakPoint.
Using an APC, we may be able to “persuade” an existing thread to load our DLL. This is much stealthier, since it’s an existing thread loading a DLL – a very common occurrence. To achieve that, we can use the generic QueueUserAPCAPI:
Fortunately, an APC function has the same binary layout as a thread function – again receiving some kind of pointer. The main issue with this technique is that the target thread may not get into an alertable wait ever. To increase the probability of success, we can queue the APC to all threads in the target process – we just need one to enter an alertable wait. This works well for processes like Explorer, which have so many threads it practically always works. Here is a link to a video I made to show this technique: https://youtu.be/RBCR9Gvp5BM
A Natural Queue
Lastly, since APCs are stored in a queue, we can create a “work queue” very naturally just by utilizing APCs. If you need a queue of functions to be invoked sequentially, you could manage them yourself with the help of (say) std::queue<> in C++. But that queue is not thread-safe, so you would have to properly protect it. If you’re using .NET, you may use ConcurrentQueue<> to help with synchronization, but you still would need to build some kind of loop to pop items, invoke them, etc. With APCs, this all becomes natural and pretty easy:
Simplicity itself. An event object can be used to quit this infinite loop (SetEventcalled from somewhere). The thread waits for APCs to appear in its queue, and runs them when they do, returning to waiting. Clients of this queue call QueueUserAPC to enqueue work items (callbacks) to that thread. That’s it – simple and elegant.
Summary
APCs provide a way to allow callbacks to be invoked sequentially by a target thread. Maybe you can find other creative use of APCs.
The Application Verifier tool that is part of the Windows SDK provide a way to analyze processes for various types of misbehavior. The GUI provided looks like the following:
Application Verifier application window
To add an application, you can browse your file system and select an executable. The Application Verifier settings are based around the executable name only – not a full path. This is because verifier settings are stored in a subkey under Image File Execution Options with the name of the executable. For the notepad example above, you’ll find the following in the Registry:
Key for notepad.exe under the IFEO subkey
This IFEO subkey is used for NT Global Flags settings, one of which is using the Application Verifier. The GlobalFlag value is shown to be 0x100, which is the bit used for the verifier. Another way to set it without any extra information is using the GFlags tool, part of the Debugging Tools for Windows package:
GFlags tool
The Application Verifier lists a bunch of DLLs under the VerifierDLLs value. Each one must be located in the system directory (e.g., c:\Windows\System32). Full paths are not supported; this is intentional, because the list of DLLs are going to be loaded to any process running the specified executable, and it would be risky to load DLLs from arbitrary locations in the file system. The system directory, as well as the IFEO key are normally write-accessible by administrators only.
The list of verifier DLLs is selected based on the set of tests selected by the user on the right hand side of the GUI. You’ll find subkeys that are used by the system-provided verifier DLLs with more settings related to the tests selected.
The nice thing about any verifier DLL specified, is that these DLLs are loaded early in the process lifetime, by verifier.dll (in itself loaded by NTDLL.dll), before any other DLLs are loaded into the process. Even attaching a debugger to the process while launching it would “miss” the loading of these DLLs.
This behavior makes this technique attractive for injecting a DLL into arbitrary processes. It’s even possible to enable Application Verifier globally and even dynamically (without the need to restart the system), so that these DLLs are injected into all processes (except protected processes).
Writing a Verifier DLL
Application Verifier tests descriptions is not the focus of this post. Rather, we’ll look into what it takes to create such a DLL that can be injected early and automatically into processes of our choice. As we’ll see, it’s not just about mere injection. The verifier infrastructure (part of verifier.dll) provides convenient facilities to hook functions.
If we create a standard DLL, set up the verifier entries while adding our DLL to the list of verifier DLLs (possibly removing the “standard” ones), and try to run our target executable (say, notepad), we get the following nasty message box:
The process shuts down, which means that if a verifier DLL fails to be properly processed, the process terminates rather than “skipping” the DLL.
Launching notepad with WinDbg spits the following output:
Clearly the DLL did not initialize correctly, which is what the NTSTATUS 0xc0000142 was trying to tell us in the message box.
DLLs are initialized with the DllMain function that typically looks like this:
BOOL WINAPI DllMain(HMODULE hModule, DWORD reason, PVOID lpReserved) {
	switch (reason) {
		case DLL_PROCESS_ATTACH:
		case DLL_THREAD_ATTACH:
		case DLL_THREAD_DETACH:
		case DLL_PROCESS_DETACH:
			break;
	}
	return TRUE;
}
The classic four values shown are used by the DLL to run code when it’s loaded into a process (DLL_PROCESS_ATTACH), unloaded from a process (DLL_PROCESS_DETACH), a thread is created in the process (DLL_THREAD_ATTACH), and thread is exiting in the process (DLL_THREAD_DETACH). It turns out that there is a fifth value, which must be used with verifiier DLLs:
#define DLL_PROCESS_VERIFIER 4
Returning TRUE from such a case is not nearly enough. Instead, a structure expected by the caller of DllMain must be initialized and its address provided in lpReserved. The following structures and callback type definitions are needed:
That’s quite a list. The main structure is RTL_VERIFIER_PROVIDER_DESCRIPTOR that has a pointer to an array of RTL_VERIFIER_DLL_DESCRIPTOR (the last element in the array must end with all zeros), which in itself points to an array of RTL_VERIFIER_THUNK_DESCRIPTOR , used for specifying functions to hook. There are a few callbacks as well. At a minimum, we can define this descriptor like so (no hooking, no special code in callbacks):
This time it works. MyVerify.dll loads right after verifier.dll (which is the one managing verify DLLs).
Hooking Functions
As mentioned before, we can use the verifier engine’s support for hooking functions in arbitrary DLLs. Let’s give this a try by hooking into a couple of functions, GetMessage and CreateFile. First, we need to set up the structures for the hooks on a per-DLL basis:
The second NULL in each triplet is where the original address of the hooked function is stored by the verifier engine. Now we fill the structure with the list of DLLs, pointing to the hook arrays:
The last thing is to actually implement the hooks:
BOOL WINAPI HookGetMessage(PMSG msg, HWND hWnd, UINT filterMin, UINT filterMax) {
	// get original function
	static const auto orgGetMessage = (decltype(::GetMessageW)*)user32Hooks[0].ThunkOldAddress;
	auto result = orgGetMessage(msg, hWnd, filterMin, filterMax);
	char text[128];
	sprintf_s(text, "Received message 0x%X for hWnd 0x%p\n", msg->message, msg->hwnd);
	OutputDebugStringA(text);
	return result;
}

HANDLE WINAPI HookCreateFile(PCWSTR path, DWORD access, DWORD share, LPSECURITY_ATTRIBUTES sa, DWORD cd, DWORD flags, HANDLE hTemplate) {
	// get original function
	static const auto orgCreateFile = (decltype(::CreateFileW)*)kernelbaseHooks[0].ThunkOldAddress;
	auto hFile = orgCreateFile(path, access, share, sa, cd, flags, hTemplate);
	char text[512];
	if (hFile == INVALID_HANDLE_VALUE)
		sprintf_s(text, "Failed to open file %ws (%u)\n", path, ::GetLastError());
	else
		sprintf_s(text, "Opened file %ws successfuly (0x%p)\n", path, hFile);

	OutputDebugStringA(text);
	return hFile;
}
The hooks just send some output with OutputDebugString. Here is an excerpt output when running notepad under a debugger:
ModLoad: 00007ff7`6dfa0000 00007ff7`6dfd8000   notepad.exe
ModLoad: 00007ffd`978f0000 00007ffd`97ae8000   ntdll.dll
ModLoad: 00007ffd`1f650000 00007ffd`1f6c4000   C:\Windows\System32\verifier.dll
Page heap: pid 0xEF18: page heap enabled with flags 0x3.
AVRF: notepad.exe: pid 0xEF18: flags 0x81643027: application verifier enabled
ModLoad: 00007ffd`25b80000 00007ffd`25d24000   C:\Windows\SYSTEM32\MyVerify.dll
ModLoad: 00007ffd`97650000 00007ffd`9770d000   C:\Windows\System32\KERNEL32.dll
ModLoad: 00007ffd`951b0000 00007ffd`954a6000   C:\Windows\System32\KERNELBASE.dll
ModLoad: 00007ffd`963e0000 00007ffd`9640b000   C:\Windows\System32\GDI32.dll
ModLoad: 00007ffd`95790000 00007ffd`957b2000   C:\Windows\System32\win32u.dll
ModLoad: 00007ffd`95090000 00007ffd`951a7000   C:\Windows\System32\gdi32full.dll
...
ModLoad: 00007ffd`964f0000 00007ffd`965bd000   C:\Windows\System32\OLEAUT32.dll
ModLoad: 00007ffd`96d10000 00007ffd`96d65000   C:\Windows\System32\shlwapi.dll
ModLoad: 00007ffd`965d0000 00007ffd`966e4000   C:\Windows\System32\MSCTF.dll
Opened file C:\Windows\Fonts\staticcache.dat successfuly (0x0000000000000164)
ModLoad: 00007ffd`7eac0000 00007ffd`7eb6c000   C:\Windows\System32\TextShaping.dll
ModLoad: 00007ffc`ed750000 00007ffc`ed82e000   C:\Windows\System32\efswrt.dll
ModLoad: 00007ffd`90880000 00007ffd`909d7000   C:\Windows\SYSTEM32\wintypes.dll
ModLoad: 00007ffd`8bf90000 00007ffd`8bfad000   C:\Windows\System32\MPR.dll
ModLoad: 00007ffd`8cae0000 00007ffd`8cce3000   C:\Windows\System32\twinapi.appcore.dll
Opened file C:\Windows\Registration\R000000000025.clb successfuly (0x00000000000001C4)
ModLoad: 00007ffd`823b0000 00007ffd`82416000   C:\Windows\System32\oleacc.dll
...
Received message 0x31F for hWnd 0x00000000001F1776
Received message 0xC17C for hWnd 0x00000000001F1776
Received message 0xF for hWnd 0x00000000001F1776
Received message 0xF for hWnd 0x00000000003010C0
Received message 0xF for hWnd 0x0000000000182E7A
Received message 0x113 for hWnd 0x00000000003319A8
...
ModLoad: 00007ffd`80e20000 00007ffd`80fd4000   C:\Windows\System32\WindowsCodecs.dll
ModLoad: 00007ffd`94ee0000 00007ffd`94f04000   C:\Windows\System32\profapi.dll
Opened file C:\Users\Pavel\AppData\Local\IconCache.db successfuly (0x0000000000000724)
ModLoad: 00007ffd`3e190000 00007ffd`3e1f6000   C:\Windows\System32\thumbcache.dll
Opened file C:\Users\Pavel\AppData\Local\Microsoft\Windows\Explorer\iconcache_idx.db successfuly (0x0000000000000450)
Opened file C:\Users\Pavel\AppData\Local\Microsoft\Windows\Explorer\iconcache_16.db successfuly (0x000000000000065C)
ModLoad: 00007ffd`90280000 00007ffd`90321000   C:\Windows\SYSTEM32\policymanager.dll
This application verifier technique is an interesting one, and fairly easy to use. The full example can be found at https://github.com/zodiacon/VerifierDLL.
What if you needed to get a list of all the open browser tabs in some browser? In the (very) old days you might assume that each tab is its own window, so you could find a main browser window (using FindWindow, for example), and then enumerate child windows with EnumChildWindowsto locate the tabs. Unfortunately, this approach is destined to fail. Here is a screenshot of WinSpylooking at a main window of Microsoft Edge:
MS Edge showing only two child windows
The title of the main window hints to the existence of 26 tabs, but there are only two child windows and they are not tabs. The inevitable conclusion is that the tabs are not windows at all. They are being “drawn” with some technology that the Win32 windowing infrastructure doesn’t know about nor cares.
How can we get information about those browsing tabs? Enter UI Automation.
UI Automation has been around for many years, starting with the older technology called “Active Accessibility“. This technology is geared towards accessibility while providing rich information that can be consumed by accessibility clients. Although Active Accessibility is still supported for compatibility reasons, a newer technology called UI Automation supersedes it.
UI Automation provides a tree of UI automation elements representing various aspects of a user interface. Some elements represent “true” Win32 windows (have HWND), some represent internal controls like buttons and edit boxes (created with whatever technology), and some elements are virtual (don’t have any graphical aspects), but instead provide “metadata” related to other items.
The UI Automation client API uses COM, where the root object implements the IUIAutomationinterface (it has extended interfaces implemented as well). To get the automation object, the following C++ code can be used (we’ll see a C# example later):
CComPtr<IUIAutomation> spUI;
auto hr = spUI.CoCreateInstance(__uuidof(CUIAutomation));
if (FAILED(hr))
	return Error("Failed to create Automation root", hr);
The client automation interfaces are declared in <UIAutomationClient.h>. The code uses the ATL CComPtr<> smart pointers, but any COM smart or raw pointers will do.
With the UI Automation object pointer in hand, several options are available. One is to enumerate the full or part of the UI element tree. To get started, we can obtain a “walker” object by calling IUIAutomation::get_RawViewWalker. From there, we can start enumerating by calling IUIAutomationTreeWalkerinterface methods, like GetFirstChildElementand GetNextSiblingElement.
Each element, represented by a IUIAutomationElement interface provides a set of properties, some available directly on the interface (e.g. get_CurrentName, get_CurrentClassName, get_CurrentProcessId), while others hide behind a generic method, get_CurrentPropertyValue, where each property has an integer ID, and the result is a VARIANT, to allow for various types of values.
Using this method, the menu item View Automation Tree in WinSpy shows the full automation tree, and you can drill down to any level, while many of the selected element’s properties are shown on the right:
WinSpy automation tree view
If you dig deep enough, you’ll find that MS Edge tabs have a UI automation class name of “EdgeTab”. This is the key to locating browser tabs. (Other browsers may have a different class name). To find tabs, we can enumerate the full tree manually, but fortunately, there is a better way. IUIAutomationElement has a FindAll method that searches for elements based on a set of conditions. The conditions available are pretty flexible – based on some property or properties of elements, which can be combined with And, Or, etc. to get more complex conditions. In our case, we just need one condition – a class name called “EdgeTab”.
First, we’ll create the root object, and the condition (error handling omitted for brevity):
int main() {
	::CoInitialize(nullptr);

	CComPtr<IUIAutomation> spUI;
	auto hr = spUI.CoCreateInstance(__uuidof(CUIAutomation));

	CComPtr<IUIAutomationCondition> spCond;
	CComVariant edgeTab(L"EdgeTab");
	spUI->CreatePropertyCondition(UIA_ClassNamePropertyId, edgeTab, &spCond);
We have a single condition for the class name property, which has an ID defined in the automation headers. Next, we’ll fire off the search from the root element (desktop):
int count = 0;
spTabs->get_Length(&count);
for (int i = 0; i < count; i++) {
	CComPtr<IUIAutomationElement> spTab;
	spTabs->GetElement(i, &spTab);
	CComBSTR name;
	spTab->get_CurrentName(&name);
	int pid;
	spTab->get_CurrentProcessId(&pid);
	printf("%2d PID %6d: %ws\n", i + 1, pid, name.m_str);
}
Try it!
.NET Code
A convenient Nuget package called Interop.UIAutomationClient.Signed provides wrappers for the automation API for .NET clients. Here is the same search done in C# after adding the Nuget package reference:
static void Main(string[] args) {
    const int ClassPropertyId = 30012;
    var ui = new CUIAutomationClass();
    var cond = ui.CreatePropertyCondition(ClassPropertyId, "EdgeTab");
    var tabs = ui.GetRootElement().FindAll(TreeScope.TreeScope_Descendants, cond);
    for (int i = 0; i < tabs.Length; i++) {
        var tab = tabs.GetElement(i);
        Console.WriteLine($"{i + 1,2} PID {tab.CurrentProcessId,6}: {tab.CurrentName}");
    }
}
More Automation
There is a lot more to UI automation – the word “automation” implies some more control. One capability of the API is providing various notifications when certain aspects of elements change. Examples include the IUIAutomation methods AddAutomationEventHandler, AddFocusChangedEventHandler, AddPropertyChangedEventHandler, and AddStructureChangedEventHandler.
More specific information on elements (and some control) is also available with more specific interfaces related to controls, such as IUIAutomationTextPattern, IUIAutomationTextRange, and others.
A little-known feature in modern Windows is the ability to expose hierarchical data using the file system. This is called Windows Projected File System (ProjFS), available since Windows 10 version 1809. There is even a sample that exposes the Registry hierarchy using this technology. Using the file system as a “projection” mechanism provides a couple of advantages over a custom mechanism:
Any file viewing tool can present the information such as Explorer, or commands in a terminal.
“Standard” file APIs are used, which are well-known, and available in any programming language or library.
Let’s see how to build a Projected File System provider from scratch. We’ll expose object manager directories as file system directories, and other types of objects as “files”. Normally, we can see the object manager’s namespace with dedicated tools, such as WinObj from Sysinternals, or my own Object Explorer:
WinObj showing parts of the object manager namespace
Here is an example of what we are aiming for (viewed with Explorer):
Explorer showing the root of the object manager namespace
First, support for ProjFS must be enabled to be usable. You can enable it with the Windows Features dialog or PowerShell:
projectedfslib.h is where the ProjFS declarations reside. projectedfslib.lib is the import library to link against. In this post, I’ll focus on the main coding aspects, rather than going through every little piece of code. The full code can be found at https://github.com/zodiacon/objmgrprojfs. It’s of course possible to use other languages to implement a ProjFS provider. I’m going to attempt one in Rust in a future post 🙂
The projected file system must be rooted in a folder in the file system. It doesn’t have to be empty, but it makes sense to use such a directory for this purpose only. The main function will take the requested root folder as input and pass it to the ObjectManagerProjection class that is used to manage everything:
int wmain(int argc, const wchar_t* argv[]) {
	if (argc < 2) {
		printf("Usage: ObjMgrProjFS <root_dir>\n");
		return 0;
	}

	ObjectManagerProjection omp;
	if (auto hr = omp.Init(argv[1]); hr != S_OK)
		return Error(hr);

	if (auto hr = omp.Start(); hr != S_OK)
		return Error(hr);

	printf("Virtualizing at %ws. Press ENTER to stop virtualizing...\n", argv[1]);
	char buffer[3];
	gets_s(buffer);

	omp.Term();

	return 0;
}
Let start with the initialization. We want to create the requested directory (if it doesn’t already exist). If it does exist, we’ll use it. In fact, it could exist because of a previous run of the provider, so we can keep track of the instance ID (a GUID) so that the file system itself can use its caching capabilities. We’ll “hide” the GUID in a hidden file within the directory. First, create the directory:
HRESULT ObjectManagerProjection::Init(PCWSTR root) {
	GUID instanceId = GUID_NULL;
	std::wstring instanceFile(root);
	instanceFile += L"\\_obgmgrproj.guid";

	if (!::CreateDirectory(root, nullptr)) {
		//
		// failed, does it exist?
		//
		if (::GetLastError() != ERROR_ALREADY_EXISTS)
			return HRESULT_FROM_WIN32(::GetLastError());
If creation fails not because it exists, bail out with an error. Otherwise, get the instance ID that may be there and use that GUID if present:
If we need to generate a new GUID, we’ll do that with CoCreateGuid and write it to the hidden file:
if (instanceId == GUID_NULL) {
	::CoCreateGuid(&instanceId);
	//
	// write instance ID
	//
	auto hFile = ::CreateFile(instanceFile.c_str(), GENERIC_WRITE, 0, nullptr, CREATE_NEW, FILE_ATTRIBUTE_HIDDEN, nullptr);
	if (hFile != INVALID_HANDLE_VALUE) {
		DWORD ret;
		::WriteFile(hFile, &instanceId, sizeof(instanceId), &ret, nullptr);
		::CloseHandle(hFile);
	}
}
Finally, we must register the root with ProjFS:
auto hr = ::PrjMarkDirectoryAsPlaceholder(root, nullptr, nullptr, &instanceId);
if (FAILED(hr))
	return hr;

m_RootDir = root;
return hr;
Once Init succeeds, we need to start the actual virtualization. To that end, a structure of callbacks must be filled so that ProjFS knows what functions to call to get the information requested by the file system. This is the job of the Start method:
The callbacks specified above are the absolute minimum required for a valid provider. PrjStartVirtualizing returns a virtualization context that identifies our provider, which we need to use (at least) when stopping virtualization. It’s a blocking call, which is convenient in a console app, but for other cases, it’s best put in a separate thread. The this value passed in is a user-defined context. We’ll use that to delegate these static callback functions to member functions. Here is the code for StartDirectoryEnumerationCallback:
The same trick is used for the other callbacks, so that we can implement the functionality within our class. The class ObjectManagerProjection itself holds on to the following data members of interest:
EnumInfo is a structure used to keep an object directory’s contents and the current index requested by the file system. A map is used to keep track of all current enumerations. Remember, it’s the file system – multiple directory listings may be happening at the same time. As it happens, each one is identified by a GUID, which is why it’s used as a key to the map. m_VirtContext is the returned value from PrjStartVirtualizing.
ObjectNameAndType is a little structure that stores the details of an object: its name and type:
Obviously, the bulk work for the provider is centered in the callbacks. Let’s start with StartDirectoryEnumerationCallback. Its purpose is to let the provider know that a new directory enumeration of some sort is beginning. The provider can make any necessary preparations. In our case, it’s about adding a new enumeration structure to manage based on the provided enumeration GUID:
We just add a new entry to our map, since we must be able to distinguish between multiple enumerations that may be happening concurrently. The complementary callback ends an enumeration which is where we delete the item from the map:
So far, so good. The real work is centered around the GetDirectoryEnumerationCallback callback where actual enumeration must take place. The callback receives the enumeration ID and a search expression – the client may try to search using functions such as FindFirstFile / FindNextFile or similar APIs. The provided PRJ_CALLBACK_DATA contains the basic details of the request such as the relative directory itself (which could be a subdirectory). First, we reject any unknown enumeration IDs:
HRESULT ObjectManagerProjection::DoGetDirectoryEnumerationCallback(
	const PRJ_CALLBACK_DATA* callbackData, const GUID* enumerationId,
	PCWSTR searchExpression, PRJ_DIR_ENTRY_BUFFER_HANDLE dirEntryBufferHandle) {

	auto it = m_Enumerations.find(*enumerationId);
	if(it == m_Enumerations.end())
		return E_INVALIDARG;
    auto& info = it->second;
Next, we need to enumerate the objects in the provided directory, taking into consideration the search expression (that may require returning a subset of the items):
There are quite a few things happening here. ObjectManager::EnumDirectoryObjects is a helper function that does the actual enumeration of objects in the object manager’s namespace given the root directory (callbackData->FilePathName), which is always relative to the virtualization root, which is convenient – we don’t need to care where the actual root is. The compare lambda is passed to EnumDirectoryObjects to provide a filter based on the search expression. ProjFS provides the PrjFileNameMatch function we can use to test if a specific name should be returned or not. It has the logic that caters for wildcards like * and ?.
Once the results return in a vector (info.Objects), we must sort it. The file system expects returned files/directories to be sorted in a case insensitive way, but we don’t actually need to know that. PrjFileNameCompare is provided as a function to use for sorting purposes. We call sort on the returned vector passing this function PrjFileNameCompare as the compare function.
The enumeration must happen if the PRJ_CB_DATA_FLAG_ENUM_RESTART_SCAN is specified. I also enumerate if it’s the first call for this enumeration ID.
Now that we have results (or an empty vector), we can proceed by telling ProjFS about the results. If we have no results, just return success (an empty directory):
if (info.Objects.empty())
	return S_OK;
Otherwise, we must call PrjFillDirEntryBuffer for each entry in the results. However, ProjFS provides a limited buffer to accept data, which means we need to keep track of where we left off because we may be called again (without the PRJ_CB_DATA_FLAG_ENUM_RESTART_SCAN flag) to continue filling in data. This is why we keep track of the index we need to use.
The first step in the loop is to fill in details of the item: is it a subdirectory or a “file”? We can also specify the size of its data and common times like creation time, modify time, etc.:
We fill in two details: a directory or not, based on the kernel object type being “Directory”, and a file size (in case of another type object). What is the meaning of a “file size”? It can mean whatever we want it to mean, including just specifying a size of zero. However, I decided that the “data” being held in an object would be text that provides the object’s name, type, and target (if it’s a symbolic link). Here are a few example when running the provider and using a command window:
C:\objectmanager>dir p* Volume in drive C is OS Volume Serial Number is 18CF-552E
Directory of C:\objectmanager
02/20/2024 11:09 AM 60 PdcPort.ALPC Port 02/20/2024 11:09 AM 76 PendingRenameMutex.Mutant 02/20/2024 11:09 AM 78 PowerMonitorPort.ALPC Port 02/20/2024 11:09 AM 64 PowerPort.ALPC Port 02/20/2024 11:09 AM 88 PrjFltPort.FilterConnectionPort 5 File(s) 366 bytes 0 Dir(s) 518,890,110,976 bytes free
What is the meaning of the various times and file attributes? It can mean whatever you want – it might make sense for some types of data. If left at zero, the current time is used.
GetObjectSize is a helper function that calculates the number of bytes needed to keep the object’s text, which is what is reported to the file system.
Now we can pass the information for the item to ProjFS by calling PrjFillDirEntryBuffer:
The “name” of the item is comprised of the kernel object’s name, and the “file extension” is the object’s type name. This is just a matter of choice – I could have passed the object’s name only so that it would appear as a file with no extension. If the call to PrjFillDirEntryBuffer fails, it means the buffer is full, so we break out, but the index is not incremented, so we can provide the next object in the next callback that does not requires a rescan.
We have two callbacks remaining. One is GetPlaceholderInformationCallback, whose purpose is to provide “placeholder” information about an item, without providing its data. This is used by the file system for caching purposes. The implementation is like so:
HRESULT ObjectManagerProjection::DoGetPlaceholderInformationCallback(const PRJ_CALLBACK_DATA* callbackData) {
	auto path = callbackData->FilePathName;
	auto dir = ObjectManager::DirectoryExists(path);
	std::optional<ObjectNameAndType> object;
	if (!dir)
		object = ObjectManager::ObjectExists(path);
	if(!dir && !object)
		return HRESULT_FROM_WIN32(ERROR_FILE_NOT_FOUND);

	PRJ_PLACEHOLDER_INFO info{};
	info.FileBasicInfo.IsDirectory = dir;
	info.FileBasicInfo.FileSize = dir ? 0 : GetObjectSize(path, object.value());
	return PrjWritePlaceholderInfo(m_VirtContext, callbackData->FilePathName, &info, sizeof(info));
}
The item could be a file or a directory. We use the file path name provided to figure out if it’s a directory kernel object or something else by utilizing some helpers in the ObjectManager class (we’ll examine those later). Then the structure PRJ_PLACEHOLDER_INFO is filled with the details and provided to PrjWritePlaceholderInfo.
The final required callback is the one that provides the data for files – objects in our case:
HRESULT ObjectManagerProjection::DoGetFileDataCallback(const PRJ_CALLBACK_DATA* callbackData, UINT64 byteOffset, UINT32 length) {
	auto object = ObjectManager::ObjectExists(callbackData->FilePathName);
	if (!object)
		return HRESULT_FROM_WIN32(ERROR_FILE_NOT_FOUND);

	auto buffer = ::PrjAllocateAlignedBuffer(m_VirtContext, length);
	if (!buffer)
		return E_OUTOFMEMORY;

	auto data = GetObjectData(callbackData->FilePathName, object.value());
	memcpy(buffer, (PBYTE)data.c_str() + byteOffset, length);
	auto hr = ::PrjWriteFileData(m_VirtContext, &callbackData->DataStreamId, buffer, byteOffset, length);
	::PrjFreeAlignedBuffer(buffer);

	return hr;
}
First we check if the object’s path is valid. Next, we need to allocate buffer for the data. There are some ProjFS alignment requirements, so we call PrjAllocateAlignedBuffer to allocate a properly-aligned buffer. Then we get the object data (a string, by calling our helper GetObjectData), and copy it into the allocated buffer. Finally, we pass the buffer to PrjWriteFileData and free the buffer. The byte offset provided is usually zero, but could theoretically be larger if the client reads from a non-zero position, so we must be prepared for it. In our case, the data is small, but in general it could be arbitrarily large.
GetObjectData itself looks like this:
std::wstring ObjectManagerProjection::GetObjectData(PCWSTR fullname, ObjectNameAndType const& info) {
	std::wstring target;
	if (info.TypeName == L"SymbolicLink") {
		target = ObjectManager::GetSymbolicLinkTarget(fullname);
	}
	auto result = std::format(L"Name: {}\nType: {}\n", info.Name, info.TypeName);
	if (!target.empty())
		result = std::format(L"{}Target: {}\n", result, target);
	return result;
}
It calls a helper function, ObjectManager::GetSymbolicLinkTarget in case of a symbolic link, and builds the final string by using format (C++ 20) before returning it to the caller.
That’s all for the provider, except when terminating:
Looking into the ObjectManager helper class is somewhat out of the focus of this post, since it has nothing to do with ProjFS. It uses native APIs to enumerate objects in the object manager’s namespace and get details of a symbolic link’s target. For more information about the native APIs, check out my book “Windows Native API Programming” or search online. First, it includes <Winternl.h> to get some basic native functions like RtlInitUnicodeString, and also adds the APIs for directory objects:
Here is the main code that enumerates directory objects (some details omitted for clarity, see the full source code in the Github repo):
std::vector<ObjectNameAndType> ObjectManager::EnumDirectoryObjects(PCWSTR path,
	PCWSTR objectName, std::function<bool(PCWSTR)> compare) {
	std::vector<ObjectNameAndType> objects;
	HANDLE hDirectory;
	OBJECT_ATTRIBUTES attr;
	UNICODE_STRING name;
	std::wstring spath(path);
	if (spath[0] != L'\\')
		spath = L'\\' + spath;

	std::wstring object(objectName ? objectName : L"");

	RtlInitUnicodeString(&name, spath.c_str());
	InitializeObjectAttributes(&attr, &name, 0, nullptr, nullptr);
	if (!NT_SUCCESS(NtOpenDirectoryObject(&hDirectory, DIRECTORY_QUERY, &attr)))
		return objects;

	objects.reserve(128);
	BYTE buffer[1 << 12];
	auto info = reinterpret_cast<OBJECT_DIRECTORY_INFORMATION*>(buffer);
	bool first = true;
	ULONG size, index = 0;
	for (;;) {
		auto start = index;
		if (!NT_SUCCESS(NtQueryDirectoryObject(hDirectory, info, sizeof(buffer), FALSE, first, &index, &size)))
			break;
		first = false;
		for (ULONG i = 0; i < index - start; i++) {
			ObjectNameAndType data;
			auto& p = info[i];
			data.Name = std::wstring(p.Name.Buffer, p.Name.Length / sizeof(WCHAR));
			if(compare && !compare(data.Name.c_str()))
				continue;
			data.TypeName = std::wstring(p.TypeName.Buffer, p.TypeName.Length / sizeof(WCHAR));
			if(!objectName)
				objects.push_back(std::move(data));
			if (objectName && _wcsicmp(object.c_str(), data.Name.c_str()) == 0 ||
				_wcsicmp(object.c_str(), (data.Name + L"." + data.TypeName).c_str()) == 0) {
				objects.push_back(std::move(data));
				break;
			}
		}
	}
	::CloseHandle(hDirectory);
	return objects;
}
NtQueryDirectoryObject is called in a loop with increasing indices until it fails. The returned details for each entry is the object’s name and type name.
The example provided is the bare minimum needed to write a ProjFS provider. This could be interesting for various types of data that is convenient to access with I/O APIs. Feel free to extend the example and resolve any bugs.
Clients program against interfaces, never concrete classes.
Location transparency – clients need not know where the actual object is (in-process, out-of-process, another machine).
Although simple in principle, there are many details involved in COM, as those with COM experience are well aware. In this post, I’d like to introduce one extensibility aspect of COM called Monikers.
The idea of a moniker is to provide some way to identify and locate specific objects based on string names instead of some custom mechanism. Windows provides some implementations of monikers, most of which are related to Object Linking and Embedding (OLE), most notably used in Microsoft Office applications. For example, when an Excel chart is embedded in a Word document as a link, an Item moniker is used to point to that specific chart using a string with a specific format understood by the moniker mechanism and the specific monikers involved. This also suggests that monikers can be combined, which is indeed the case. For example, a cell in some Excel document can be located by going to a specific sheet, then a specific range, then a specific cell – each one could be pointed to by a moniker, that when chained together can locate the required object.
Let’s start with perhaps the simplest example of an existing moniker implementation – the Class moniker. This moniker can be used to replace a creation operation. Here is an example that creates a COM object using the “standard” mechanism of calling CoCreateInstance:
#include <shlobjidl.h>
//...
CComPtr<IShellWindows> spShell;
auto hr = spShell.CoCreateInstance(__uuidof(ShellWindows));
I use the ATL smart pointers (#include <atlcomcli.h> or <atlbase.h>). The interface and class I’m using is just an example – any standard COM class would work. The CoCreateInstance method calls the real CoCreateInstance. To make it clearer, here is the CoCreateInstance call without using the helper provided by the smart pointer:
CComPtr<IShellWindows> spShell;
auto hr = ::CoCreateInstance(__uuidof(ShellWindows), nullptr,
    CLSCTX_ALL, __uuidof(IShellWindows),
    reinterpret_cast<void**>(&spShell));
CoCreateInstance itself is a glorified wrapper for calling CoGetClassObjectto retrieve a class factory, requesting the standard IClassFactory interface, and then calling CreateInstance on it:
CComPtr<IClassFactory> spCF;
auto hr = ::CoGetClassObject(__uuidof(ShellWindows),
    CLSCTX_ALL, nullptr, __uuidof(IClassFactory),
    reinterpret_cast<void**>(&spCF));
if (SUCCEEDED(hr)) {
    CComPtr<IShellWindows> spShell;
    hr = spCF->CreateInstance(nullptr, __uuidof(IShellWindows),
        reinterpret_cast<void**>(&spShell));
    if (SUCCEEDED(hr)) {
        // use spShell
    }
}
Here is where the Class moniker comes in: It’s possible to get a class factory directly using a string like so:
Using CoGetObject is the most convenient way in C++ to locate an object based on a moniker. The moniker name is the string provided to CoGetObject. It starts with a ProgID of sorts followed by a colon. The rest of the string is to be interpreted by the moniker behind the scenes. With the class factory in hand, the code can use IClassFactory::CreateInstance just as with the previous example.
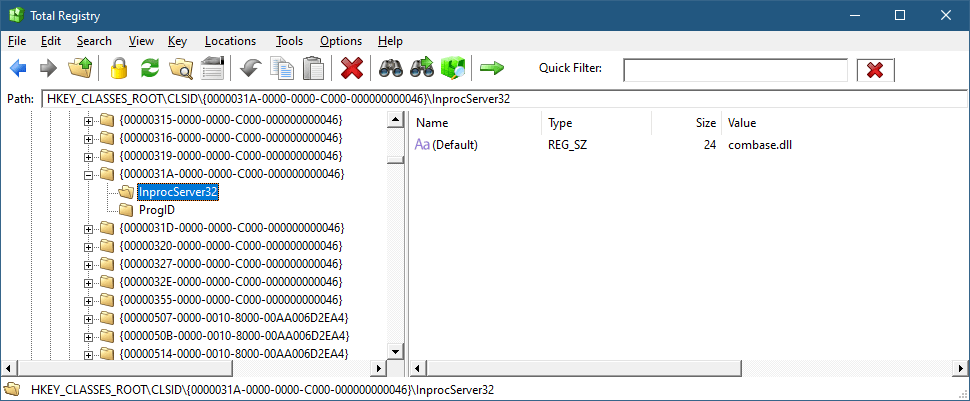
How does it work? As is usual with COM, the Registry is involved. If you open RegEdit or TotalRegistry and navigate to HKYE_CLASSES_ROOT, ProgIDs are all there. One of them is “clsid” – yes, it’s a bit weird perhaps, but the entry point to the moniker system is that ProgID. Each ProgID should have a CLSID subkey pointing to the class ID of the moniker. So here, the key is HKCR\CLSID\CLSID!
Class Moniker Registration
Of course, other monikers have different names (not CLSID). If we follow the CLSID on the right to the normal location for COM CLSID registration (HKCR\CLSID), this is what we find:
Class moniker
And the InProcServer32 subkey points to Combase.dll, the DLL implementing the COM infrastructure:
Class Moniker Implementation
At this point, we know how the class moniker got discovered, but it’s still not clear what is that moniker and where is it anyway?
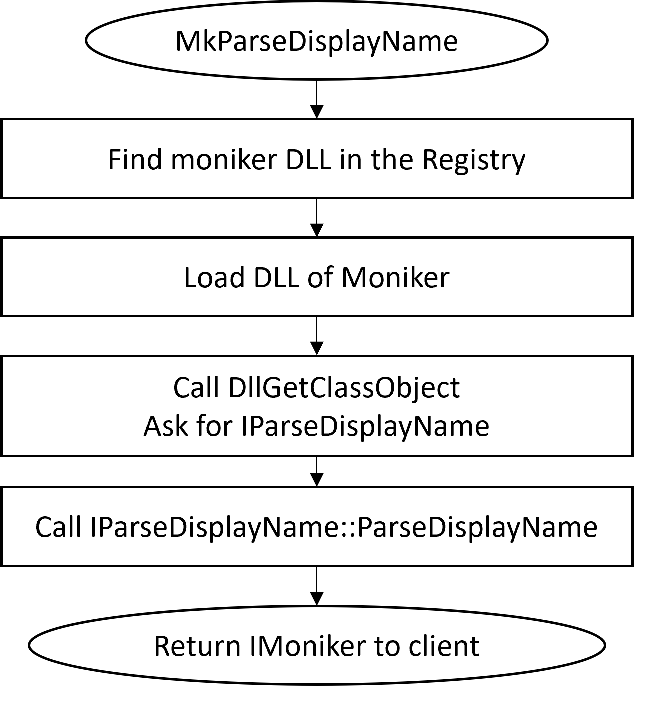
As mentioned earlier, CoGetObjectis the simplest way to get an object from a moniker, as it hides the details of the moniker itself. CoGetObject is a shortcut for calling MkParseDisplayName– the real entry point to the COM moniker namespace. Here is the full way to get a class moniker by going through the moniker:
MkParseDisplayName takes a “display name” – a string, and attempts to locate the moniker based on the information in the Registry (it actually has some special code for certain OLE stuff which is not interesting in this context). The Bind Context is a helper object that can (in the general case) contain an arbitrary set of properties that can be used by the moniker to customize the way it interprets the display name. The class moniker does not use any property, but it’s still necessary to provide the object even if it has no interesting data in it. If successful, MkParseDisplayName returns the moniker interface pointer, implementing the IMoniker interface that all monikers must implement. IMonikeris somewhat a scary interface, having 20 methods (excluding IUnknown). Fortunately, not all have to be implemented. We’ll get to implementing our own moniker soon.
The primary method in IMoniker is BindToObject, which is tasked of interpreting the display name, if possible, and returning the real object that the client is trying to locate. The client provides the interface it expects the target object to implement – IClassFactory in the case of a class moniker.
You might be wondering what’s the point of the class moniker if you could simply create the required object directly with the normal class factory. One advantage of the moniker is that a string is involved, which allows “late binding” of sorts, and allows other languages, such as scripting languages, to create COM objects indirectly. For example, VBScript provides the GetObject function that calls CoGetObject.
Implementing a Moniker
Some details are still missing, such as how does the moniker object itself gets created? To show that, let’s implement our own moniker. We’ll call it the Process Moniker – its purpose is to locate a COM process object we’ll implement that allows working with a Windows Process object.
Here is an example of something a client would do to find a process object based on its PID, and then display its executable path:
BIND_OPTS opts{ sizeof(opts) };
CComPtr<IWinProcess> spProcess;
auto hr = ::CoGetObject(L"process:3284",
    &opts, __uuidof(IWinProcess),
    reinterpret_cast<void**>(&spProcess));
if (SUCCEEDED(hr)) {
    CComBSTR path;
    if (S_OK == spProcess->get_ImagePath(&path)) {
        printf("Image path: %ws\n", path.m_str);
    }
}
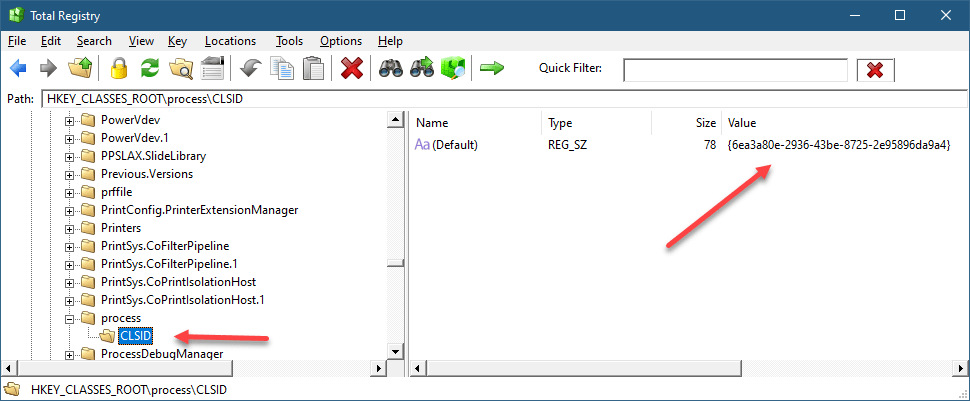
The IWinProcess is the interface our process object implements, but there is no need to know its CLSID (in fact, it has none, and is created privately by the moniker). The display name “prcess:3284” identifies the string “process” as the moniker name, meaning there must be a subkey under HKCR named “process” for this to have any chance of working. And under the “process” key there must be the CLSID of the moniker. Here is the final result:
process moniker
The CLSID of the process moniker must be registered normally like all COM classes. The text after the colon is passed to the moniker which should interpret it in a way that makes sense for that moniker (or fail trying). In our case, it’s supposed to be a PID of an existing process.
Let’s see the main steps needed to implement the process moniker. From a technical perspective, I created an ATL DLL project in Visual Studio (could be an EXE as well), and then added an “ATL Simple Object” class template to get the boilerplate code the ATL template provides. We just need to implement IMoniker – no need for some custom interface. Here is the layout of the class:
Those familiar with the typical code the ATL wizard generates might notice one important difference from the standard template: the class factory. It turns out that monikers are not created by an IClassFactory when called by a client invoking MkParseDisplayName (or its CoGetObject wrapper), but instead must implement the interface IParseDisplayName, which we’ll tackle in a moment. This is why DECLARE_CLASSFACTORY_EX(CMonikerClassFactory) is used to instruct ATL to use a custom class factory which we must implement.
MkParseDisplayName operation
Before we get to that, let’s implement the “main” method – BindToObject. We have to assume that the m_DisplayName member already has the process ID – it will be provided by our class factory that creates our moniker. First, we’ll convert the display name to a number:
Next, we’ll attempt to open a handle to the process:
auto hProcess = ::OpenProcess(PROCESS_QUERY_LIMITED_INFORMATION,
    FALSE, pid);
if (!hProcess)
    return HRESULT_FROM_WIN32(::GetLastError());
If we fail, we just return a failed HRESULT and we’re done. If successful, we can create the WinProcess object, pass the handle and return the interface requested by the client (if supported):
The creation of the object is internal via CComObject<>. The WinProcess COM class is not registered, which is just a matter of choice. I decided, a WinProcess object can only be obtained through the Process Moniker.
The calls to AddRef/Release may be puzzling, but there is a good reason for using them. When creating a CComObject<> object, the reference count of the object is zero. Then, the call to AddRef increments it to 1. Next, if the QueryInterface call succeeds, the ref count is incremented to 2. Then, the Release call decrements it to 1, as that is the correct count when the object is returned to the client. If, however, the call to QI fails, the ref count remains at 1, and the Release call will destroy the object! More elegant than calling delete.
SetHandle is a function in CWinProcess (outside the IWinProcess interface) that passes the handle to the object.
The WinProcess COM class is the uninteresting part in all of these, so I created a bare minimum class like so:
The APIs used above are fairly straightforward and of course fully documented.
The last piece of the puzzle is the moniker’s class factory:
class ATL_NO_VTABLE CMonikerClassFactory :
	public ATL::CComObjectRootEx<ATL::CComMultiThreadModel>,
	public IParseDisplayName {
public:
	BEGIN_COM_MAP(CMonikerClassFactory)
		COM_INTERFACE_ENTRY(IParseDisplayName)
	END_COM_MAP()

	// Inherited via IParseDisplayName
	HRESULT __stdcall ParseDisplayName(IBindCtx* pbc, LPOLESTR pszDisplayName, ULONG* pchEaten, IMoniker** ppmkOut) override;
};
Just one method to implement:
HRESULT __stdcall CMonikerClassFactory::ParseDisplayName(
    IBindCtx* pbc, LPOLESTR pszDisplayName,
    ULONG* pchEaten, IMoniker** ppmkOut) {
    auto colon = wcschr(pszDisplayName, L':');
    ATLASSERT(colon);
    if (colon == nullptr)
        return E_INVALIDARG;

    //
    // simplistic, assume all display name consumed
    //
    *pchEaten = (ULONG)wcslen(pszDisplayName);

    CComObject<CProcessMoniker>* pMon;
    auto hr = pMon->CreateInstance(&pMon);
    if (FAILED(hr))
        return hr;

    //
    // provide the process ID
    //
    pMon->m_DisplayName = colon + 1;
    pMon->AddRef();
    hr = pMon->QueryInterface(ppmkOut);
    pMon->Release();
    return hr;
}
First, the colon is searched for, as the display name looks like “process:xxxx”. The “xxxx” part is stored in the resulting moniker, created with CComObject<>, similarly to the CWinProcess earlier. The pchEaten value reports back how many characters were consumed – the moniker factory should parse as much as it understands, because moniker composition may be in play. Hopefully, I’ll discuss that in a future post.
Finally, registration must be added for the moniker. Here is ProcessMoniker.rgs, where the lower part was added to connect the “process” ProgId/moniker name to the CLSID of the process moniker:
HKCR
{
	NoRemove CLSID
	{
		ForceRemove {6ea3a80e-2936-43be-8725-2e95896da9a4} = s 'ProcessMoniker class'
		{
			InprocServer32 = s '%MODULE%'
			{
				val ThreadingModel = s 'Both'
			}
			TypeLib = s '{97a86fc5-ffef-4e80-88a0-fa3d1b438075}'
			Version = s '1.0'
		}
	}
	process = s 'Process Moniker Class'
	{
		CLSID = s '{6ea3a80e-2936-43be-8725-2e95896da9a4}'
	}
}
And that is it. Here is an example client that terminates a process given its ID:
One of the new Windows 10 features visible to users is the support for additional “Desktops”. It’s now possible to create additional surfaces on which windows can be used. This idea is not new – it has been around in the Linux world for many years (e.g. KDE, Gnome), where users have 4 virtual desktops they can use. The idea is that to prevent clutter, one desktop can be used for web browsing, for example, and another desktop can be used for all dev work, and yet a third desktop could be used for all social / work apps (outlook, WhatsApp, Facebook, whatever).
To create an additional virtual desktop on Windows 10, click on the Task View button on the task bar, and then click the “New Desktop” button marked with a plus sign.
Now you can switch between desktops by clicking the appropriate desktop button and then launch apps as usual. It’s even possible (by clicking Task View again) to move windows from desktop to desktop, or to request that a window be visible on all desktops.
The Sysinternals tools had a tool called “Desktops” for many years now. It too allows for creation of up to 4 desktops where applications can be launched. The question is – is this Desktops tool the same as the Windows 10 virtual desktops feature? Not quite.
First, some background information. In the kernel object hierarchy under a session object, there are window stations, desktops and other objects. Here’s a diagram summarizing this tree-like relationship:
As can be seen in the diagram, a session contains a set of Window Stations. One window station can be interactive, meaning it can receive user input, and is always called winsta0. If there are other window stations, they are non-interactive.
Each window station contains a set of desktops. Each of these desktops can hold windows. So at any given moment, an interactive user can interact with a single desktop under winsta0. Upon logging in, a desktop called “Default” is created and this is where all the normal windows appear. If you click Ctrl+Alt+Del for example, you’ll be transferred to another desktop, called “Winlogon”, that was created by the winlogon process. That’s why your normal windows “disappear” – you have been switched to another desktop where different windows may exist. This switching is done by a documented function – SwitchDesktop.
And here lies the difference between the Windows 10 virtual desktops and the Sysinternals desktops tool. The desktops tool actually creates desktop objects using the CreateDesktop API. In that desktop, it launches Explorer.exe so that a taskbar is created on that desktop – initially the desktop has nothing on it. How can desktops launch a process that by default creates windows in a different desktop? This is possible to do with the normal CreateProcess function by specifying the desktop name in the STARTUPINFO structure’s lpDesktop member. The format is “windowstation\desktop”. So in the desktops tool case, that’s something like “winsta0\Sysinternals Desktop 1”. How do I know the name of the Sysinternals desktop objects? Desktops can be enumerated with the EnumDesktops API. I’ve written a small tool, that enumerates window stations and desktops in the current session. Here’s a sample output when one additional desktop has been created with “desktops”:
In the Windows 10 virtual desktops feature, no new desktops are ever created. Win32k.sys just manipulates the visibility of windows and that’s it. Can you guess why? Why doesn’t Window 10 use the CreateDesktop/SwitchDesktop APIs for its virtual desktop feature?
The reason has to do with some limitations that exist on desktop objects. For one, a window (technically a thread) that is bound to a desktop cannot be switched to another; in other words, there is no way to transfer a windows from one desktop to another. This is intentional, because desktops provide some protection. For example, hooks set with SetWindowsHookEx can only be set on the current desktop, so cannot affect other windows in other desktops. The Winlogon desktop, as another example, has a strict security descriptor that prevents non system-level users from accessing that desktop. Otherwise, that desktop could have been tampered with.
The virtual desktops in Windows 10 is not intended for security purposes, but for flexibility and convenience (security always “contradicts” convenience). That’s why it’s possible to move windows between desktops, because there is no real “moving” going on at all. From the kernel’s perspective, everything is still on the same “Default” desktop.
AppContainers are the sanboxes typically used to run UWP processes (also known as metro, store, modern…). A process within an AppContainer runs with an Integrity Level of low, which effectively means it has no access to almost everything, as the default integrity level of objects (such as files) is Medium. This means code running inside an AppContainer can’t do any sigtnificant damage because of that lack of access. Furthermore, from an Object Manager perspective, named objects created by an AppContainer are stored under its own object manager directory, based on an identifier known as AppContainer SID. This means one AppContainer cannot interfere with another’s objects.
For example, if a process not in an AppContainer creates a mutex named “abc”, its full name is really “\Sessions\1\BaseNamedObjects\abc” (assuming the process runs in session 1). On the other hand, if AppContainer A creates a mutex named “abc”, its full name is something like “\Sessions\1\AppContainerNamedObjects\S-1-15-2-466767348-3739614953-2700836392-1801644223-4227750657-1087833535-2488631167\abc”, meaning it can nevr interfere with another AppContainer or any process running outside of an AppContainer.
Although AppContainers were created specifically for store apps, theye can also be used to execute “normal” applications, providing the same level of security and isolation. Let’s see how to do that.
First, we need to create the AppContainer and obtain an AppContainer SID. This SID is based on a hash of the container name. In the UWP world, this name is made up of the application package and the 13 digits of the signer’s hash. For normal applications, we can select any string; selecting the same string would yield the same SID – which means we can actually use it to “bundle” several processes into the same AppContainer.
The first step is to create an AppContainer profile (error handling ommitted):
The containerName argument is the important one. If the function fails, it probably means the container profile exists already. In that case, we need to extract the SID from the existing profile:
The next step is prepare for process creation. The absolute minimum is to initialize a process attribute list with a SECURITY_CAPABILITIES structure to indicate we want the process to be created inside an AppContainer. As part of this, we can specify capabilities this AppContainer should have, such as internet access, access to the documents library and any other capabilities as defined by the Windows Runtime:
We can try this with the usual first victim, Notepad. Notepad launches and everyhing seems OK. However, if we try to open almost any file by using Notepad’s File/Open menu item, we’ll see that notepad has no access to usual things, such as “my documents” or “my pictures”. This is because it’s runnign with Low Integrity Level and files are defaulted to Medium integrity level:
“AppContainer” in Process Explorer implies Low integirty level.
If we would want Notepad to have access to the user’s files, such as documents and pictures, we would have to set explict permissions on these objects allowing access to the AppContainer SID. Functions to use include SetNamedSecurityInfo (see the project on Github for the full code).
I’ve created a simple application to test these things. We can specify a container name, an executable path and click “Run” to execute in in AppContainer. We can add folders/files that would get full permissions:
Let’s now try a more interesting application – Windows Media Player (yes, I know, who uses the old Media Player these days? But it’s an interesting example). Windows Media Player has the (annoying?) feature where you can only run a single instance of it at any given time. The way this works is that WMP creates a mutex with a very specific name, “Microsoft_WMP_70_CheckForOtherInstanceMutex“, if it already exists, it sends a message to its buddy (a previous instance of WMP) and then terminates. A simple trick we can do with Process Explorer is to close that handle and then launching another WMP.
Let’s try something different: let’s run WMP in an AppContainer. Then let’s run another one in a different AppContainer. Will we get two instances?
Running WMP in this way popus up its helper, setup_wm.exe which asks for the initial settings for WMP. Clicking “Express Settings” closes the dialog but it then it comes up again! And again! You can’t get rid of it, unless you close the dialog and then WMP does not launch. Can you guess why is that?
If you guessed “permissions” – you are correct. Running Process Monitor when this dialog comes up and filtering for “ACCESS DENIED” shows something like this:
Clearly, some keys need access so the settings can be saved. The tool allows adding these keys and setting full permissions for them:
Now we can run WMP in two different containers (change the container name and re-run) and they both run just fine. That’s becuase each mutex now has a unique name prefixed with the AppContainer SID of the relevant AppContainer:
After a short twitter questionaire, I’m excited to announce a Remote Windows Kernel Programming class to be scheduled for the end of January 2019 (28 to 31).
If you want to learn how to write software drivers for Windows (not hardware, plug & play drivers), including file system mini filters – this is the class for you! You should be comfortable with programming on Windows in user mode (although we’ll discuss some of the finer points of working with the Windows API) and have a basic understanding of Windows OS concepts such as processes, threads and virtual memory.
If you’re interested, send an email to zodiacon@live.com with the title “Windows Kernel Programming Training” with your name, company name (if any), and time zone. I will reply with further details.
Here is the syllabus (not final, but should be close enough):
Windows Kernel Programming
Duration:
4 Days (January 28th to 31st, 2019)
Target Audience:
Experienced windows developers, interested in developing kernel mode drivers
Objectives:
· Understand the Windows kernel driver programming model
· Write drivers for monitoring processes, threads, registry and some types of objects
· Use documented kernel hooking mechanisms
· Write basic file system mini-filter drivers
Pre Requisites:
· At least 1 year of experience working with the Windows API
· Basic understanding of Windows OS concepts such as processes, threads, virtual memory and DLLs
Software requirements:
· Windows 10 Pro 64 bit (latest official release)
· Virtual machine (preferable Windows 10 64 bit) using any virtualization technology (for testing and debugging)
· Visual Studio 2017 (any SKU) + latest update
· Windows 10 SDK (latest)
· Windows 10 WDK (latest)
Cost: $1950
Syllabus
Module 1: Windows Internals quick overview
Processes and threads
System architecture
User / kernel transitions
Virtual memory
APIs
Objects and handles
Summary
Module 2: The I/O System and Device Drivers
I/O System overview
Device Drivers
The Windows Driver Model (WDM)
The Kernel Mode Driver Framework (KMDF)
Other device driver models
Driver types
Software drivers
Driver and device objects
I/O Processing and Data Flow
Accessing files and devices
Asynchronous I/O
Summary
Module 3: Kernel programming basics
Installing the tools: Visual Studio, SDK, WDK
C++ in a kernel driver
Creating a driver project
Building and deploying
The kernel API
Strings
Linked Lists
Kernel Memory Pools
The DriverEntry function
The Unload routine
Installation
Summary
Lab: create a simple driver; deploy a driver
Module 4: Building a simple driver
Creating a device object
Exporting a device name
Building a driver client
Driver dispatch routines
Introduction to I/O Request Packets (IRPs)
Completing IRPs
Dealing with user space buffers
Handling DeviceIoControl calls
Testing the driver
Debugging the driver
Using WinDbg with a virtual machine
Summary
Lab: open a process for any access; zero driver; debug a driver
Module 5: Kernel mechanisms
Interrupt Request Levels (IRQLs)
Interrupts
Deferred Procedure Calls (DPCs)
Dispatcher objects
Thread Synchronization
Spin locks
Work items
Summary
Module 6: Process and thread monitoring
Process creation/destruction callback
Specifying process creation status
Thread creation/destruction callback
Notifying user mode
Writing a user mode client
User/kernel communication
Summary
Labs: monitoring process/thread activity; prevent specific processes from running; protecting processes
Module 7: Object and registry notifications
Process/thread object notifications
Pre and post callbacks
Registry notifications
Performance considerations
Reporting results to user mode
Summary
Lab: protect specific process from termination; hiding registry keys; simple registry monitor
Module 8: File system mini filters
File system model
Filters vs. mini filters
The Filter Manager
Filter registration
Pre and Post callbacks
File name information
Contexts
File system operations
Driver to user mode communication
Debugging mini-filters
Summary
Labs: protect a directory from write; hide a file/directory; prevent file/directory deletion; log file operations
While working on my GflagsX tool, there was yet another feature the tool was missing compared to the classic GFlags tool – Silent Process Exit support. But what is Silent Process Exit?
According to the documentation there are two scenarios that trigger Silent Process Exit:
Self exiting – one of the threads in the process calls ExitProcess.
A TerminateProcess call is issued from another (or the same process).
The documentation states that if a process exits because all threads terminate normally, then Silent Process Exit is not in effect. (also if kernel code kills a process, Silent Process Exit is not invoked).
The documentation may lead us to belive that if a process exits normally (no abnormal termination or exception) then Silent Process Exit will not be invoked. Let’s test that theory.
First, let’s configure Silent Process Exit with GFlags. (GFlagsX support is on its way). Run GFlags and select the Silent Process Exit tab:
Let’s test it with notepad. Type notepad.exe in the Image text box and press Tab. Some of the options light up. Let’s try something simple – generating a dump file when notepad terminates. Check Enable Silent Process Exit Monitoring and then set a dump folder location and dump type, like so:
Click Apply to apply the settings. Now launch Notepad. If you terminate it using (say) Task Manager, you’ll find a subfolder under the configured Dump Folder Location named Notepad.exe-(PID xxxx)-yyyyyyyy where xxxx is the terminating process ID and yyyyyy is the value returned from GetTickCount at the time of the exit (the number of milliseconds elapsed since Windows booted). Inside the folder you’ll find the dump file itself.
However, if you launch notepad again and just close its main window, you’ll find, perhaps surprisingly, that yet another folder was created with a new dump file. But why? Isn’t this a normal process termination?
Since we can be pretty sure no process (including notepad) called TerminateProcess, this means notepad called ExitProcess. Is this “normal”? Are there processes that terminate by just ending all their threads?
Let’s launch another notepad instance and attach WinDbg to it. Break into the debugger and add a breakpoint for ExitProcess:
0:000> x kernel32!ExitProcess*00007ffe`1509b190 KERNEL32!ExitProcessImplementation (<no parameter info>)0:000> bp KERNEL32!ExitProcessImplementation
Now let the process go and close notepad’s window. The breakpoint should hit:
Breakpoint 0 hitKERNEL32!ExitProcessImplementation:00007ffe`1509b190 4883ec28 sub rsp,28h
Now it seems clear: when the first (“main”) thread of notepad returns from its main function, the C-runtime library calls ExitProcess explicitly. And in fact this is what you’ll find with most executables. This is why when the main thread exits in a C/C++ application, the process ends wven if other threads still exist and executing. From the Windows kernel’s perspective, there is no “main” thread – all threads are equal.
Silent Exit Process support is part of NTDLL and the Windows Error Reporting Service. This is in contrast to tools such as ProcDump from Sysinternals that attaches a debugger to the monitored process and creates a dump file when it exits. To set it up, the global flag with the value 0x200 (512) must be set in the “Image File Execution Options” (IFEO) subkey (just like all other global flags). However, once the bit is set, the actual details need to be written into the key HKLM\SOFTWARE\Microsoft\Windows NT\CurrentVersion\SilentProcessExit\notepad.exe.This is done on an image name basis just as with the IFEO key. Here is the example for notepad just shown:
Stay tuned for more info on Silent Process Exit support in GFlagsX!